Communicating with other operating systems connected to the same network for file sharing, printing, or sending any instruction from the server to the client has been made easy by a number of server applications. On Arch and other Linux distributions, Samba is particularly relevant as it bridges the gap between Windows operating systems and Linux-based systems.
Samba is a client-server application that enables file and printer sharing between the different operating systems connected to the same network. Moreover, it allows to access files and resources on a Linux server to Windows or between two different Linux distributions and vice versa.
Outline:
- How to Install Samba on Arch Linux
- How To Configure Samba on Arch Linux
- How to Remove Samba Server From Arch Linux
- Conclusion
How To Install Samba on Arch Linux
On Arch Linux Samba can be installed using its default package installer, however before executing the installation command update it and afterward execute:

Once the installation is successfully completed, verify it by checking the details about the package installed:

Next, you can also check the directories created for Samba by using the whereis command which will help you in locating the file related to it:

How To Configure Samba on Arch Linux
Samba by default doesn’t come with its configuration file as users can create their own configuration files, you can see there is no file in the Samba directory:
ls

However, to run the Samba service you need to create its configuration file, for demonstration Arch Linux help page gives a dummy configuration file that can be used for learning purposes. So visit the Samba Git repository and copy the code from there, next create a Samba configuration file in the Samba directory and paste the code there:

Next, in the configuration file, set the workgroup name as per your preference, though the already written one is also correct, but such names are used for Windows operating systems. Here, I have set my workgroup name to ARCHGROUP:
workgroup = <Group-name>

Now at the bottom of the code in the configuration file add the below-given lines of code:
comment = My Samba Share
path = /samba
writable = yes
browsable = yes
create mask = 0700
directory mask = 0700
read only = no
guest ok = no
Here is the one-line explanation for each instruction that I have added:
[sambashare]: This is the section header that defines the share
Comment: it is a brief description of the samba share.
Path: it specifies the directory of the server system which will be shared with other systems.
Writable: This option allows or restricts the users from editing the files within the shared folder.
Browsable: This option allows users to discover and access the files or data on the shared directory.
Create Mask: To determine the permissions (write, read, and execute) assigned to newly created files in the Samba share this option is used. In this case, I have set the permissions for only the owner.
Directory Mask: To determine the permissions (write, read, and execute) assigned to newly created directories in the Samba share this option is used. In this case, I have set the permissions for only the owner.
Read only: To give read and write access to users about the shared folder. Here no means they have read and writ access.
Guest ok: To restrict or allow the guest or anonymous access to the shared folder of Samba share this option is used.

Here at the bottom a template is given which can be used to set various parameters for the Samba configuration, you can use this template by placing values or data of your choice:

Now move to the home directory and create a new group:

Now add the user to whom you want to give access for Samba share:

I did this because I want to use my username for the Samba share if you want you can also create an extra user for the Samba service as well. Now I need to give a password for this samba service, so for that:

Now you have to create a directory that you want to have for Samba share on Arch as previously in the configuration file we set the directory path /samba to create it:

Now change the ownership of the Samba directory to the smbusers group and for that execute:

Now for Samba configuration, change the permissions of this Samba directory on Arch and for that execute:

Now to activate the Samba we need to start the Samba service:

The nmb is one of the daemons that create the Samba suite which is responsible for understanding and responding to the NetBIOS name service requests that are generated by either SMB or CIFS clients. So to make Samba function properly this service also needs to be activated:

Now the Samba service is up and running and next, we need to connect the client with this share before jumping to the client we need to check if all the settings are correct and the service is working correctly so for that execute:

Now the last thing that you need to do on the server machine is to look for its IP address as it will be needed to mount the shared folder on the client machine.

Now launch the client machine and go to the file manager in case it is Linux and then click on Other locations, execute the following command in the execution bar below, and click on connect:
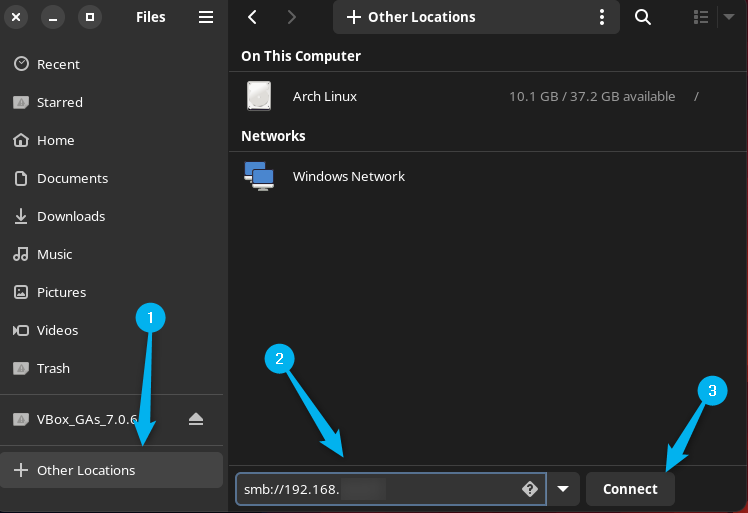
Once the connection is successful the sambashare server will appear right click on it and then select the mount option:

Next, a pop will appear that will require a password, username, and domain to establish the connection of the client device with the server system. The username and domain name are most likely to be picked up automatically, in case if not then enter the server workgroup name as the domain name and username in the server system. Once done, click on Connect to proceed with establishing the connection:
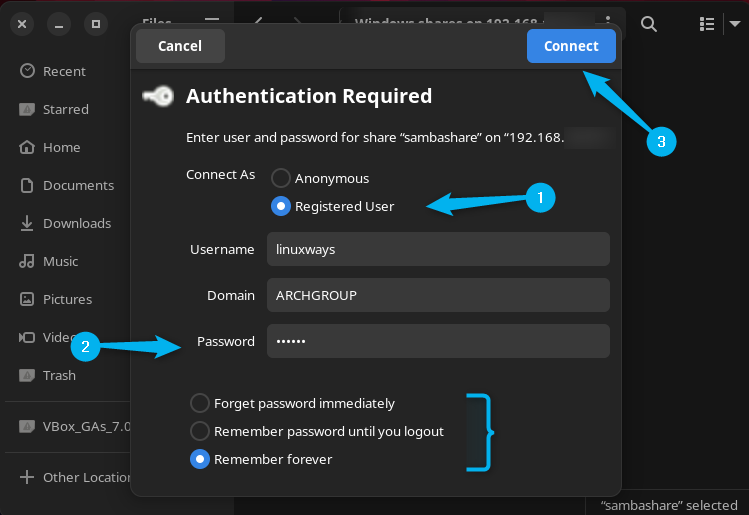
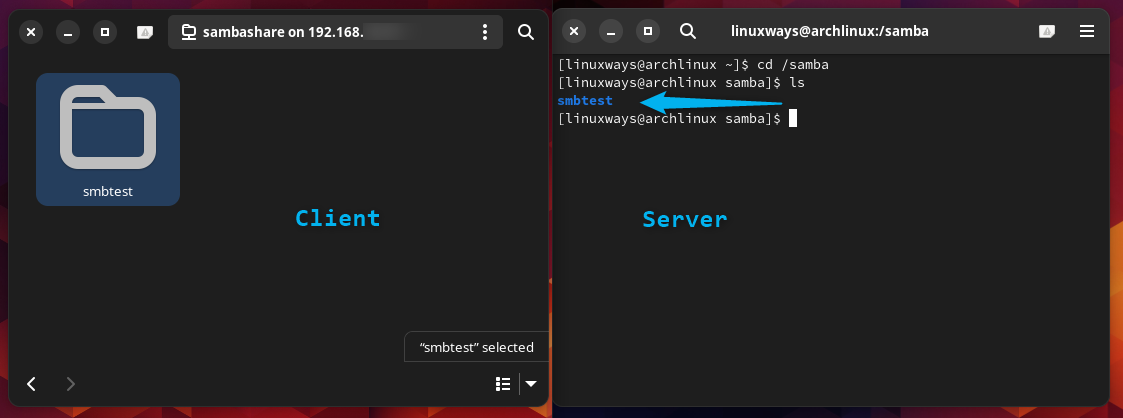
After the connection is established, you will see the mounted samba share in the menu on the left. Now here to verify the connection, I have created a Samba test folder for the right-click menu:

Now I have verified the connection by navigating to Samba directory on the server side and upon listing the contents of the directory you can see the same test folder:
Now to avoid establishing the connection manually every time by entering the IP address, unmount the Samba share directory and delete the folder:

Now mount the Samba directory here in the client machine and then make it persistent so that when the machine is booted the Samba share is always available. This will remove the hassle of logging in to Samba every time manually by giving the IP address of the server side. So for that first of all we have to create a Samba share server directory on Arch where we can mount it, here I have created a directory named server:
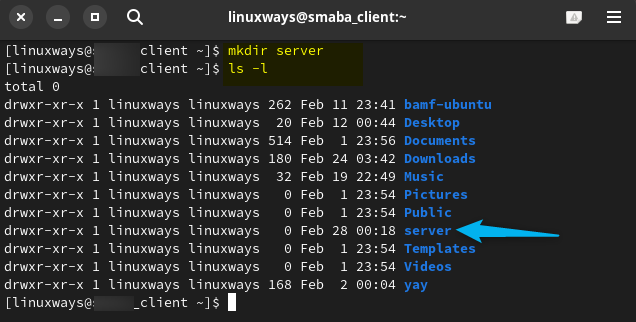
Now mount the samba share in the server directory we created previously by using the server IP address and a bunch of other options:
Here, I have used the common internet file system (CIFS) that is normally used for mounting Windows shared folders and to specify it, the t flag is used. Next to add multiple options o flag is used, and the options include the username, password, and workgroup name.

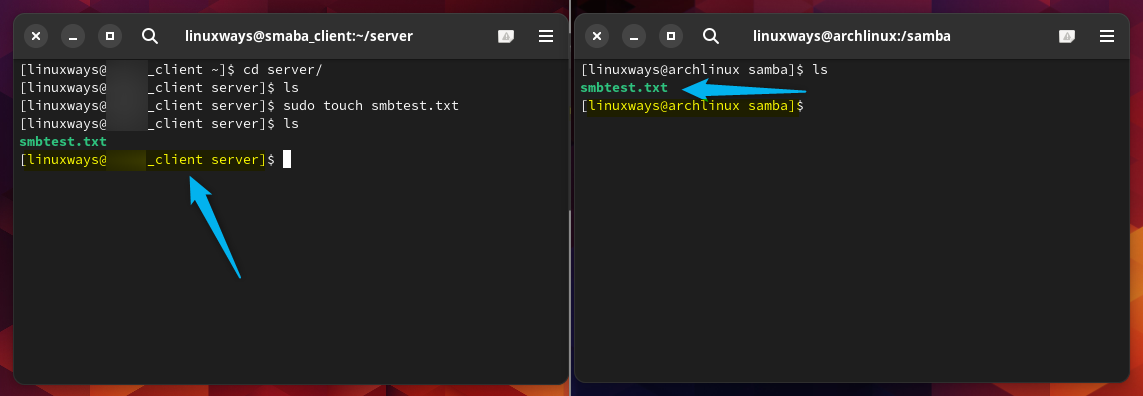
Once the mounting is successful do the same exercise of creating a folder by navigating to the server directory:
sudo touch smbtest.txt

Now verify the file creation on the server side as well by navigating to the Samba directory:
How To Remove Samba Server From Arch Linux
The complete removal of Samba is quite a lengthy process but it is easy to follow. Before beginning to remove Samba it is recommended to back up your necessary files or folders as all the data will be removed after uninstallation. So the first step is to unmount the Samba share from the server directory on the client system:

Now remove the server directory from the client system:

Next move to the server system and remove Samba using the Arch Linux default package installer:

Now remove the samba directory created on the Arch server machine:

Next, delete the user group created for Samba share on Arch:

Lastly, delete the configuration file along with the Samba directory created on the server machine while configuring Samba on Arch Linux:
sudo rm -r /etc/samba

Conclusion
Samba is a software suite that enables print and file sharing between Linux and Windows operating systems, to install it on Arch use its default package installer. To configure Samba on Arch Linux you need to first create its configuration file and then create a Samba user group, afterward activate the service, and mount the created directory for Samba. To connect the shared directory, simply use the server IP address.
I’m Aaliyan javaid, an electrical engineer and a passionate tech enthusiast. I have been working with embedded systems, programming, and Linux operating systems for over 2 years. I love to explore new technologies and share my knowledge and experience with others.


