Although it is said that malware that infects Linux is not very common, it is still a very good idea to install anti-malware protection software on your Linux machine. If you transfer files between machines or exchange files with other computer users, you may want to scan such files for viruses and other forms of malware.
In this guide, we will walk you through the steps to install ClamAV — an open-source anti-malware protection software developed by Cisco Systems. We will also install a graphical tool for using ClamAV called ClamTK.
Install ClamAV
First of all, run the following command to update the list of packages on Ubuntu if you have not done so in a while.
$ sudo apt-get update
Run the next command to begin installing ClamAV.
$ sudo apt-get install clamav
If prompted, enter y to continue installing ClamAV.
Download the Latest ClamAV Virus Database
ClamAV uses a frequently updated database of known viruses. The database files are stored in /var/lib/clamav by default.
First, run the command below to stop the ClamAV database updater service so that the necessary files can be successfully accessed.
$ sudo systemctl stop clamav-freshclam
Next, download the latest ClamAV virus database by running the following command.
$ sudo freshclam
You may now start the ClamAV database updater by running the command below.
$ sudo systemctl start clamav-freshclam
To ensure that the ClamAV database updater service is always started whenever the system boots, run the next command.
$ sudo systemctl enable clamav-freshclam
Perform a Manual Scan with clamscan
For your basic scanning tasks, ClamAV includes a command-line tool called clamscan.
The basic usage of the clamscan command is:
clamscan [options] [file or directory path to scan]
To see all available clamscan options, run:
$ man clamscan
Some common options for using clamscan include:
–log=file – to save the scan report to the specified file
–bell – to sound a bell when a virus is detected
–recursive – to scan all subfolders within the specified directory
–max-filesize=xm – to skip files larger than xm, where x is a number and m means megabytes
For example, the following command scans everything in my home directory.
$ clamscan -r /home/shola
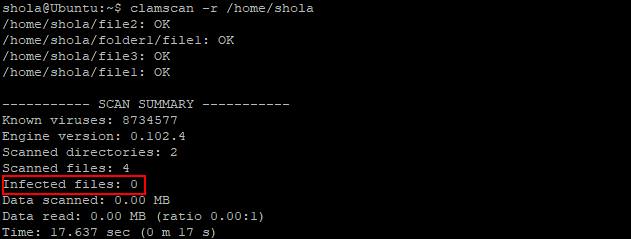
Figure 1: Perform a manual scan by using clamscan
There were no infected files detected as denoted by Infected files: 0 in figure 1 above.
Schedule a Daily Scan
In order to schedule a daily scan, you could create a small script in /etc/cron/cron.daily containing the clamscan instructions.
Run the following command to create the script file.
$ sudo nano /etc/cron.daily/clamscan_daily
As an example, the script below will recursively scan my Downloads folder. You may copy this script but remember to edit the folder path to scan on the second line.
#!/usr/bin/env bash clamscan -r /home/shola/Downloads |
Save changes and close the file.
Next, run the command below to make the script file executable.
$ chmod +x /etc/cron.daily/clamscan_daily
The script will automatically run once a day.
Install ClamTK
ClamTK is a free tool that you can use to easily manage the ClamAV anti-malware software through a graphical user interface. This can be used as an alternative to the clamscan command-line tool.
To install ClamTK, run the following command.
$ sudo apt-get install clamtk
Launch ClamTK
You can launch ClamTK either from the Applications menu > Accessories or by running the following command in the Ubuntu terminal.
$ clamtk
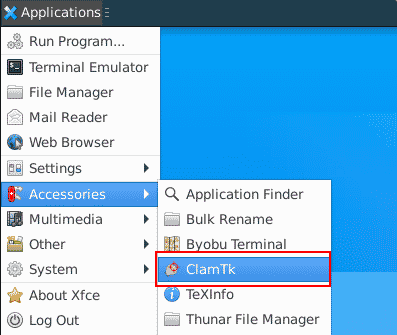
Figure 2: Launch clamtk from Applications menu
Configure ClamTK
In the Virus Scanner window that appears, you will see options to quickly configure settings, perform a manual scan, schedule a scan, view the quarantine, etc.
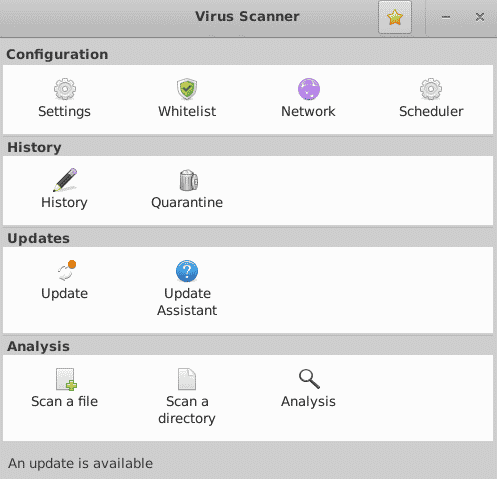
Figure 3: ClamTK virus scanner main window
Configure clamtk settings
In the Virus Scanner main Window, click Settings and then check all options as shown in figure 4 below.
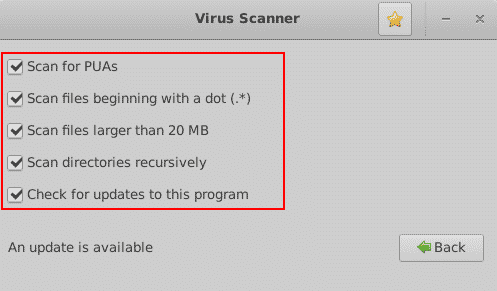
Figure 4: Configure clamtk settings.
Click Back to return to the main window.
Configure clamtk scheduler
1. In the main window, click Scheduler
2. Use the + and – buttons to set a time to scan your home directory
3. Remember to click the big green plus icon to confirm your settings
4. You should then see a message at the bottom of the window indicating that a daily scan has been scheduled
In the example shown in figure 5 below, the scanner will run everyday at 10:09 PM local time.
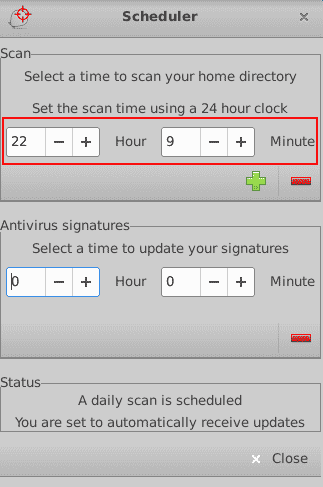
Figure 5: Configure clamtk scheduler
You could also schedule a time to manually update the ClamAV virus database if you wish. But you would first need to:
1. Go back to the main window
2. Click Update Assistant
3. Choose “I would like to update signatures myself”
4. Apply the changes and then go back to Scheduler to set your preferred time
When you are done, remember to click the shiny star icon to confirm your schedule.
Perform a manual scan with ClamTK
1. In the main Virus Scanner window, click either Scan a file or Scan a directory to perform a one-time scan of a file or folder respectively
2. In the window that appears, click a location on the left and then select the specific file or folder on the right to scan
3. Click OK to begin scanning
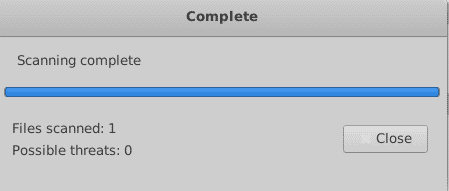
Figure 6: Scan a file by using clamtk
Uninstall ClamAV
The following command will uninstall ClamAV on Ubuntu.
$ sudo apt-get remove clamav*
Uninstall ClamTK
The following command will uninstall ClamTK on Ubuntu.
$ sudo apt-get remove clamtk*
Conclusion
In this guide, we have successfully installed and configured ClamAV and ClamTK to scan for malware on Ubuntu 20.04. If you have any questions or comments regarding this guide, please reach out to us via the comments section below.
