Minecraft is a very popular video game released in 2011 by a Swedish developer and then later purchased by Microsoft. It is supported on the major OS platforms, which includes Windows, Linux, and Mac. In today’s post, we will be describing how to install Minecraft on Ubuntu OS. We will cover:
- Installing Minecraft via .deb package (Command Line)
- Installing Minecraft via Snap (Command Line)
- Installing Minecraft via .deb package (GUI)
Note: The procedure shown here has been tested on Ubuntu 20.04 LTS (Focal Fossa).
Installing Minecraft via .deb package (Command Line)
In this procedure, we will download and install Minecraft from the command line. We will use the deb package available on its official website.
Use the following command to download the package from the command line:
$ wget https://launcher.mojang.com/download/Minecraft.deb
It will save the downloaded package as Minecraft.deb to your current working directory.
Now to install the Minecraft package, run this command in Terminal:
$ sudo apt install ./Minecraft.deb
Enter the sudo password, after which the installation of Minecraft will be started.

Installing Minecraft via Snap (Command Line)
Snap package of Minecraft is also available for Ubuntu users. In this procedure, we will install Minecraft using its snap package.
1. To begin, ensure that snapd is installed on your system. To do so, use the below command:
$ snap version
If it is installed, you will see a similar output:

If it is not installed, you can install it as follows:
$ sudo apt install snapd
Enter the sudo password.
2. To install Minecraft using the snap package, the command is as follows:
$ sudo snap install mc-installer
Once Minecraft snap is installed, you will see the below output.

Installing Minecraft via .deb package (GUI)
In this procedure, we will download and install Minecraft from the graphical user interface. We will use its deb package available on its official website.
Head over to Minecraft’s official Downloads page and download package for Debian. It will save the downloaded package as Minecraft.deb to your Downloads folder.

Open your File Manager and go to the Downloads folder where the Minecraft .deb package is placed. Right-click the Minecraft.deb package and select the Open With Software Install option.

Now following window will appear. Click the Install button to install the Minecraft.deb package.
You will be asked to provide an authentication password to install the package. Provide the password and click the Authenticate button. 

After authenticating, it will start the installation, and once completed, you will see the following view which indicates the installation of Minecraft has been completed.

Launch Minecraft
You can launch Minecraft using either the command line Terminal or the GUI.
To launch Minecraft from the Terminal, use the below command:
$ mc-installer
In order to launch Minecraft from GUI, hit the super key and type minecraft in the search area. When the icon for Minecraft appears, click it to launch Minecraft.

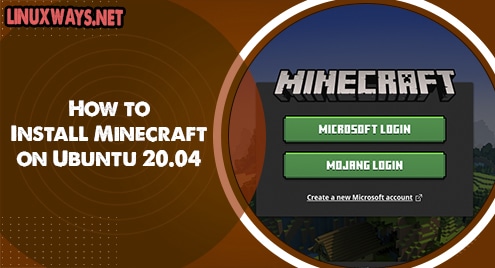
After launching Minecraft, you will see the following view:
 If you already have a Minecraft account, you can log in by proving the login credentials. Otherwise, click Sign up to create a new account.
Remove Minecraft
In case, you no longer need Minecraft, you can easily remove it from your system.
To remove Minecraft that was installed using the .deb package, use the below command:
$ sudo apt remove minecraft-launcher
Enter the sudo password, after which it will remove Minecraft from the system.
To remove Minecraft that was installed using the snap package, use the below command:
$ sudo snap remove mc-installer
In this post, we have covered three different methods to install and launch Minecraft on Ubuntu OS. Based on your preferences, you can use any of these methods. We have also covered how to remove Minecraft in case you need to do so.

Karim Buzdar holds a degree in telecommunication engineering and holds several sysadmin certifications including CCNA RS, SCP, and ACE. As an IT engineer and technical author, he writes for various websites.


