An SSH banner is usually configured to provide a disclaimer or set of rules that govern who needs to have access to the message. It is simply a warning message that typically warns unauthorized users from proceeding to access the system. Most organizations are likely to configure a banner to ward off unauthorized users and stipulate repercussions of doing so which, most of the time, have legal ramifications.
With that brief introduction out of the way, let us walk you through how you can create your own custom SSH banner.
Step 1: Make changes to the sshd_config configuration file
The first step is to make a small tweak in the /etc/ssh/sshd_config SSH configuration file. Here, I’m going to open the file using the vim command-line editor:
$ sudo vim /etc/ssh/sshd_config
Scroll and locate the Banner attribute which specifies the location of the file that contains the banner message. By default, this is assigned the value of none as indicated.

The next thing you need to do is to uncomment the line and specify your custom banner file. In our case, we have specified the file to hold the SSH banner as /etc/custom_banner
Banner /etc/custom_banner

Save the changes and exit the SSH configuration file. Then restart the SSH daemon to apply the changes .
$ sudo systemctl restart sshd
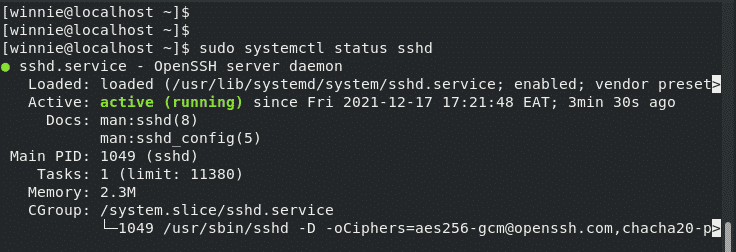
And confirm that SSH is up and running.
$ sudo systemctl status sshd

SSH is running as expected. Now, let us head over and create the banner.
Step 2: Create the SSH warning banner
In this step, we will proceed and create the file that will contain the banner message. This is the file that that we have just specified in the /etc/ssh/sshd_config SSH configuration file.
$ sudo vim /etc/custom_banner
For demonstration purposes, copy and paste the following content into the file. Of course, you are at liberty to tweak the banner however you deem fit.
Authorized access only!
This system is a property of Linuxways and is only meant to be accessed by system administrators and the IT manager. If you are not authorized to access this system, disconnect immediately!
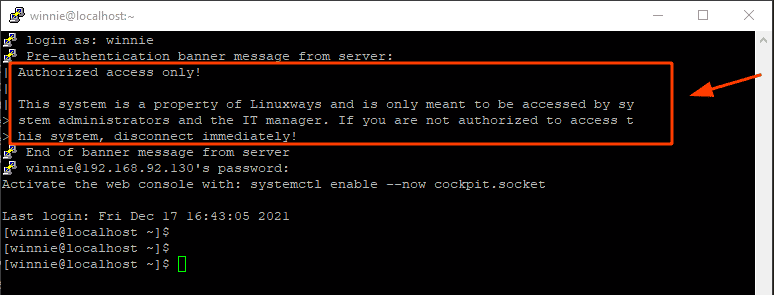
Save the changes and exit. Let’s now try to log in to the system remotely and verify if we have the banner displayed. On your Linux terminal run the command:
$ ssh user@server-ip
Alternatively, you can use the Putty ssh client, and once you have specified your username, the pre-authentication banner message that you configured will be displayed as shown.
Next, provide your password to gain access to your system.

Step 3: Create a MOTD banner ( optional )
Additionally, if you wish to set a MOTD banner, short for the Message Of The Day banner, edit the /etc/motd file.
$ sudo vim /etc/motd
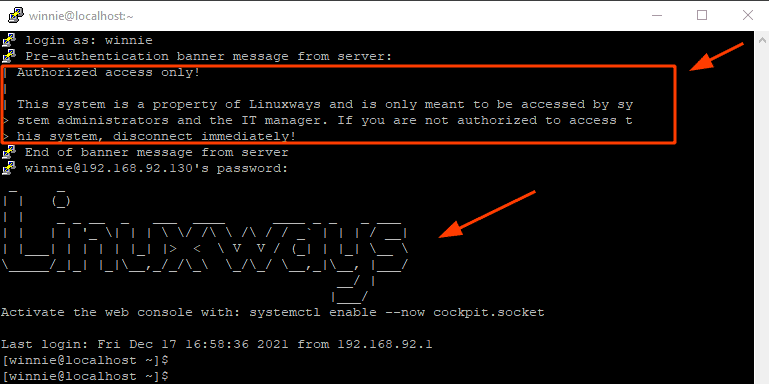
Next, define the message to appear on the SSH banner upon login. You can create a fancy ASCII artwork using an ASCII generator. Here is our sample ASCII banner art. Create your own ASCII art and paste it to the file.
_ _
| | (_)
| | _ _ __ _ ___ ____ ____ _ _ _ ___
| | | | ‘_ \| | | \ \/ /\ \ /\ / / _` | | | / __|
| |___| | | | | |_| |> < \ V V / (_| | |_| \__ \
\_____/_|_| |_|\__,_/_/\_\ \_/\_/ \__,_|\__, |___/
__/ |
|___/
Save and exit. Once again, restart the SSH service.
$ sudo systemctl restart sshd
Next time round you try logging in, the banner will be displayed once you have successfully provided your password and accessed the system.

As you have seen configuring an SSH banner and MOTD is easy peasy.


