In this article, we are going to show you the detailed steps to manage your disk volumes. This will include adding or extending the physical hard drives to extending the existing volumes and mount points. Mainly to cover the most important and routine-based tasks of adding and extending disk volumes that every system administrator has to work on.
Prerequisites:
The basic requirements of managing disk volumes need you to have root-level access on your system as well as on the VMware vCenter, Workstation, or Virtualbox. Whatever virtualization platform you are using you can follow the same steps.
The environment I will be using during this article is a VMware vCenter with RHEL/CentOS 7 Operating System.
Step 1: Check the Current Disks Status
Before extending or adding new disks to your system, it is most important to check the currently attached disks and their utilization. You can check disk utilization and their mount points by running the commands below.
# df -h
# lsblk
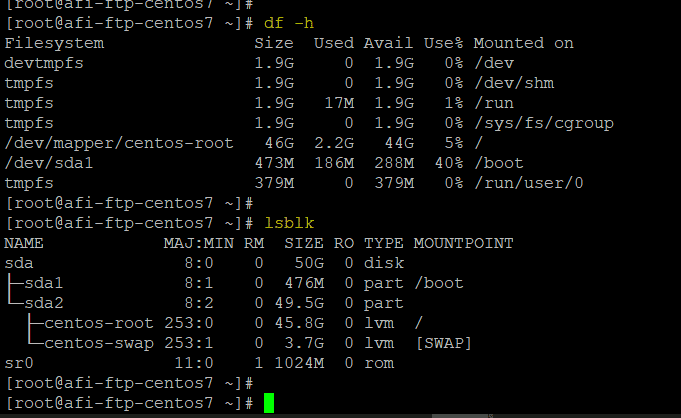
From the commands above we have an exact idea about the current state of disk space utilization and the remaining size on disks as well as how many physical disks are attached.
Step 2: Extend Physical Disk Size
Let’s say your plan is to increase the size of the root partition from 50GB to 70GB or even more as per your requirements. In this regard, you can either add a new drive or extend the same physical disk as shown below.
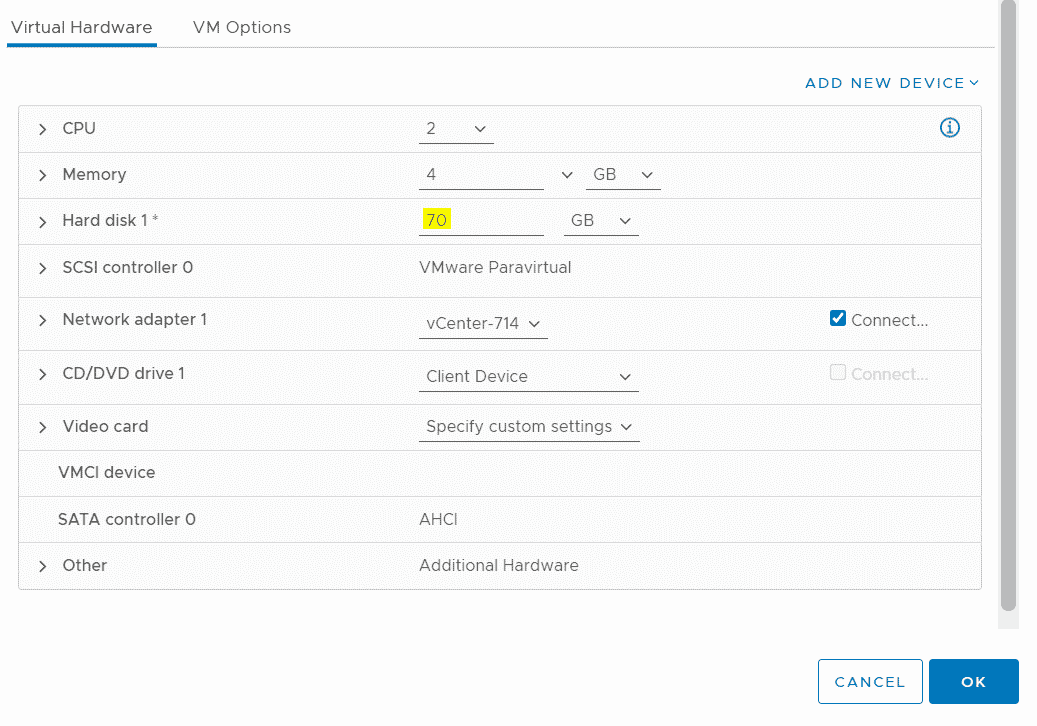
Here we have extended the same attached disk to 50GB from 70GB.
Step 3: Sync Disk Changes
After making the changes to your disk hardware resources, we need to make it reflect in the OS as well. For what either reboot the server or run the scan commands on each scsi hosts and devices as shown below.
echo "- - -" > /sys/class/scsi_host/host0/scan
echo "- - -" > /sys/class/scsi_host/host1/scan
echo 1 > /sys/class/scsi_device/0\:0\:0\:0/device/rescan
echo 1 > /sys/class/scsi_device/3\:0\:0\:0/device/rescan
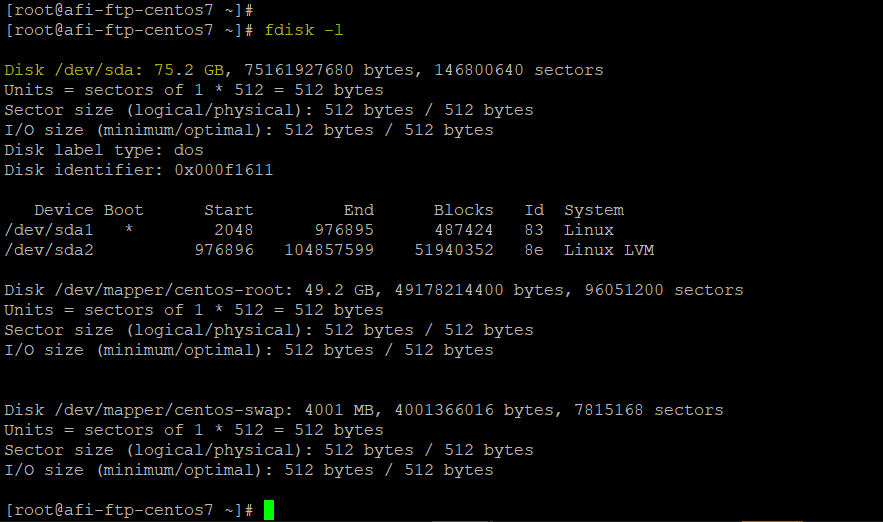
Make sure to run the ‘echo’ command on each host and device of your physical server. After that, you can confirm the updated disk specs using the below command.
fdisk -l
Step 4: Creating New Disk Partition
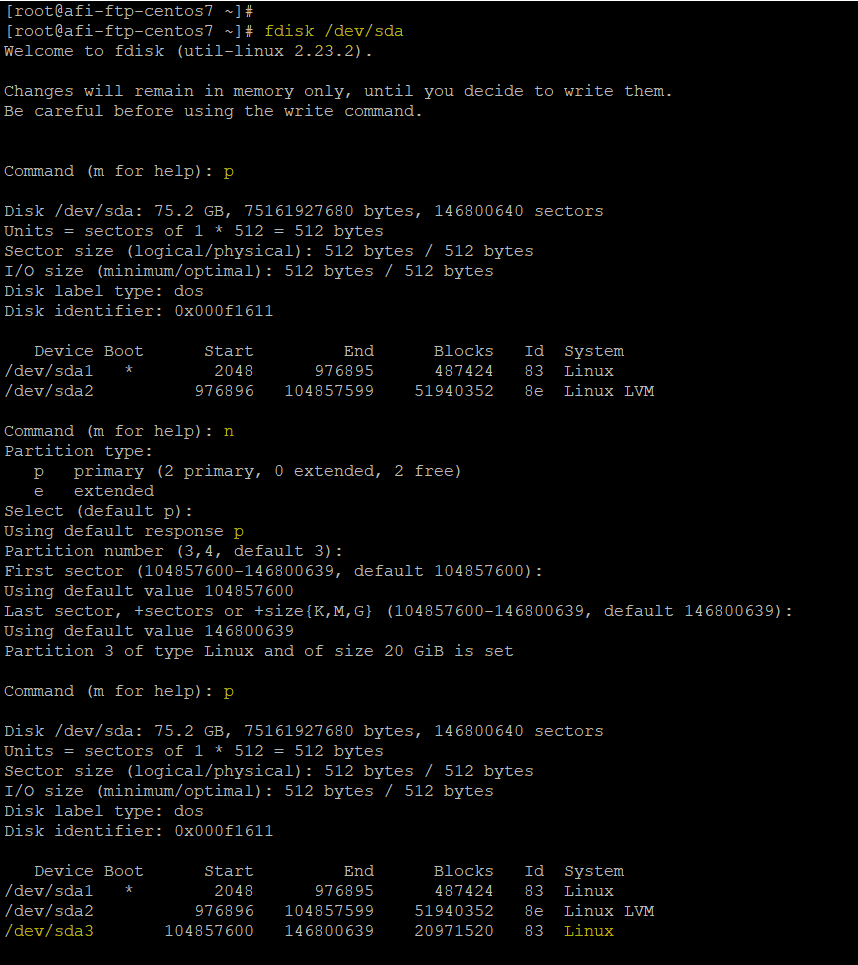
In this step, we are now going to create a new partition using ‘fdisk’ utility.
fdisk /dev/sda
Here we use ‘p’ to print the current status of disk partitions, then ‘n’ to create a new primary partition on the same disk as /dev/sda3 choosing the default sectors.
Next, change the partition type to Linux LVM using ‘t’ and typing the required code as ‘8e’. To confirm the changes type ‘p’ which will print the changes you have made. Once all good we are ok to write the changes using ‘w’ key.
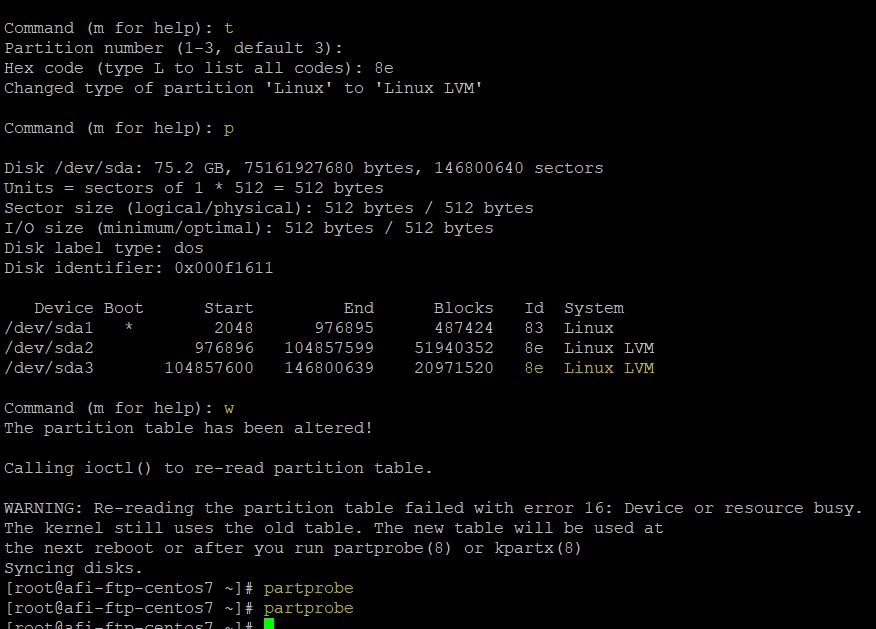
To reflect the changes, reboot your system or run the ‘partprobe’ command.
Step 5: Extend Root with New Partition
As we have created the new primary partition on the same disk, now we are going to make it part of the root partition in Linux by making it part of the existing Volume Group and Logical Volume.
Run the command below to check the current status of physical volumes and then create a new physical volume for the partition we have created earlier.
# pvs
# pvdisplay
# pvcreate /dev/sda3
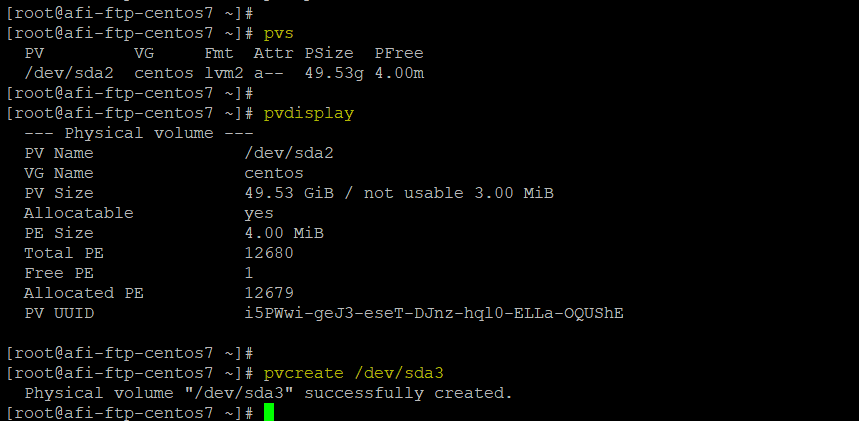
Now extend the volume group and logical volume of root using below commands.
# vgextend centos /dev/sda3
# lvextend -L +20G /dev/mapper/centos-root
At this point, we have extended the logical volume of the root, now to extend the root drive use the below command.
# xfs_growfs /dev/mapper/centos-root
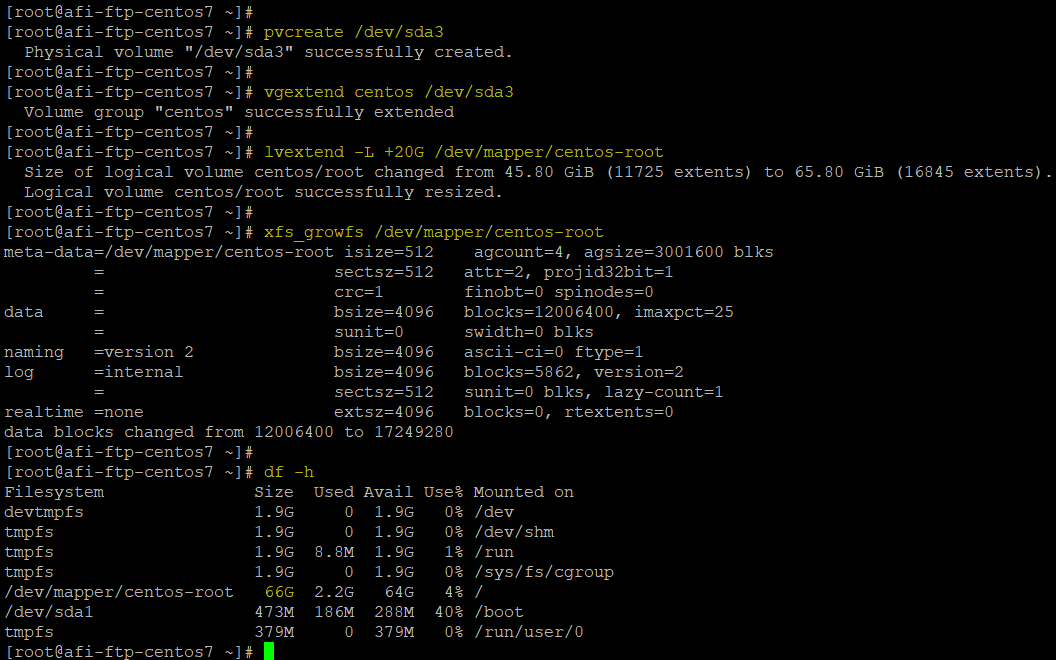
The root partition has been upgraded with the addition of 20GB.
Step 6: Adding New Disk with New PV/VG/LV
In this step, we will add a new disk to create a new mount point by using a new Volume Group and Logical Volume.
Go to your VM console to add a new disk using edit settings in your VMware workstation or vCenter. Select the size of the disk and its type as thin provisioning or thik provisioning.
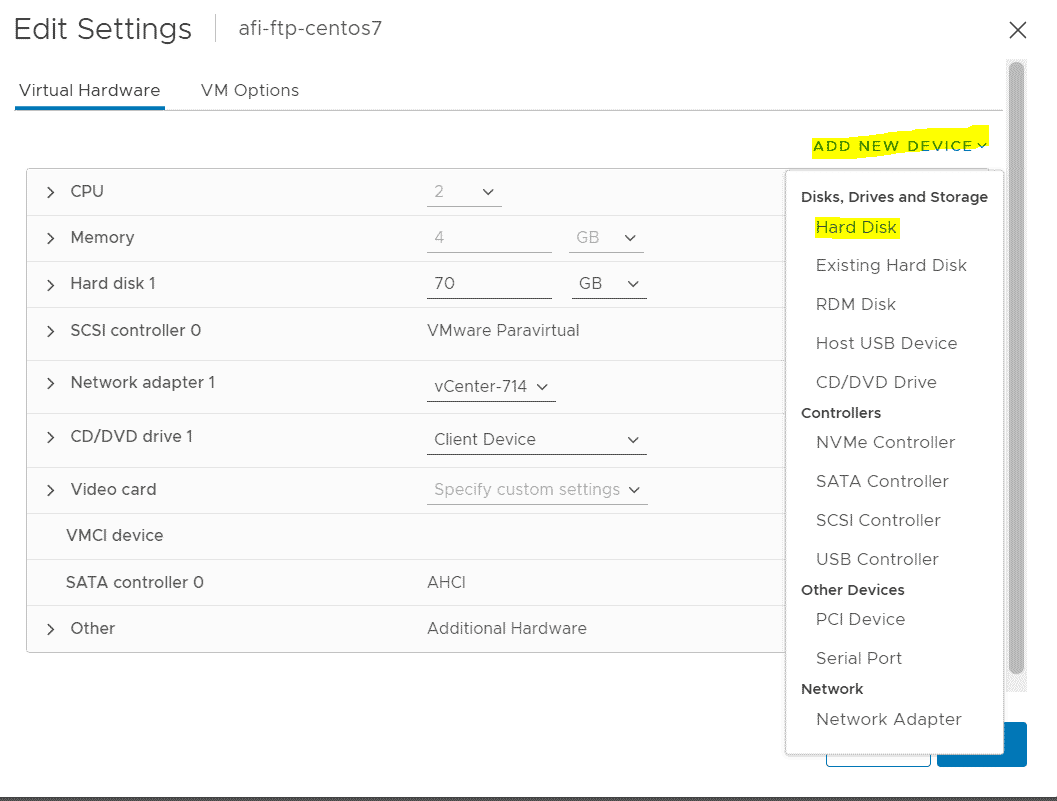
To reflect the changes reboot the VM or run sync commands as mentioned in step 3 and then run the command below to check if the new disk is synced up.
# lsblk
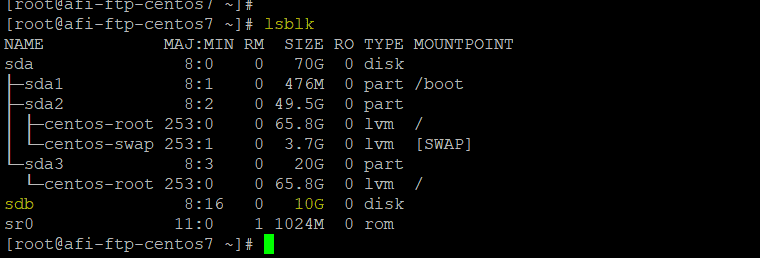
Now, repeating similar steps, we are going to create its new physical volume, new volume group, and a new logical volume using the commands below.
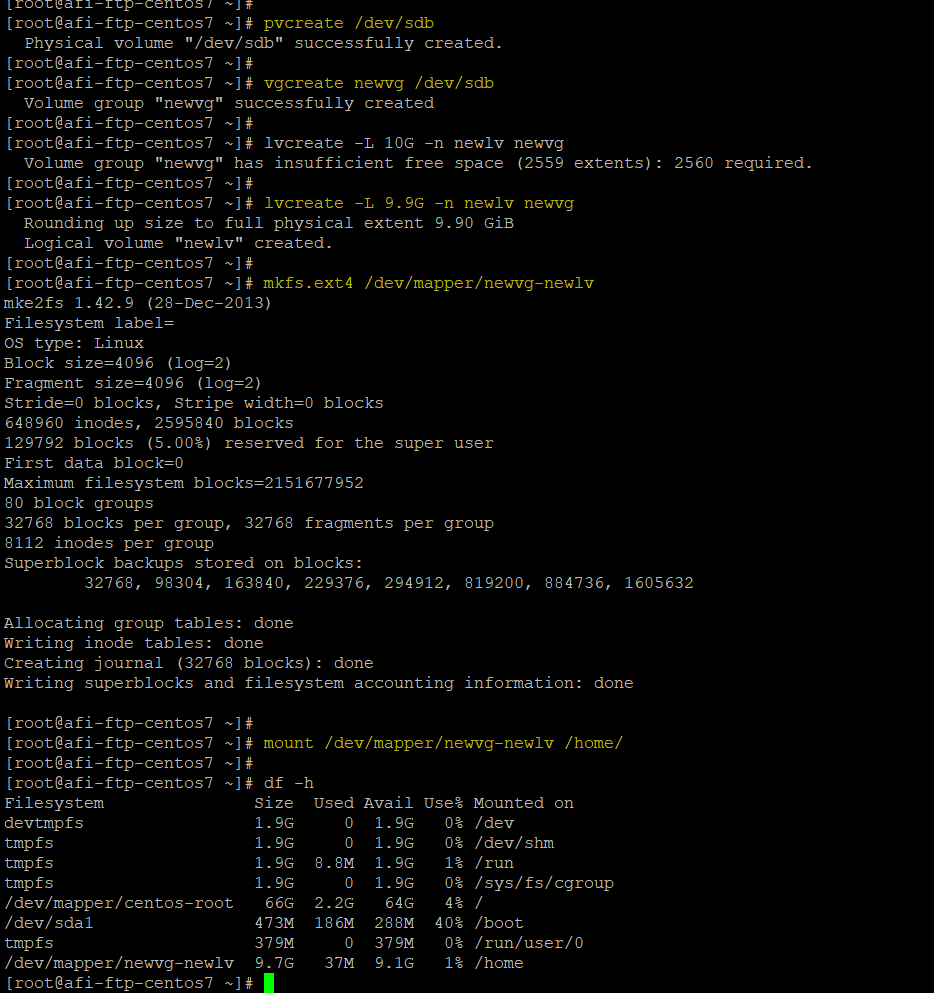
# pvcreate /dev/sdb
# vgcreate newvg /dev/sdb
# lvcreate -L 9.9G -n newlv newvg
Using the below command we created ext4 filesystem on the new volume group.
# mkfs.ext4 /dev/mapper/newvg-newlv
After this, we can mount the new logical volume to any drive that we want, like we have mounted with the /home using the below command.
# mount /dev/mapper/newvg-newlv /home/
To make it permanent, you need to add the following line in ‘/etc/fstab’ file.
/dev/mapper/newvg-newlv /home/ ext4 defaults 0 0
Save and close the file and run the command below to confirm.
# mount -a
Conclusion:
Disk drives management is one of the most repeated and important tasks for every System Administrator which is considered one of the critical activities. Following this article now you should be feeling comfortable where ever you need to increase the disk on your system.
