Fail2ban is an open-source intrusion prevention software for Linux and other Unix-like systems. Fail2ban works by scanning log files for failed authentication attempts or other signs of potential intrusion. It can automatically update firewall rules to ban (block) offending IP addresses for a predefined period of time.
By default, Fail2Ban provides filters for various services such as ssh, apache, etc. In this tutorial, we will cover the steps to install Fail2ban on Red Hat Enterprise Linux 8 (RHEL 8) and configure the ssh service filter.
Prerequisites
- RHEL 8 system
- A user with sudo capability
Install Fail2ban
On RHEL 8, Fail2ban is available through the Extra Packages for Enterprise Linux (EPEL) repository. If you do not already have EPEL installed, run the command below.
$ sudo yum install https://dl.fedoraproject.org/pub/epel/epel-release-latest-8.noarch.rpm
Also, it is recommended to enable the codeready-builder-for-rhel-8-*-rpms repository since EPEL packages may depend on packages from it. Run the next commands to do that.
$ sudo ARCH=$( /bin/arch )
$ sudo subscription-manager repos --enable "codeready-builder-for-rhel-8-${ARCH}-rpms"
Next, update available packages as follows.
$ sudo yum update
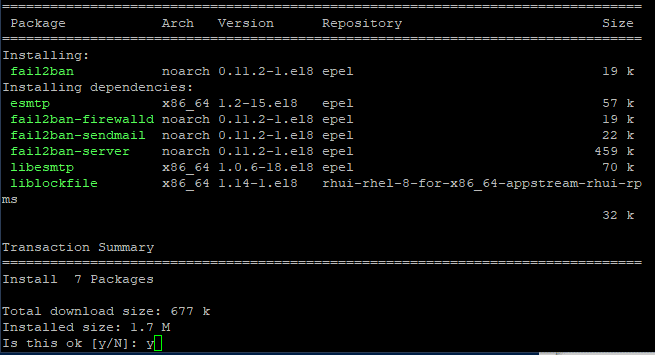
Now, install Fail2ban with the command below.
$ sudo dnf install fail2ban
When prompted, enter y to proceed to install Fail2ban.

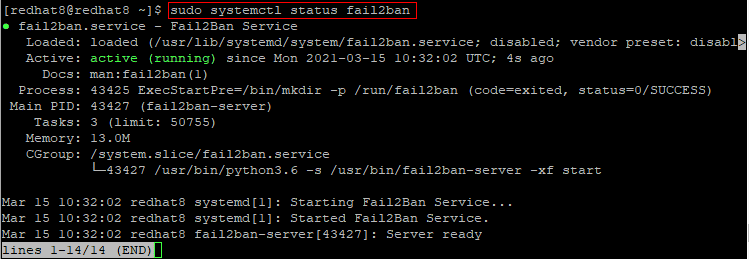
After the installation completes successfully, run the following command to check the status of the fail2ban service.
$ sudo systemctl status fail2ban
If you do not get an output that indicates that the Fail2ban service is active, then run the next command to start the service.
$ sudo systemctl start fail2ban
After that, check the status of the fail2ban service to confirm that it is now active.

Press q to return to the command prompt.
Configure Fail2ban
The configuration files for Fail2ban are stored in /etc/fail2ban and you can list them as follows.
$ ls /etc/fail2ban

As earlier mentioned, Fail2ban provides filters for popular services including ssh. These filters are stored in the /etc/fail2ban/filter.d directory.
Fail2ban’s global configuration file is jail.conf but it is not recommended to directly modify this file because it could be overwritten during a distribution upgrade. Instead, we are going to create a jail.local file and make our global configuration changes there.
Further, it is also advisable to create separate jail files in the /etc/fail2ban/jail.d directory for each service that you intend to protect.
Now, run the command below to create the jail.local configuration file based on the existing jail.conf file.
$ sudo cp /etc/fail2ban/jail.conf /etc/fail2ban/jail.local
Open the jail.local file for editing.
$ sudo nano /etc/fail2ban/jail.local
Look for the ignoreip option and uncomment it by deleting the preceding # symbol.

The ignoreip option is used to specify IP addresses or network ranges that Fail2ban should never block. The default value points to localhost and this should prevent the system from interfering with itself. You can add other IP addresses separated by a space or comma.
Save and close the jail.local file.
Configure ssh filter for Fail2ban
Run the command below to create a separate jail file for the ssh service.
$ sudo nano /etc/fail2ban/jail.d/sshd.local
Copy and paste the following custom configuration settings into the sshd.local file.
[sshd] enabled = true maxretry = 3 bantime = 5m |
Note:
maxretry is the number of failures before the offending IP address is blocked
bantime is how long an offending IP address will be blocked for. In the example above, 5m denotes 5 minutes. You can change this as desired. For example, 1h would mean 1 hour. And if you do not specify either m or h, the value would be in seconds.
Save and close the sshd.local file.
Restart Fail2ban with the next command.
$ sudo systemctl restart fail2ban
Test Fail2ban
To illustrate, I am now going to initiate failed login attempts to my RHEL 8 system from another computer via ssh. You may do the same.
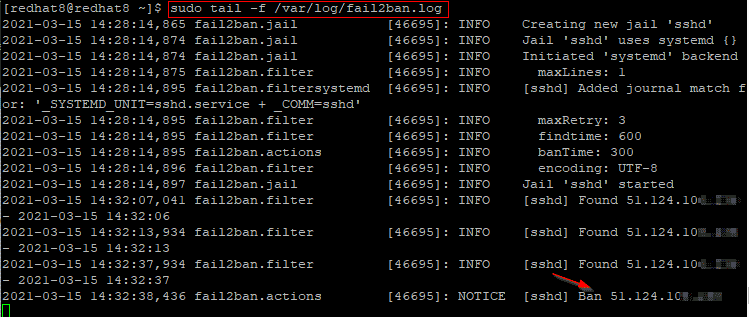
The failed login attempts will be logged to /var/log/fail2ban.log and you can see this in real time with the command below.
$ sudo tail -f /var/log/fail2ban.log
As shown in the image below, the IP address of my other computer was banned after 3 failed login attempts.

Press CTRL + C to return to the command prompt.
To view information about banned IP addresses for the ssh service, run the next command.
$ sudo fail2ban-client status sshd

To unblock a banned IP, run the command below. Replace <IP> with the actual IP address.
$ sudo fail2ban-client set sshd unbanip <IP>
Conclusion
In this tutorial, we covered the installation of Fail2ban and the configuration of an sshd filter.
There are so many options to configure but we focused on the basic ones. Feel free to peruse the Fail2ban man pages by running man fail2ban to discover what more you can do with it.


