LAMP (stands for Linux, Apache, MariaDB, PHP) is a collection of open-source software that is used to create dynamic websites and web-based applications. It uses Linux as the OS, Apache as a web server to serve web content over simple URLs, MariaDB as a database server to store websites and applications data, and PHP as the scripting language to serve dynamic content. Usually, the Lamp stack uses MySQL as a database server, however, for Debian systems; MariaDB is now the default MySQL server.
In this post, we will demonstrate how to install Linux, Apache, MariaDB, and PHP (LAMP) Stack on Debian 10.
Pre-requisites
- Debian 10 system
- User with sudo privileges
Step 1: Installing Apache
First, update the apt index using the below command in Terminal:
$ sudo apt update
Then to install Apache, issue this command:
$ sudo apt install apache2
Once the installation is completed, the Apache service will start running automatically. Here is the command to verify the status of the Apache service:
$ sudo systemctl status apache2
Now if a firewall is enabled on your system, you will need to allow Apache port through it. The Debian system comes with different profiles for Apache which can be used to adjust the firewall settings. To view the list of all application profiles, issue the below command in Terminal:
$ sudo ufw app list
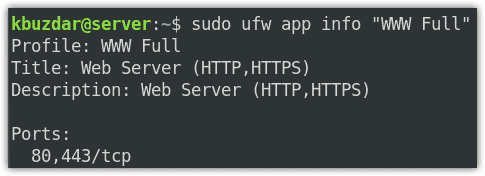
We will enable the “WWW Full” profile for Apache that will allow the traffic on both port 80(HTTP) and port 443(HTTPS). To view information about the “WWW Full” profile, execute the below command in Terminal:
$ sudo ufw app info "WWW Full"
To enable the “WWW Full” profile, execute the below command in Terminal:
$ sudo ufw allow in "WWW Full"
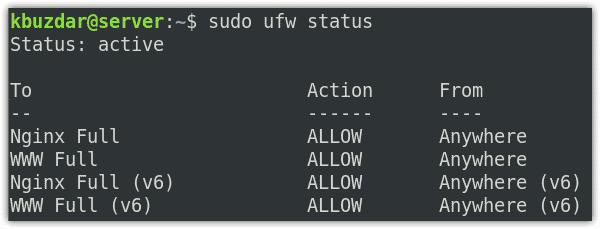
To verify if the rule has been added successfully, execute the below command in Terminal:
$ sudo ufw status
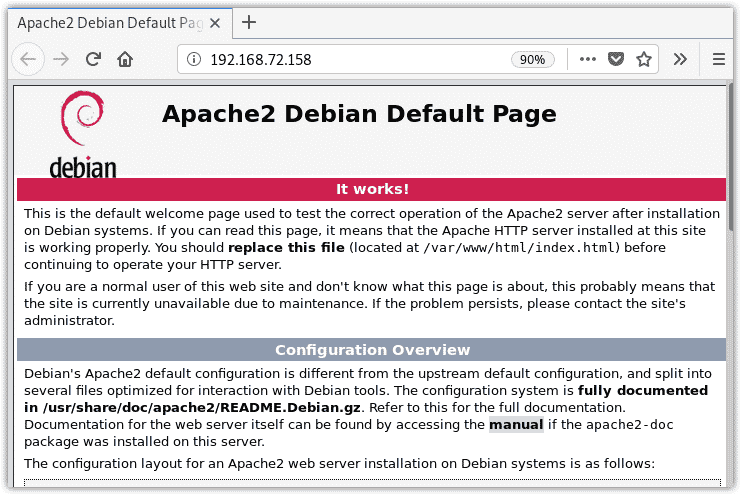
Now to check if Apache is working and can serve web pages, try to open Apache’s default webpage in your web browser:
http://ip-address
Replace the ip-address with the IP address of your own system.
Alternatively, you can also access Apache’s default webpage using the curl command in your Terminal:
$ curl http://ip-address
Step 2 — Installing MariaDB
Now, we will install the MariaDB database that will be used to store data for our site. Execute the below command in Terminal to install MariaDB database:
$ sudo apt install mariadb-server
Now execute the security script to implement some security features. Use the below command in Terminal to execute the script:
$ sudo mysql_secure_installation
You will be presented with a few questions to configure some options for MariaDB. When you are asked to provide the password for root, hit n. Then it will ask you to set the root password, again hit N, and then Enter. Then for all the next questions, hit y and then Enter to answer yes and accept the default values.

Now connect to MariaDB console as a root user. You can do so using this command in Terminal:
$ sudo mariadb
Enter the sudo password.
Now create a database let’s say “test“.
CREATE DATABASE test;
Now create a user along with a password and give it full permission to the “test” database. Execute the below command to do so:
GRANT ALL ON test.* TO tin@'localhost' IDENTIFIED BY 'tintin' WITH GRANT OPTION;
We have created a user ‘tin’ with password ‘tintin’.
Now reload the privileges using the below command:
FLUSH PRIVILEGES;
Then exit the console:
exit

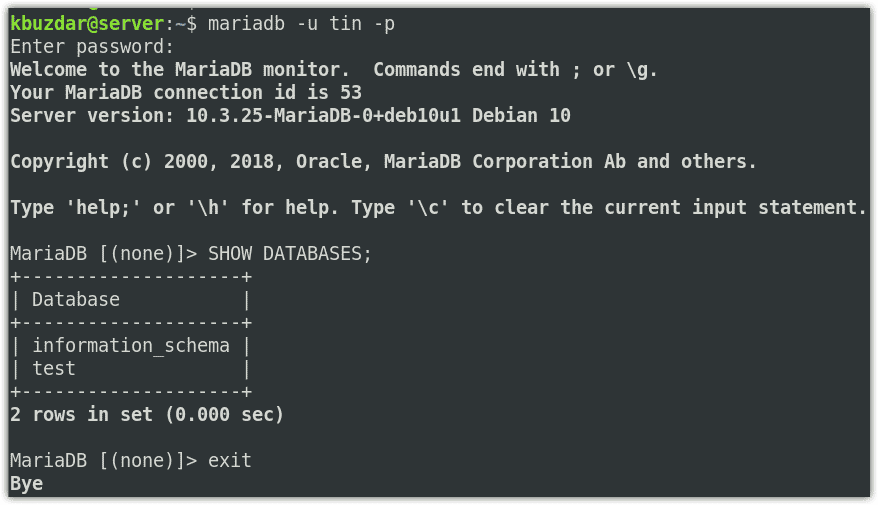
Now try logging in to the MariaDB console using the new user credentials you have set in the previous step.
$ mariadb -u tin -p
Now enter the password for this user (in our case, it was “tintin”).
To view the database “test” that you have created in the previous step, execute the below command in Terminal:
SHOW DATABASES;
To leave the console, execute the below command in Terminal:
exit
Step 3: Installing PHP
In this, we will install PHP to connect with the MariaDB database and retrieve the required information. PHP also connects with the Apache server to hand over the processed information for displaying over the web.
In order to install PHP, issue this command in Terminal:
$ sudo apt install php libapache2-mod-php php-mysql
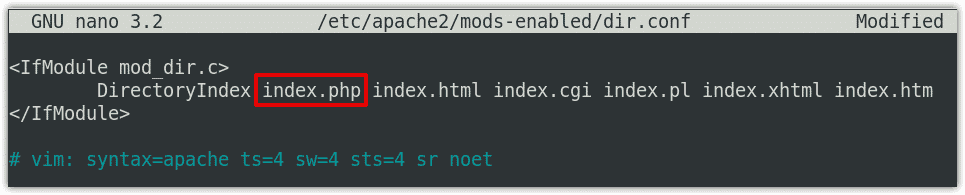
Usually, when a user requests something from the Apache server, it first searches it in the index.html file. In order to make the server first look for the requested item in the index.php file, you will need to make a little change in the dir.conf file for Apache. Execute the below command in Terminal to edit this file:
$ sudo nano /etc/apache2/mods-enabled/dir.conf
Find the below line in the dir.conf file:
DirectoryIndex index.html index.cgi index.pl index.php index.xhtml index.htm
From the above line, cut index.php entry and paste it after the DirectoryIndex as shown in the following screenshot.
Then save and close the dir.conf file and reload Apache’s configuration using the below command.
$ sudo systemctl reload apache2
Then execute the below command to verify the status of Apache and to make sure there is no error:
$ sudo systemctl status apache2
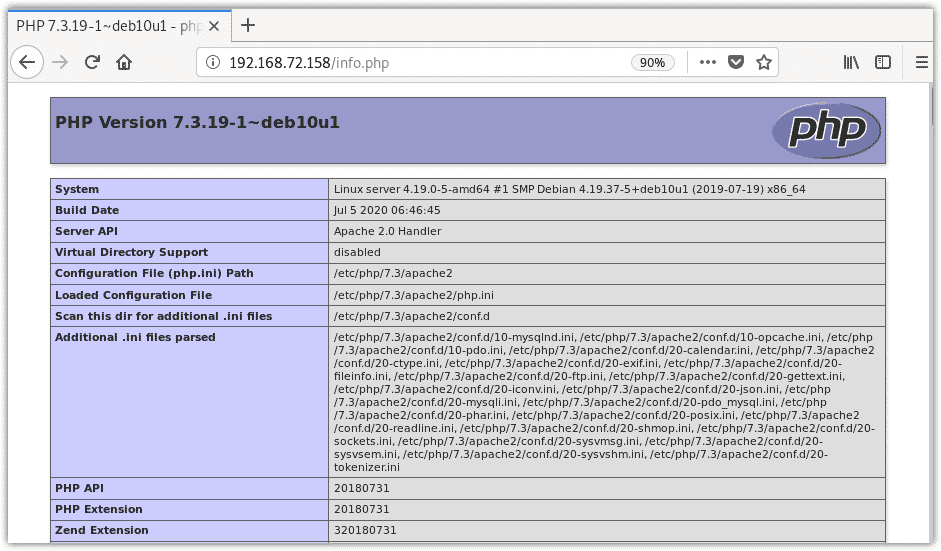
Step 4— Testing PHP Processing on Apache
Now in this step, we will check if Apache is configured properly and can process requests for PHP files. To do so, create a new info.php file inside the /var/www/html directory using the below command in Terminal:
$ sudo nano /var/www/html/info.php
Then add the below lines of code in the info.php file:
<?php

phpinfo();
After that save and close the info.php file.
Open the below address in your web browser:
http://ip-address/info.php
Replace the ip-address with the IP address of your own system.
If you see the below page, then it verifies that the Apache is configured correctly to serve the PHP content.
This page also shows some information about PHP so it is recommended to remove this page. Issue the below command in Terminal to do so:
$ sudo rm /var/www/html/info.php
That is all there is to it! In this post, you have learned how to install the LAMP stack (Linux, Apache, MariaDB, and PHP ) in your Debian system. We hope you find this post helpful!

Ummara Mushtaq is a Telecommunication engineer with two years of experience in server support and networking. She writes technical articles based on Linux system administration for LinuxWays.


