When a user presses the system’s power button or restart button, the login screen appears on their monitor. After logging in, the machine begins to function. There are several steps that are involved from pressing the power button to getting the login screen; this process is called the boot process.
Here, we will discuss and understand about the Linux boot process in details. We can divide the boot process into six steps:
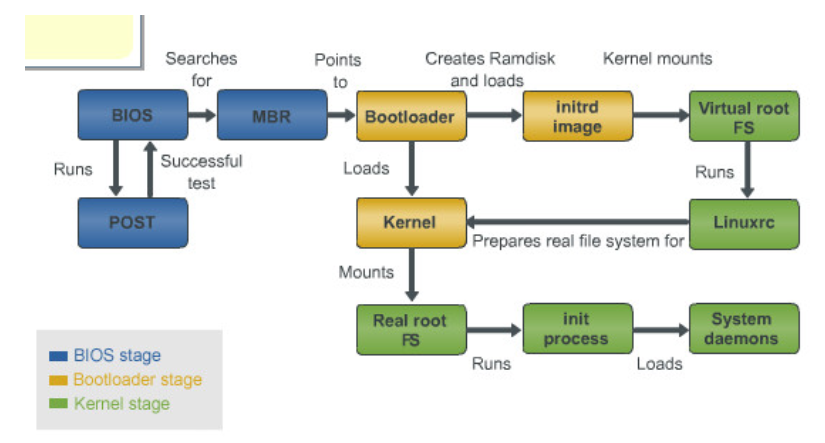
Here is one simple diagram to understand the whole Linux process.
The BIOS (Basic Input Output System): Starting Point of the Booting Process
The BIOS is where the hardware and software first interact. When the system powers up, the power supply begins to distribute the current to the different parts of the computer so they can operate. When the CPU receives the current from the power supply, it searches for a special programme that helps load the operating system into the computer’s memory. This programme is called BIOS. The BIOS is a special programme which is hardwired into the motherboard itself.
BIOS first performs an integrity check which is called a “Power On Self Test (POST)”. The POST process verifies whether all of the computer’s hardware like RAM, hard drive, CD-ROM drive, keyboard, etc., are working fine or not. If no error occurs, the boot process will continue. But if any error is encountered, it generates a beep sound, and the computer will not boot up.
After the POST, the BIOS selects the first boot device and gives back the control to the CPU. If it does not find the first boot device, it checks for the second device, and so on. If it has not found any boot devices, it shows the “No Boot Device Found” error.
MBR (Master Boot Record)
After the BIOS, the control is back to the CPU. Now, the CPU loads the MBR to the memory.
The first sector of a hard drive contains the MBR that indicates the system about the hard drive details and loads the steps for the operating system.
MBR is a location on the disk with the following details:
- The primary boot loader information is stored in the first 446 bytes.
- The next 64 bytes store the Partition table information.
- The last 2 bytes store the magic number.
From given information, we can get the MBR as 512 bytes in size.
The primary boot loader information is the location of the actual boot loader. Using this location, the CPU loads the actual boot loader (GRUB).
MBR contains 64 bytes Partition table which stores the following data:
- First and last address of each partition.
- What is the size of partition?
- What is the type of partition?
The last 2 bytes of the MBR store the magic number. Here, the magic number is 0xAA55 which is used for validation check of the MBR.
So, the primary boot loader’s task is to find and load the secondary boot loader.
GRUB (GRand Unified Bootloader)
The GRUB is a boot loader which is responsible to load the kernel.
This loader displays the GRUB menu from which we can choose the required operating system. If the user has not chosen any one from the menu with an optional timeout after the waiting time, the default one is loaded to the memory.
After loading the kernel, it gives control to the kernel.
Kernel
Here are the sequences that are followed in kernel:
- The Linux kernel is first read into the memory.
- After loading the kernel into memory, the following things happen:
The kernels are located in the /boot directory in compressed format.
After loading inside memory, it unzips itself from the zipped version. At the beginning of the kernel image, there is a routine which is responsible to extract from the compressed version.
After self-extracting, the chosen kernel mounts the root file system which is specified in the “grub.conf” file.
Here is one sample “grub.conf” file content:
default=0
timeout=5
splashimage=(hd0,0)/boot/grub/splash.xpm.gz
hiddenmenu
title CentOS (7.2.18-324.el5PAE)
root (hd0,0)
kernel /boot/vmlinuz-7.2.18-324.el5PAE ro root=LABEL=/
initrd /boot/initrd-7.2.18-324.el5PAE.img
From the previous file, we can see the entry of the kernel and the initrd image.
Then, it starts the /sbin/init programme. Init is the first program which is executed by the kernel. So, the PID of init is 1. To get the init’s PID, the following command can be used:
It initialises and sets up all of the system’s hardware after being loaded into the memory.
Then, it searches for the compressed initramfs image(s) in a specific area of memory, decompresses them directly to /sysroot/, and loads all the required drivers.
It finishes the initramfs operations and releases all the memory that the disc image previously used by initializing the virtual devices that are connected to the file system.
The root device is then created by the kernel, along with the root partition which is mounted as read-only and any unused RAM are released.
The kernel is now active and loaded into the memory. There aren’t any user apps that allow the system to receive a significant input, so not much can be done with it. The kernel runs the /sbin/init programme to configure the user environment.
Init
The /etc/inittab contains a script that is read by init. The initial configuration script, which essentially takes care of everything a system has to do when it is initializing, is read by init. This includes the following:
- setting the clock
- initializing the serial port
- other tasks
Init decides how the system should be configured for each runlevel by reading this file, and it also establishes the default run level.
Init starts all background processes which are necessary to keep the system running after deciding on the system’s default runlevel. The kill scripts, whose file names begin with a K, are first executed with the stop option. To start all services and apps, it then executes all start scripts whose file names begin with S.
Runlevels
A runlevel is a Linux system software setting that only allows a predetermined set of processes to exist. Runlevels decide about the programmers which are allowed to run after the OS is running.
There are seven runlevels which are numbered from 0 to 6.
The following table describes the function of each runlevel:
| Runlevel | Function |
| 0 | It shuts down the system. |
| 1 | It operates in single user mode. |
| 2 | It operates in multiuser mode without networking. |
| 3 | It operates in multiuser mode with networking. |
| 4 | It is defined by the user. |
| 5 | A multiuser with networking and X windows. |
| 6 | It reboots or restarts the system. |
The runlevel 0 “shuts down the system”.
Runlevel 1 is a single-user mode in which the non-root logins are not permitted, the networking is not available, but the configuration files and passwords can be changed.
There are no networking daemons at runlevel 2, and multiple users are not supported.
Runlevel 3 allows networking and command line interface.
We are able to construct the new runlevels as of run level 4.
The runlevel 5 is used in maximum Linux systems.
The runlevel 6 “reboots or restarts the system”.
The runlevel program can be executed from the following directories:
Runlevel 1 – /etc/rc.d/rc1.d/
Runlevel 2 – /etc/rc.d/rc2.d/
Runlevel 3 – /etc/rc.d/rc3.d/
Runlevel 4 – /etc/rc.d/rc4.d/
Runlevel 5 – /etc/rc.d/rc5.d/
Runlevel 6 – /etc/rc.d/rc6.d/
We can check all programs under /etc/rc.d/rc*.d/ folder. For example, if we want to see the runlevel in four files, we can check the “ls /etc/rc4.d/” directory.
If the program name starts with “S”, it is used at the start time. If the program name starts with “K”, it is used at the time of shutdown.
Here are the ways to change the runlevel:
– init command
– telinit command
The default runlevel in the /etc/inittab file can be modified by the user. Here is the command:
$ telinit <runlevel_value>
To interact with init, the /dev/initctl control channel should be used rather than SIGPWR and /etc/powerstatus.
The /sbin/telinit is linked up with /sbin/init. Telinit takes up an argument and send signals to init to do the required action.
Here is the table:
| Argument | Function |
| 0,1,2,3,4,5,6 | Switch to specified runlevel |
| a, b, c | Processes only the file entries from /etc/inittab having runlevel a,b, c |
| q or q | Re-examines the /etc/inittab file |
| s or s | Switches to a single user mode |
| u or u | Init re-executes itself |
If we want to find out our current system runlevel, we can use the following command:
To see all help related to Linux “runlevel” command, use the following commands:
Or
$ runlevel –help
Or
$ man runlevel
These are the six processes which happen in background when the user presses the power button of the system.
Conclusion
We learned the Linux boot process in details. We also learned the booting component and run levels which are very important for system administrator, developer, and also for the users of the Linux operating system. There are many detailed steps in each area, but we tried to cover the overall process in this short article.