Your laptop, desktop computer, smartphone, and all other devices connected to your local network all have a local IP address which can be either IPv4 or IPv6. Although it is invisible to the outside world, it is necessary to access the internet. Your computer is uniquely identified on the internet by its IP address. Consider it to be your home address. Similar to how your home address can be used to contact you, your IP address can be used by other networked devices to transmit and receive the data to your system.
Every computer system is assigned a 32-bit IP address when it connects to a public (Internet) or private network. IP addresses such as 10.x.x.x, 192.168.x.x, or 172.16.x.x are examples of private IP addresses using a DHCP server or statically assigned by a system administrator. We will go over both GUI and command-line methods to locate your system’s private IP address in Ubuntu 22.04 LTS in this tutorial.
Types of IP Addresses
IP is a protocol that offers several IP addressing schemes and is created to be used in various network environments. Public and private IP addresses are two of the most frequently used types of IP addresses.
Public IP Address:
The internet uses public IP addresses to communicate with servers, clients, routers, modems, etc. Additionally, it may be known as a WAN-specific or MAN IP address.
Private IP Address:
It is used within a local area network or LAN. It does not use the internet and is mostly used for local network gateway access. For data transmission over the network (internet), the internet gateway often uses a Public IP Address of its own. Additionally, LAN clients receive a private IP addresses through Wi-Fi, routers, and modems.
Let’s look at how we can find the local IP address in Ubuntu 22.04.
Finding the Local IP Using the Terminal in Ubuntu 22.04
In these sections, you will learn how to obtain the IP addresses that are assigned to our Ubuntu machine by the router. To best explain how to obtain the IP address, we’ll demonstrate two alternative commands. Although both are simple to use, they offer different levels of information.
A hostname is the first command. Since it merely displays the IP addresses themselves, this command is the simplest to use.
The IP command comes in second. Use this command to find out which network adapter is responsible for allocating that IP address.
You must first open the terminal if you are using an Ubuntu desktop version. One of the easiest ways to launch the Ubuntu terminal is by using the keyboard shortcut “ctrl-key + alt-key + t”.
Method 1: Using the Hostname Command to Find the IP Address
The hostname command makes it simple to locate the IP address when finding it using the terminal method. Since this command simply returns the IP addresses, it has the benefit of being more effective. By writing the command “-I” option, we instruct it to print every IP address that has been issued to your host.
![]()
You will obtain the IP addresses given to your Ubuntu device after running this command. It can be seen that the previous command returned three local IP addresses in our example.
![]()
Method 2: Ubuntu’s IP Command to Find the Local IP Address
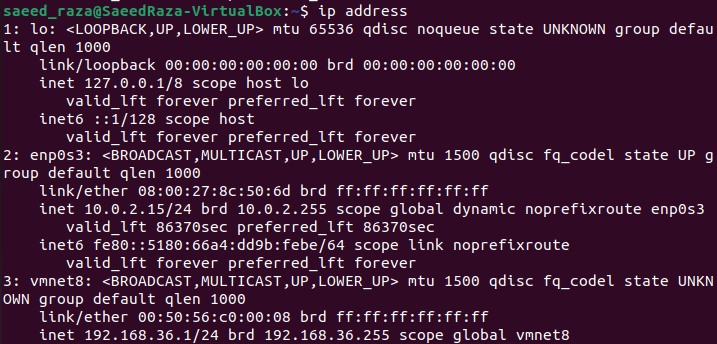
After launching the terminal, to determine the IP of our Ubuntu devices, we can use the “ip address” command. When you need to see which IPs are being allocated to specific network devices, this command should be used. Use the following command in the terminal to view a list of the IP addresses that have been assigned to you.
![]()
You’ll see right away that this command gives you a lot of info. It contains a variety of information about the network adapters, such as the mac addresses of all connected devices. The network device i.e. (1: lo:) can be ignored. Ubuntu uses this device, known as the loopback device (127.0.0.1), to communicate with itself. You must look for “inet” for an IPv4 address and “inet6” for an IPv6 address in each network adapter. Immediately after that, the address is mentioned.

The aforementioned output demonstrates that our “enp0s3” adapter has two IP addresses. The two IP addresses are: one each for IPv4 and IPv6. Our Ubuntu device’s IPv4 address is “192.168.0.43” while our IPv6 address is “fe80::f9c9:e82d:97d2:185”, as we can see and so on.
Finding the Local IP Using the Desktop Interface of Ubuntu
Through the desktop interface, the Ubuntu device’s IP address can also be found. You can simply find both the IPv6 and IPv4 addresses by accessing your device’s settings.
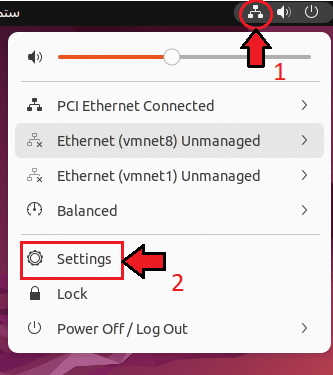
The following screenshots and instructions are for Ubuntu 22.04. However, they should work for both previous and recent releases. Before starting this section, we must open the settings app. On the desktop interface, clicking the top-right corner of Ubuntu is the simplest way to access the settings. Click or tap the “Settings” page when the menu pops up.

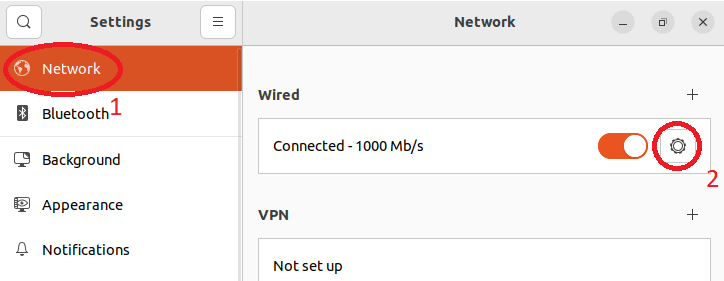
We choose the “Network” tab from the options within the settings page. We will see a list of the network adapters that are accessible in our Ubuntu device if we’re on the correct tab. Next, click or tap the cog icon after identifying the adapter that you want to use to obtain your IP address.

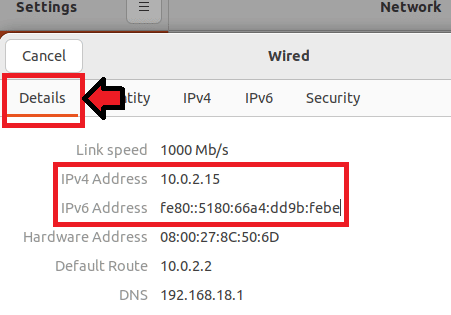
In the “details” option, you will see the various information and details of the network adapter. These details include the IPv6 and IPv4 addresses of your Ubuntu device.

It can be seen that the IP address of IPv4 is 10.0.2.15 and the IP address of IPv6 in our system is fe80::5180:66a4:dd9b:febe.
Conclusion
In this tutorial, we discussed what IP is and how we can obtain or find the local IP address in Ubuntu 22.04. In the introduction section, we discussed the IP address. Then, we explained its types (“local” and “private”). First, we explained how to find the local IP using the Terminal by using the hostname and IP commands. Second, we used the GUI method to find the local IP address in Ubuntu 22.04.


