Ubuntu is one of the many Linux operating systems that provides several utilities to help us perform different tasks according to our requirements. It allows us to check the IP address of our system using multiple ways. It is important to know the IP address of your computer as it allows sending any type of information between multiple systems on the network. In this article, we will discuss the approaches to check IP addresses on your Ubuntu System.
An IP address abbreviated as an Internet Protocol address is a numeric assignment that is provided to many computers networked devices that use the Internet Protocol. It is used to identify a machine as well as to pinpoint its location. Public and private are two types of IP addresses and every IP address on the network is distinct, making communication between all linked devices easier. In the same way that your physical address is used for postal mail, your public IP address is used to communicate over the Internet. On the other hand, on a local network, every device is assigned a private IP address that is distinct in its sub-network.
There are two different internet protocols available for communication purpose which are IPv4 and IPv6. The classic IP format is IPv4, which consists of a four-part structure with four bytes separated by dots (e.g., 192.168.1.3). Besides as the number of devices grows, it becomes more difficult to keep track of them all, IPv4 may face a shortage of addresses soon. That’s why IPv6 was created in comparison to IPv4.
Checking IP Address in Ubuntu
There are two ways through which your IP address can be checked in Ubuntu:
- Check IP-address Using Command Line Method
- Check IP-address Using GUI (Graphical User Interface) Method
A brief detail of both methods is explained below:
Checking IP Address Using a Command Line Method
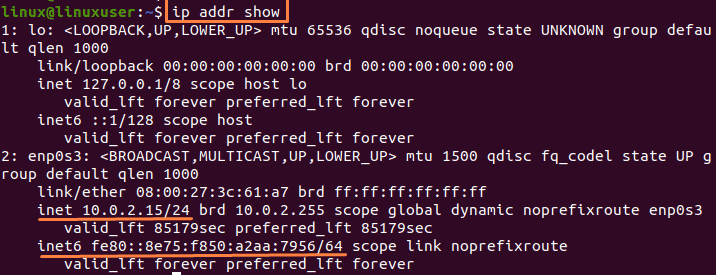
The Command Line method is a simple and mostly used way in Linux to check your IP address in Ubuntu. Run the mentioned below command to check IP address using CLI:
$ ip addr show |
The above command will be used to display the IPv6 and IPv4 addresses. On the system, the IP command displays and manages routing, device, and routing of policies. The option “addr” in command is used to display IP or IPv6 addresses of devices.

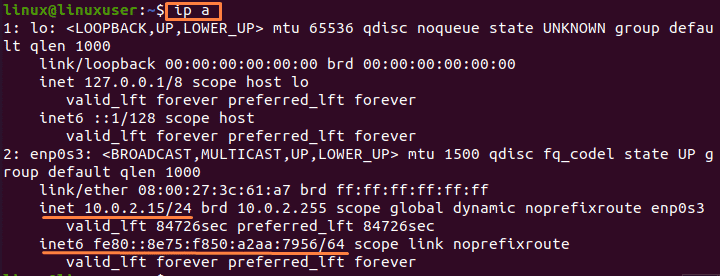
You can further check IP addresses in Ubuntu by simply shortening this command which will give you the exact result for IP address.
$ ip a |

Check IP Address Using a GUI (Graphical User Interface) Method
If you don’t know how to use the command line or you are facing any difficulty in the application of commands, you can also check IP addresses by another method.
Mentioned below are the steps to check IP-address using GUI.
Step 1: Application Menu Settings
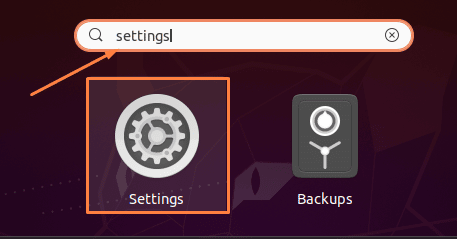
Open up the Ubuntu Applications Menu which is provided in the left corner of the screen(denoted by nine dots symbol) and then search for the Settings option and click on the icon:

Step 2: Network Settings
Settings Menu will be shown after clicking the settings icon. In settings options, go to Network.

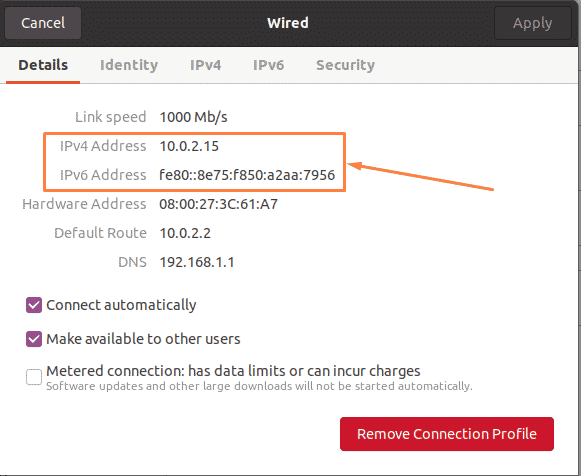
Step 3: IP Address in Ubuntu
When you press the gear icon given after your connection, a window will get opened that contain more setting and information about your connection with the network and IP address.

Conclusion
In this article, the basic overview of IP addresses, their types, and the contrast between the IPv4 and IPv6 protocols is being provided. There are multiple ways to check IP addresses in different operating systems. The two different ways through which you can find your IP address in Ubuntu Linux are being discussed in this article as well.


