Reading and writing are the basic operations that can be applied to data in every system. TCP is abbreviated as Transmission Control Protocol and is a connection-oriented communication protocol that makes it easier for computers on a network to send and receive messages. It is the most widely used protocol in networks that employ the Internet Protocol (IP); it is sometimes referred to as TCP/IP when used jointly. UDP, abbreviated as User Datagram Protocol, is a communication protocol used to construct low-latency and loss-tolerant connections between applications on the internet. In this article, we will discuss the command “Netcat,” which is used to read and write disks across networks using TCP and UDP protocols on Ubuntu 20.04 (Linux OS).
The Netcat utility application includes several instructions for managing networks and monitoring the level of data between systems. The TCP and UDP protocols are the basis of computer networks, like the internet. It is regarded as the Swiss army knife of networking tools and is among the most effective tools in the armory of network and system administrators. Netcat is a cross-platform program that runs on Linux, Windows, Mac OS X, and BSD. Netcat can be used to debug and analyze connectivity issues as well as scan for open ports, transfer data, and act as a proxy.
Using Netcat to Read and Write Data Across the Network
On macOS and common Linux distributions such as Ubuntu and Debian, the Netcat package comes pre-installed. Some of the “Netcat” utilities are mentioned below.
- Perform Port Scanning through Netcat
- Sending Files through Netcat
- Create a web server through Netcat
Syntax:
$ nc [options] host port |
Either “nc” or “netcat” is used on Ubuntu systems.
A TCP connection will be established to provide host/hosts and port/ports by Netcat as default. Use the -u option if you want to create a UDP connection.
$ nc -u host port |
Perform Port Scanning through Netcat
One of the most prevalent Netcat applications is port scanning. You have the option of scanning a single port or a range of ports.
TCP:
Scan for open ports:
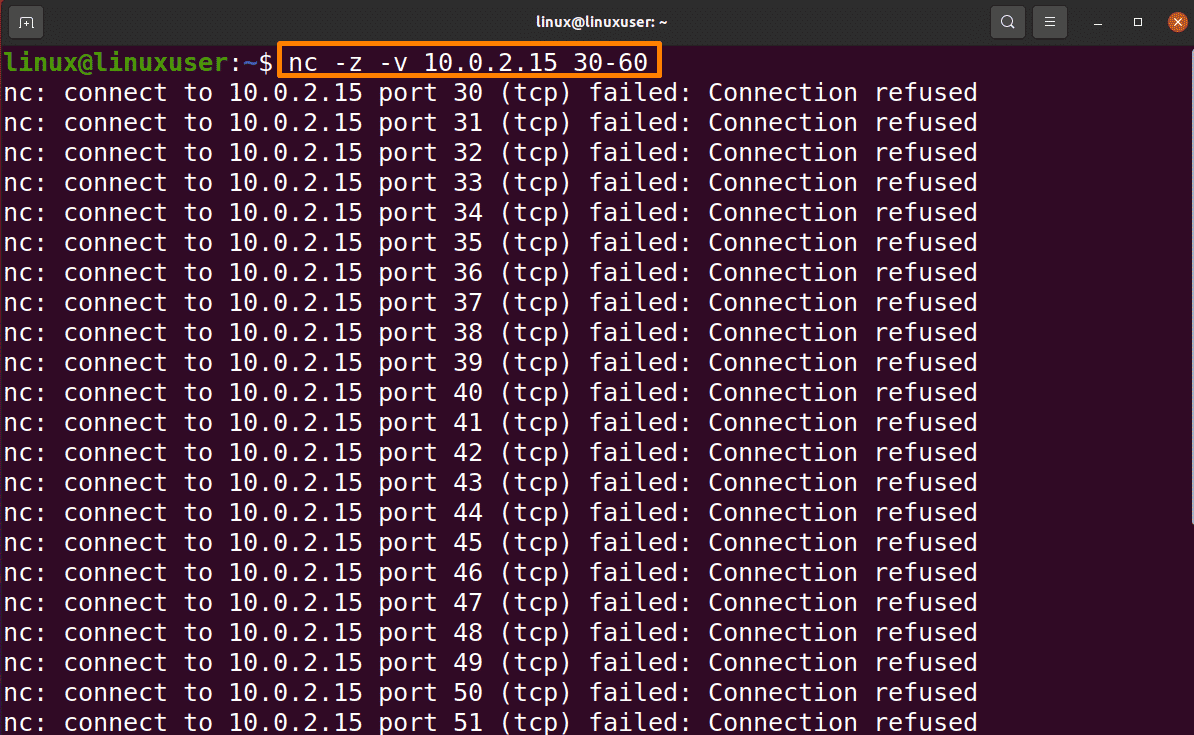
To scan the open ports in the range of 30-60 using Netcat, run the command mentioned below:
$ nc -z -v 10.0.2.15 30-60 |

-z will instruct NC to just scan for open ports and not to send any data to them.
-v tells the info about verbose.
Filter the result using the grep command:
$ nc -z -v 10.0.2.15 2>&1 | grep succeeded |

No connection was successful in this range.
UDP:
Simply add the -u parameter to the script to check for UDP ports in the below-mentioned command:
$ nc -z -v -u 10.0.2.15 30-60 |

There is no UDP port in this range.
Sending Files through Netcat
By establishing a basic client or server model, Netcat may be used to transport data from one host to another. This is accomplished using the -l option on the receiving host to set Netcat to listen on a certain port, then creating a standard TCP connection from multiple computers and transferring the file across it.
Run the below-mentioned command on the receiving end, which opens port 6666 for incoming connections and diverts the output result to the file:
$ nc -l 6666 > linux1.txt |

Linux1.txt is the filename to be opened for writing, and you can change the filename according to your requirements.
Now receiving host will be connected to sending host and sends the file:
$ nc google.com 6666 < linux2.txt |

Creating Web Server Through Netcat
Firstly, create a simple HTML “linux, html” file by using the nano command:
$ nano linux.html |

Type the below mentioned content or you can add content according to your requirement following the html file rules.
<html> <head> <title> Linux<title> <head> <html> |

Save by “Ctrl+S” and close the file by “Ctrl+X”.
$ printf 'HTTP/1.1 200 OK\n\n%s' "$(cat linux.html)" | netcat -l 8888 |

Now in the browser, you can access the file by below-mentioned link:
http://server-ip:8888 |
Conclusion:
Netcat is a basic Linux utility that uses the TCP/UDP protocols for reading and writing data across network connections. It’s intended to be a dependable backend tool that may be operated directly or simply by other applications and programs. This article gives information about the usage of Netcat with TCP and UDP protocol and some other uses like scanning ports, sending files, and creating a web server.


