“This tutorial explains how to use the UFW (Uncomplicated Firewall) Iptables frontend.
After reading this tutorial, you will be able to set up your own firewall rules in a very simple way without needing to learn complicated commands.
This article is optimized for both inexperienced users looking for simple instructions for fast implementation and advanced users who want to become familiar with UFW. The content is mainly valid for Debian-based distributions like Ubuntu.
All instructions described below contain screenshots, making it easy for every Linux user to understand and implement them.”
Getting Started With UFW (Uncomplicated Firewall) in Ubuntu
UWF is included by default in previous Debian-based Linux distributions like Ubuntu. While current versions incorporate Nftables, older versions with Iptables offer the Iptables frontend called UFW.
In case UFW isn’t installed, you can install it using the apt packages manager, as shown below.
sudo apt install ufw -y

Whatever UFW was already installed or you installed it, check its status (If enabled or disabled) by running the following command.
sudo ufw status

As you can see, UFW is inactive; to enable it to use the following command.
sudo ufw enable

Once enabled, use the following syntax to open specific ports:
sudo ufw allow <Port>
For example, to open port 8080, execute the following command.
sudo ufw allow 8080

With UFW, you can specify ports both by their number or by their protocol name. For example, to open the ssh port, you can run the following command.
sudo ufw allow ssh

You could get the same result by replacing “ssh” with “22”.
The syntax to close ports is the same; just replace “allow” with “deny,” as shown below, where port 22 is closed.
sudo ufw deny 22

To specify a protocol (UDP or TCP), add a slash after the defined port, followed by the protocol.
In the example below, port 21 is open specifically through the UDP protocol.
sudo ufw allow 21/udp

To allow TCP traffic, use the same syntax replacing “udp” with “tcp,” as shown in the following screenshot.
sudo ufw allow 21/tcp

You also can deny or allow port ranges, but when doing it, the user must specify the protocol.
In the figure below, the port range between 6000 and 6010 is allowed through the protocol TCP.
sudo ufw allow 6000:6010/tcp

UFW allows you to define default policies, like restrictive or unrestricted.
By defining a restrictive policy, we deny all traffic through all ports and protocols unless we define exceptions.
Contrary to this, when defining an unrestricted policy, all traffic is allowed unless exceptions are defined.
For example, to deny all incoming traffic by default, run:
sudo ufw default deny incoming
To allow all outgoing traffic to run:
sudo ufw default allow outgoing
Not only a specific port can be allowed or denied for either outgoing or incoming, but also an IP address too. When the IP address is specified in the rule, any request from this particular IP is subjected to just the specified rule; for instance, in the following command, it allows all requests from 67.205.171.204 IP address, then it allows all requests from 67.205.171.204 to both port 80 and 443 ports, what this means is any device with this IP can send successful requests to the server without being denied in a case when the default rule blocks all incoming connections. This is quite useful for private servers that are used by a single person or a specific network.
sudo ufw allow from 67.205.171.204

Then we enable incoming traffic from a specific IP to port 80.
sudo ufw allow from 67.205.171.204 to any port 80

The following command enables traffic from a specific IP to port 443.
sudo ufw allow from 67.205.171.204 to any port 443

When a range of IP addresses is involved, it’s difficult to manually add each IP address record to a firewall rule to either deny or allow, and thus IP address ranges can be specified in CIDR notation, which typically consists of the IP address, and the amount of hosts it contains and IP of each host.
In the following example, it uses the following two commands. In the first example, it uses /24 netmasks, and thus the rule is valid from 192.168.1.1 to 192.168.1.254 IP addresses. In the second example, the same rule is valid for port number 25 only. So if incoming requests are blocked by default, now the mentioned IP addresses are allowed to send requests to port number 25 of the server.
sudo ufw allow from 192.168.1.1/24

The command below allows traffic from a specific subnet to port 25.
sudo ufw allow from 192.168.1.1/24 to any port 25

Rules can be removed from the firewall. The following first command lines up each rule in the firewall with a number; then, with the second command, the rule can be deleted by specifying the number belonging to the rule.
sudo ufw status numbered
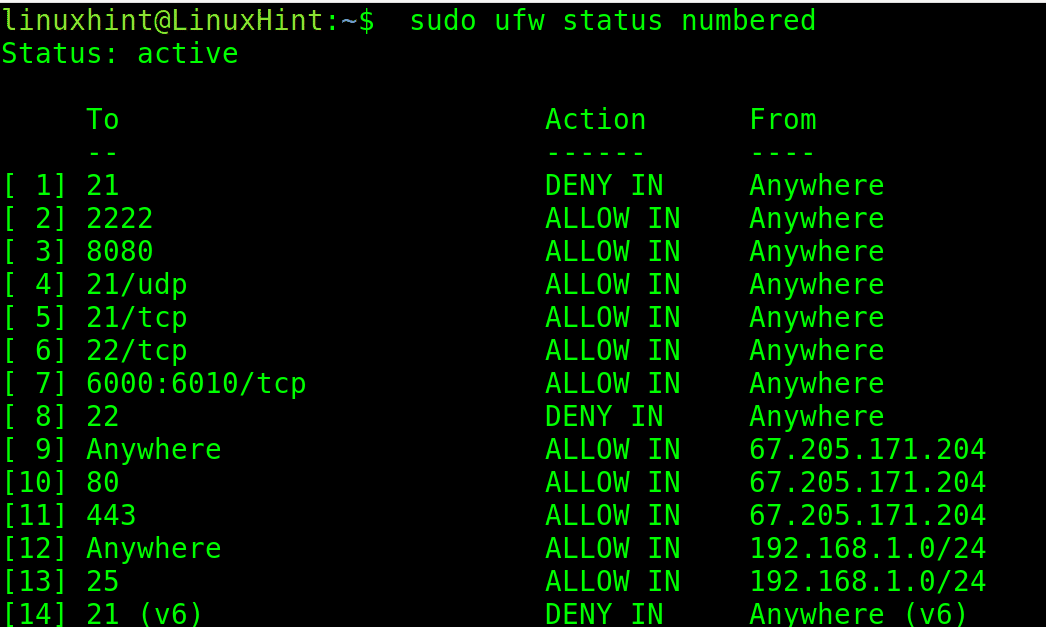
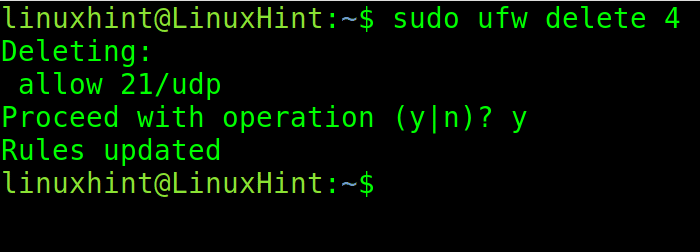
To delete rule 4, which allows traffic through port 21/UDP, run the following command.
When requested to confirm the operation, type “y” and press ENTER.
sudo ufw delete 4
Finally, to start over the firewall configuration, use the following command. This is quite useful if the firewall starts working oddly or if the firewall behaves in an unexpected manner.

Sometimes the default firewall has to be disabled in order to test the network or when a different firewall is intended to install. The following command completely disables the firewall and allows all incoming and outgoing connections unconditionally. This is not advisable unless the aforesaid intentions are the reasons for disabling. Disabling the firewall doesn’t reset or delete its configurations; hence, it can again be enabled with previous settings.
sudo ufw disable

You can go deeper into UFW with the following articles: How to limit ssh with UFW, Working with Debian Firewalls (UFW), and How Do I Check My UFW Log?.
Conclusion
Ubuntu is a Linux operating system that is quite popular among server administrators due to the advanced features provided with it by default. One such feature is the firewall, which is a security system that monitors both incoming and outgoing network connections to make decisions depending on the predefined security rules. To define such rules, the firewall has to be configured prior to its use, and this guide demonstrates how to enable and configure the firewall in Ubuntu with ease, along with other useful tips in configuring the firewall.
As you can see, UFW is a great tool or frontend which simplifies Iptables drastically. Thanks to this, inexperienced users can implement their own security or networking rules without needing to learn Iptables.
It is important to remember UFW is an iptables frontend, irrelevant on newer Linux versions with Nftables. Iptables is discontinued.
Thank you for reading this tutorial explaining UFW basics. Keep following us for additional Linux tips and professional content.
