Setting up multiple IP addresses on a single NIC can be required for various reasons like to bind different services to different IP addresses, to host multiple SSL sites, etc. This post is going to show you how to assign multiple IP addresses to a single NIC in Debian system. If you are using the Ubuntu OS, you can visit our post on How to assign multiple IP addresses to a single NIC in Ubuntu.
Note: We will be using Debian 10 (Buster) for testing the commands and procedure.
Adding Multiple IP Addresses to Single NIC Temporarily
We can add the secondary IP address to the network interface temporarily. The IP address added by this method stays until you reboot the system. Let’s see how to add this:
1. Before configuring the secondary IP address, you can check the current IP address of the system by running the following command:
$ ip a
or
$ ifconfig
This is what the output of the “ip a” command on our system looks like:

You can see the current or main IP address on our system is 192.168.72.189/24 on NIC ens37.
2. Now, we are going to assign the secondary IP address to it.
To assign a secondary IP address to a NIC, the syntax is as follows:
$ ip adder add <ip-address> dev <interface-name>
For instance, to assign 10.1.1.10/8 as the secondary IP to NIC ens37, we will run the following command:
$ ip addr add 10.1.1.10/8 dev ens37
3. Now, run the following command to verify if the secondary IP address has been added to the NIC:
$ ip a

Similarly, you can add more IP addresses to your NIC. However, as discussed earlier, these IP addresses are temporary and cannot survive a reboot.
Removing the Multiple IP addresses from NIC
There are two ways to remove the additional IP addresses from the NIC. The first one is to reboot the system which automatically removes the temporary IP addresses from the NIC. However, rebooting a system is not a practical solution. The alternate and the right way is to manually remove the IP addresses using “ip addr del” command.
Here is the command for removing the IP address from the system:
$ sudo ip addr del <ip-address> dev <interface-name>
For instance, in order to remove the IP address, 10.1.1.10/8 added to the ens37, we would run the following command:
$ sudo ip addr del 10.1.1.10/8 dev ens37
Adding Multiple IP Addresses to Single NIC Permanently
The “ip addr” command temporarily assigns the secondary IP address to a NIC. You can also permanently assign the secondary IP address using the interface configuration file so that it remains persistent even if the system is rebooted. Let’s see how to do this:
1. Before configuring the secondary IP address, you can check the current IP address of the system by running the following command:
$ ip a
or
$ ifconfig
This is what the output of the “ip a” command on our system looks like:

You can see the current or main IP address on our system is 192.168.72.189/24 on NIC ens37. Now we are going to assign the secondary IP address to it.
2. Edit the NIC configuration file as follows:
$ sudo nano /etc/network/interfaces
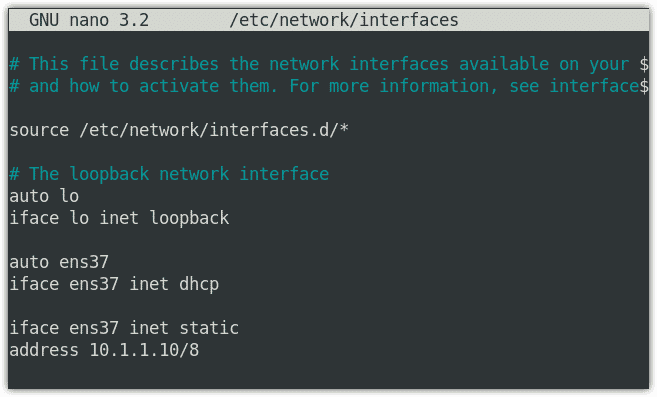
This is how the default interfaces configuration file looks like:

3. Now, under the current configuration lines, add an entry for the secondary IP address using the following syntax:
iface <interface-name> inet static

address <ip-address>
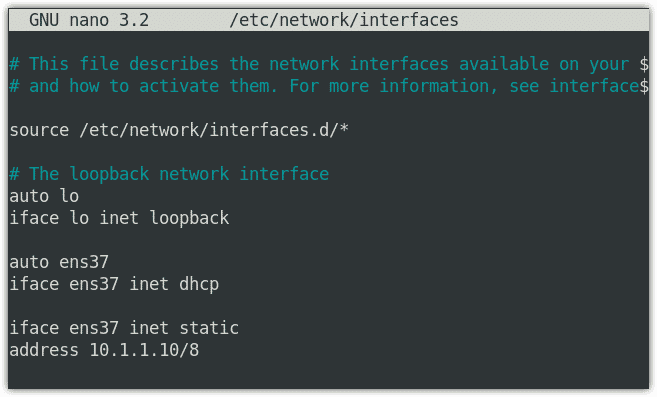
For instance, to assign 10.1.1.10/8 as the secondary IP address to NIC ens37, we will add the following entry in the /etc/network/interfaces file:
iface ens37 inet static

address 10.1.1.10/8

Similarly, you can add more IP addresses to your NIC. Once you are done with the configurations, save and close the interface configuration file.
4. Now, in order to apply the configuration changes you have made to the interfaces configuration file, restart the networking service as follows:
$ sudo systemctl restart networking.service
On the other hand, you can also apply the configuration changes by bringing down and bringing up the network interface.
To bring down the network interface, run the following command:
$ sudo ifdown ens37
Then run the following command to bring it up:
$ sudo ifup ens37
5. Now, run the following command to verify if the secondary IP address has been added to the NIC:
$ ip a
Removing the Multiple IP addresses from NIC
You can also remove the IP address permanently assigned to the network interface. Here is how to do it:
1. Edit the interfaces configuration file:
$ sudo nano /etc/network.interfaces
2. Now, remove the additional IP addresses entries you have added to a NIC except for the main IP address. Once you are done, save, and close the file.
3. Now, restart the networking services to apply the configuration changes as follows:
$ sudo systemctl restart networking.service
On the other hand, you can also apply the configuration changes by bringing down and bringing up the network interface.
To bring down the network interface, run the following command:
$ sudo ifdown ens37
Then run the following command to bring it up:
$ sudo ifup ens37
4. Now, run the following command to verify if the secondary IP address has been removed to the NIC:
$ ip a
In this post, you have learned how to assign and remove multiple IP addresses to and from a single NIC. Based on your preferences, you can either assign the multiple IP addresses temporarily or permanently as described in this post.


