PDF is one of the most popular file formats in use today. It is used for exchanging electronic files including images, documents, and web pages. PDF file preserves the format of the document making them more shareable and ensuring that they look the same on every device including laptops, smartphones, and tablets. Among many PDF readers, Foxit reader is a popular PDF Reader that lets you create, read, print, sign, and distribute PDF files irrespective of where you are or what device you are using.
In this post, we will install Foxit reader on the CentOS system.
Note: The methods described here have been tested on CentOS 8 system.
Installing Foxit Reader on CentOS
On CentOS, the Foxit PDF Reader can be installed using the package available at the Foxit website. Follow the steps below for the installation of Foxit PDF Reader:
Step 1: Downloading Foxit
To download Foxit PDF Reader, you can go to the Foxit PDF Reader Downloads page and download Foxit PDF Reader (32-bit or 64-bit) for your CentOS system.
Alternatively, you can download Foxit PDF Reader using the commands below:
If your CentOS system is 32-bit, then use the command below to download Foxit Reader 32-bit setup:
$ wget https://cdn01.foxitsoftware.com/pub/foxit/reader/desktop/linux/2.x/2.4/en_us/FoxitReader.enu.setup.2.4.4.0910.x86.run.tar.gz
If your CentOS system is 64-bit, then use the command below to download Foxit Reader 64-bit setup:
$ wget https://cdn01.foxitsoftware.com/pub/foxit/reader/desktop/linux/2.x/2.4/en_us/FoxitReader.enu.setup.2.4.4.0911.x64.run.tar.gz
The downloaded file will be an archive file ending with the tar.gz extension.

Step 2: Extracting Archive
You will need to extract the downloaded archive file. Use the command below to do this:
For 32-bit CentOS:
$ tar -xvf FoxitReader.enu.setup.2.4.4.0910.x86.run.tar.gz
For 64-bit CentOS:
$ tar -xvf FoxitReader.enu.setup.2.4.4.0911.x64.run.tar.gz
If your downloaded Foxit Reader version number is different, make sure to replace it in the above commands.
After extraction, you will find the extracted file FoxitReader.enu.setup.2.4.4.0911.x64.run in the same directory containing the archive file.

Step 3: Installing Foxit Reader
Now you can install the Foxit PDF Reader using the .run file you extracted in the step 2. Use the command below to install Foxit PDF Reader:
For 32-bit CentOS:
$ ./FoxitReader.enu.setup.2.4.4.0910.x86.run
For 64-bit CentOS:
$ ./FoxitReader.enu.setup.2.4.4.0911.x64.run
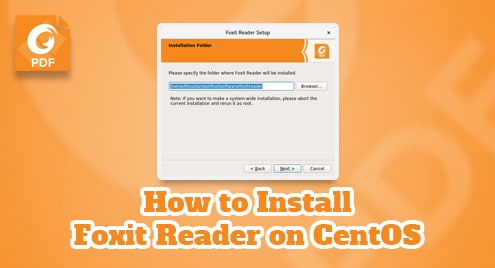
After running the command, the installation wizard will be started. The following window is showing you the location where Foxit Reader is going to be installed. Click Next to start the installation process.

Then in the next window, accept the license by selecting the I accept the license and clicking Next.

The next screen is showing that the installation of Foxit Reader has been initiated.

Now the following screen shows that installation has been completed. It is also showing the location where Foxit Reader has been installed. Click Finish.

To open Foxit Reader, press the super key and type foxit in the search bar. From the search results listed, click on Foxit Reader icon to open it.

Uninstall Foxit Reader
In order to uninstall Foxit Reader, open the Terminal application and go to the directory where the Foxit Reader is installed. You can use the command below to do so:
$ cd ~/opt/foxitsoftware/foxitreader/
Now you can uninstall Foxit Reader using the maintenancetool script located in this directory. Use the command below to do so:
$ ./maintenancetool
Then the below window will appear. Click Uninstall to uninstall Foxit PDF Reader.

When the following screen appears, click Finish.

This is how you can install Foxit PDF Reader on the CentOS system. Now you can start using Foxit PDF Reader to read, print, share, and sign PDF files. We also shared the uninstallation procedure of Foxit Reader in case you need to do so.

Karim Buzdar holds a degree in telecommunication engineering and holds several sysadmin certifications including CCNA RS, SCP, and ACE. As an IT engineer and technical author, he writes for various websites.


