Introduction
In this article, we are going to learn how to install, configure, and use the git version control system on Debian effectively. We will cover essential git commands, so you can configure and use git on Debian or related Linux distributions like Ubuntu or Linux Mint. For the course of this tutorial, I am using Debian 10 Buster Edition. You can either use the same distribution or any derived one. Let us begin!
Why use Git?
Git is a version control system, and it helps a user to keep history of certain files which are continuously edited. Due to rapid edits, it is impossible to keep the history of each change. Therefore, there are higher chances that the user may lose some data if something goes wrong. This is where git helps users to avoid unwanted circumstances. Git is not limited to individual users. It is even more helpful in a team environment. Each and every logged user who pushes changes can track their and other team members’ changes which takes teamwork to the next level.
Let’s Configure Git
1. First we’ll install git on our Debian system using the following command
$ sudo apt install git
![]()
Once installed, you can check the version using git –version command, and it should display the following results:

2. Now we will configure git on priority, so when it comes to using git features we do not run into problems.
Register your name and email using the following commands:
$ git config --global user.name "John Doe"
$ git config --global user.email [email protected]
Above commands will register both your name and email. Once done successfully, your name and email will display when you push the changes to the remote repository. Read my article on how to configure a remote repository on LinuxWays.
Get Using Git
We have installed git and configured it successfully. Now, we are going to use git for our benefits.
1. Create a new directory using mkdir newRepo command

2. Change the directory using cd /newRepo command
3. We will now initialize the folder as a git repo. Following command will help us with this:
$ git init

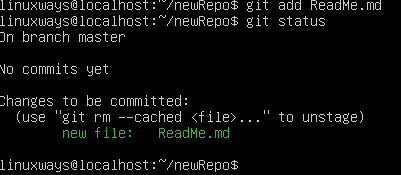
4. Now we have a local repo and we will add some files into it then we’ll check the status.
$ git add ReadMe.md
$ git status

5. We have a new file in our local repository. Now we are going to commit and push the file using the following commands.
$ git commit -m “this is my first git commit”
$ git push origin master
Conclusion
In this article, we have covered a significant breadth of Git commands which are used on a daily basis. Many individual developers and teams do not go beyond these commands in their routine. All of the commands are valid for Debian, Ubuntu, and related distributions which follow apt packaging systems. On LinuxWays, we strive to publish beginner to advanced articles. We will cover more git commands in a future article. If you have any questions, do not hesitate to ask in the comments.


