Network settings play the most important and the founding role in any server configuration. In this article we are going to show you the use of two most important and commonly used utilities in Linux systems that is NMTUI and NETPLAN. Using both these utilities you can configure the network settings by assigning the right IP, subnet mask and the Gateway. NMTUI (Network Manager Text User Interface) is an alternative to NMCLI (Network Manager Command Line Interface). Whereas Netplan is a Linux command-line utility that uses YAML descriptive files to configure network interfaces.
Prerequisites:
The prerequisites for this article is to have a Linux system running a Debian or RHEL Operating System with sudo rights.
Step 1: System Login
Let’s start by login to your system. You want to configure its network interface using NMTUI or Netplan on a Debian system which is Ubuntu in our case.
Open its shell terminal or connect to its console from your host server as shown below.

Step 2: Checking Network Interface
To check the network interface we are going to make use the ‘ifconfig’ or ‘ip’ command as below.
# ip a
# ifconfig

Here you can see the detail of its interface so in the next step we are going to assign an IP to this interface.
Step 3: Assigning IP Using Netplan
Netplan utility come by default in Ubuntu 20 LTS, so we just need to configure it using its configuration file.
Open its network interface .yaml configuration file using any of your favorite editor to add its required parameters in YAML Format.
# vim /etc/netplan0/00-installer-config.yaml
# This is the network config written by 'subiquity'

network:

version: 2

ethernets:

ens160:

addresses: [xx.xx.xx.xx/24]

gateway4: xx.xx.xx.x

nameservers:

addresses: [8.8.8.8, 8.8.4.4]
Save and close the file using ‘:wq!’ and then run the ‘netplan apply’ command to make the configuration effective.

Here you can see that its network interface is up with our assigned IP address.
To know more about using the netplan you can make use of its help parameters.
# netplan –help
usage: /usr/sbin/netplan [-h] [–debug] …
Network configuration in YAML
optional arguments:
-h, –help show this help message and exit
–debug Enable debug messages
Available commands:
help Show this help message
apply Apply current netplan config to running system
generate Generate backend specific configuration files from /etc/netplan/*.yaml
info Show current netplan version and available features
ip Retrieve IP information from the system
try Try to apply a new netplan config to running system, with automatic rollback
Step 4: Assigning IP using NMTUI
NMTUI is an alternative tool to configure network interfaces on a Linux systems, it stands for Network Manager Text User Interface. It available on default repository of RHEL/CentOS 7 and later version but if you are using Ubuntu 20 LTS like in our case then you have to install it first.
To install NMTUI on Ubuntu run the command below on your terminal.
# apt install network-manager
After installation, run the below command to run this on your system and its interface will pop up.
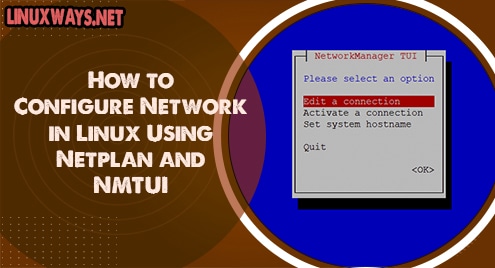
# nmtui

Here as shown, you can edit or activate any other connection interface as well as set the system hostname.
Let go for Edit connection to configure your IPv4 configurations as per your network addresses.

Make sure to check automatically connect option and then select ‘OK’ to save the changes. To apply the made changes run the command below to restart your network services.
# systemctl restart network
And that’s it, check your IP status and it should be assigned to your connected interface.
Conclusion:
In this article you have learned about setting up your network interface using Netplan and NMTUI. Setting up the network interfaces is one of the most basic step that every system administrator and server engineers have to do to make it accessible over the network. I hope you have found this article much helpful in configuring your system network.

Karim Buzdar holds a degree in telecommunication engineering and holds several sysadmin certifications including CCNA RS, SCP, and ACE. As an IT engineer and technical author, he writes for various websites.


