Kali Linux Purple is a variation of the official Kali Linux operating system designed and optimized by the Kali Linux developers keeping in mind the security-focused scenarios. Kali Linux Purple includes additional tools and features that are designed specifically for defensive security. Further, Kali Linux Purple offers a more advanced version of existing Kali Linux tools with extra for security testing, web application, password cracking, and more.
If you are a Kali Linux user and looking to dive deep into the world of cybersecurity, you should give Kali Linux Purple a go. In this guide, you will find the steps required to install Kali Linux Purple on VMware (Virtualization tool).
Outline:
How to Install Kali Linux Purple on VMware
Before installing Kali Linux Purple on VMware, you will first require downloading and installing the VMware application on your system. VMware is a virtualization tool used to run an operating system onto the other operating system in a separate environment. It doesn’t coincide with the previously installed operating system, allowing you the freedom to use multiple operating systems simultaneously.
There are two versions of VMWare you can download and use on your system: VMware Workstation Pro and VMware Player. VMware Workstation Pro provides a 30-day trial right after you install this tool on your system. After 30 days, you will have to purchase this tool, however, you can freely use VMware Player on your system which offers similar functionality.
Note: You can download VMware Workstation Pro and VMware Player for Windows and Linux PC. For Mac, you have to go with downloading and installing VMware Fusion.
After you download and install VMware on your system, you will then be required to download the Kali Linux Purple ISO file on your system. Navigate to Kali Official website, scroll down, and hit the Download button to begin downloading the Kali Linux Purple ISO file on your system:
Once the Kali Linux Purple ISO file is downloaded, open VMware on your system. Here, I am using VMware Workstation Pro on Windows, which you can open from the Start menu:

After running the VMware application, use the following steps to install Kali Linux Purple on VMware:
Step 1: First, create a new Virtual Machine on VMware:

Step 2: Then go with the Typical (recommended) option:

Step 3: Now, select the Installer disk image file (iso) option and load the downloaded Kali Linux Purple ISO file in VMware from the system using the Browse button:

Step 4: After loading the ISO file, move toward the next step:

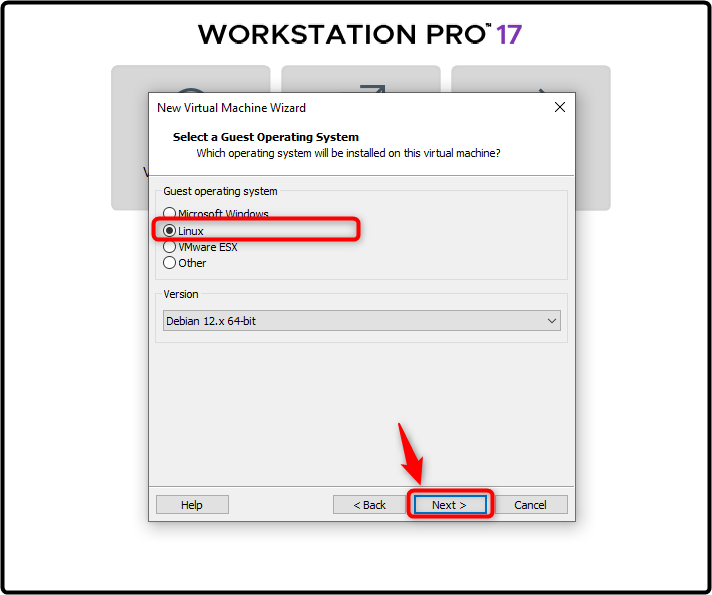
Step 5: Now, select the Guest operating system, since we are installing Kali Linux Purple, go with the Linux option, and choose Debian 12.x 64 Bit:

Step 6: Choose the Virtual Machine name and the location where to save the Kali Linux Purple file:

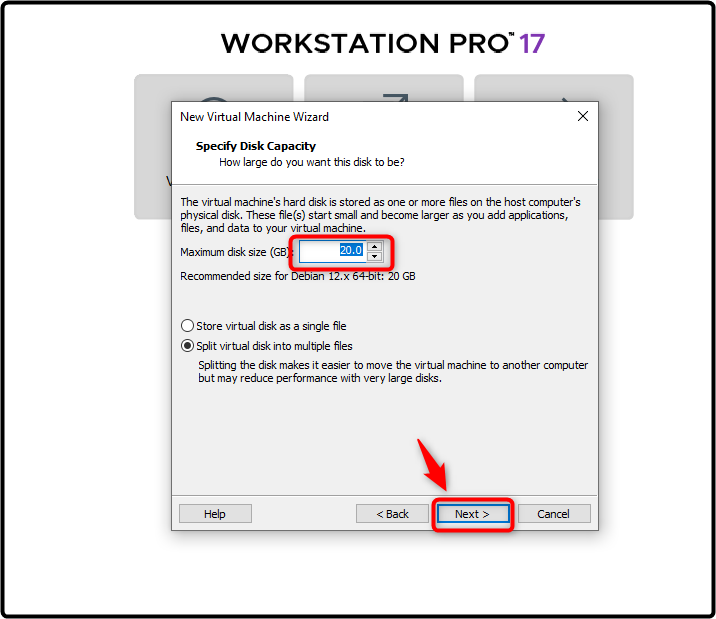
Step 7: Specify the disk capacity for Kali Linux Purple, it is advised to use at least 20GB of disk space for Linux systems:

Step 8: You can also customize your settings for Kali Linux Purple by using the Customize Hardware option, or clicking the Finish button to complete the process:

Step 9: Now, power on your Kali Linux Purple machine using the Power on this virtual machine option:

Step 10: Then use the Graphic install option from the Kali Linux menu to begin setting up Kali Linux Purple installation on VMware:

Step 11: Choose your preferred language for Kali Linux Purple:

Step 12: Then choose your location accordingly:

Step 13: Select the keyboard language and press Enter:

Step 14: Enter the hostname for Kali Linux Purple in this step:

Step 15: Leave the domain box empty and press the Enter button:

Step 16: Create a user account for Kali Linux Purple by entering the full username here:

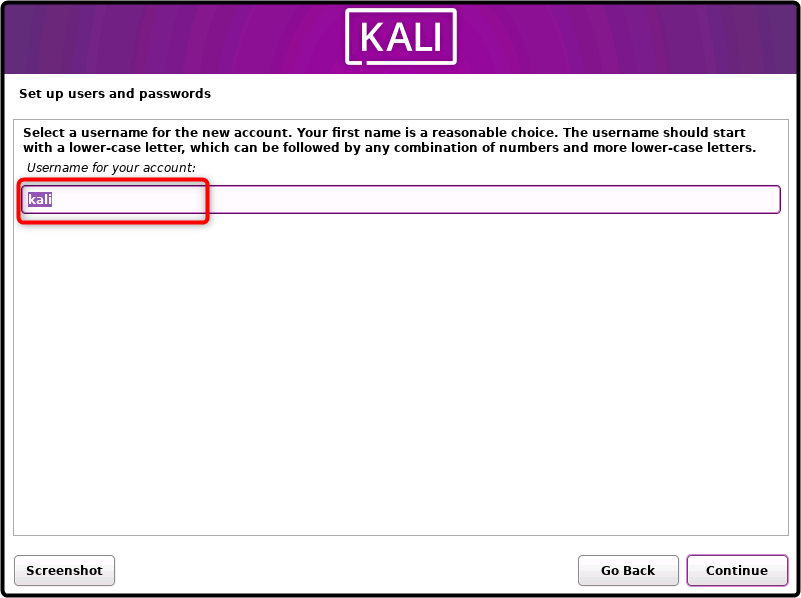
Step 17: Then enter the username of your account:

Step 18: Set the password for the user account you have created in the previous step:

Step 19: Then select your timezone for this machine:

Step 20: Now choose the default partitioning disk option, i.e, Guided-use entire disk:

Step 21: Go with the default option here as well by pressing the Enter button:

Step 22: Follow the onscreen recommended option to move forward:

Step 23: Then save the changes by selecting the default Finish partitioning option:

Step 24: Save changes to the disk by going with the Yes option here:

This will begin installing Kali Linux Purple on VMware, wait until the process is done:

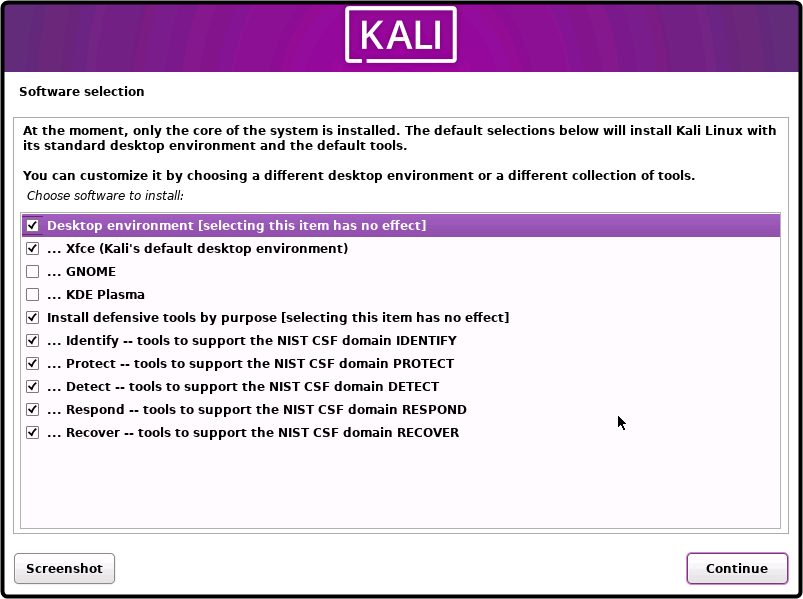
Step 25: During the installation, you must select the software, you can go with the default options here and press Enter to move forward:

Step 26: You should also install the GRUB bootloader for Kali Linux Purple by using the Yes option:

Step 27: Select the /dev/sda option for the GRUB bootloader:

Step 28: The process will then take some time to finish the installation, wait until you see the Installation Complete window. Once it appears, simply press the Enter button to reboot the virtual machine:

Step 29: Enter your username and password that you have created earlier for Kali Linux Purple:

Once the correct information is entered, you will see the Kali Linux Purple desktop environment on VMware. It ensures that you have successfully installed Kali Linux Purple on VMware:

Conclusion
Kali Linux Purple is a newly introduced flavor of the Kali Linux operating system that includes advanced security tools and a user-friendly interface. You can install Kali Linux Purple on VMware by first downloading and installing the VMware application based on your system. Then download the Kali Linux Purple ISO file, load it in VMware, and follow the installation steps to create a Virtual Machine on VMware. You must provide at least 20GB disk space and 2GB RAM memory for Kali Linux Purple. After creating the Kali Linux Purple Virtual Machine, run it and follow the step-by-step guide mentioned above to install the system on VMware.
By day, I am an engineer and researcher, building bridges and figuring out how the universe works. But when the clock strikes five, I turn into a wordsmith!
I write about my adventures on my blog, sharing tips and tricks to help others join the tech fun. I have worked on Raspberry Pi, Ubuntu, Debian, and Laptops. Right now, I have accepted the challenge of working on the Kali Linux system, and with my vast expertise in Linux systems, I will help users overcome the challenges through my blogs.


