Kali Linux is a Debian-based Linux distribution that is used by security professionals and ethical hackers for network troubleshooting, penetration testing, and more. Kali Linux can be installed on different devices, either Computer, MacBook, Chromebook, or Android phone. Apart from that, you can also install Kali Linux on Windows 11 by using the Windows Subsystem for Linux (WSL) feature. The advantage of WSL is that you don’t need to install Kali Linux separately on your computer, instead, you can use Windows 11 normally and quickly switch to Kali Linux within seconds.
In this guide, you will learn:
- What is Windows Subsystem for Linux
- Prerequisites for Installing Kali Linux on Windows 11
- How to Install Kali Linux on Windows 11
- How to Access Kali Linux Desktop on Windows 11
- Bonus Method: How to Fix Repository Update Issue in Kali Linux
- Conclusion
What is Windows Subsystem for Linux
Windows Subsystem for Linux, commonly referred to as WSL is a feature in Windows 11 that allows you to directly run Linux environments on your Windows computer. With WSL, you won’t require setting up complicated Linux Virtual Machines or rebooting your system to switch to Linux and Windows systems. Instead, you can run Linux from the Windows start menu right after installing it on WSL.
Prerequisites for Installing Kali Linux on Windows 11
There are some prerequisites you must follow if you want to install Kali Linux on Windows 11 using WSL. These prerequisites include:
- Windows 11 64-Bit Version 1903 or higher having Build 18362 or higher
- WSL Installed on Windows 11
How to Install WSL on Windows 11
You can install WSL on Windows 11 from:
How to Install WSL on Windows 11 from Command Prompt or PowerShell
You can quickly install WSL on Windows 11 from Command Prompt or Windows PowerShell by opening any shell on the terminal as an Administrator and using the below-given command:
The above command will install WSL on Windows 11 and the process may require rebooting the system to apply the changes.
How to Install WSL on Windows 11 from Windows Features
You can also install WSL on Windows 11 from Turn Windows Features on or off, which you can open from the Windows Start Menu by searching it:
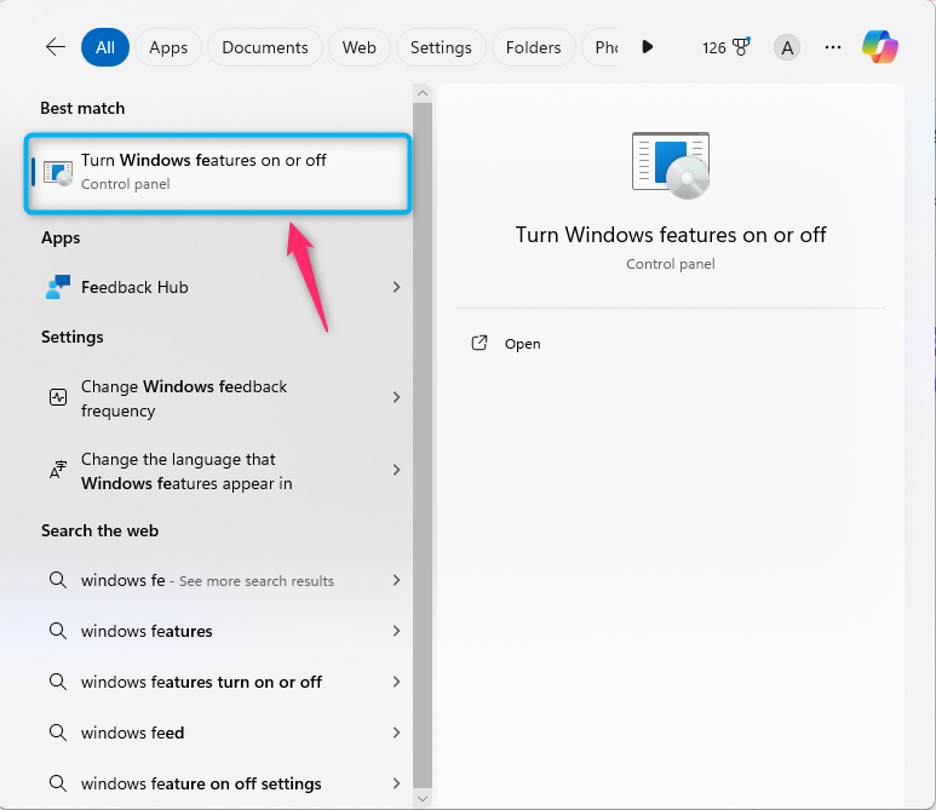
Once opened, scroll down, checkbox the Windows Subsystem for Linux, and select the OK button to begin the installation.
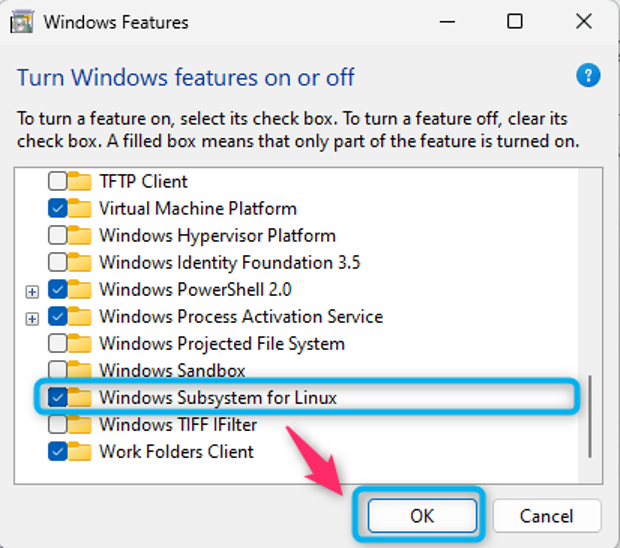
After the Windows Subsystem for Linux selection is done, restart the computer so that the system will apply the changes.
How to Install Kali Linux on Windows 11
To install Kali Linux on Windows 11, follow the below-given steps:
Step 1: Open Windows PowerShell
First, run Windows PowerShell as an Administrator on Windows 11 from the main Start Menu:
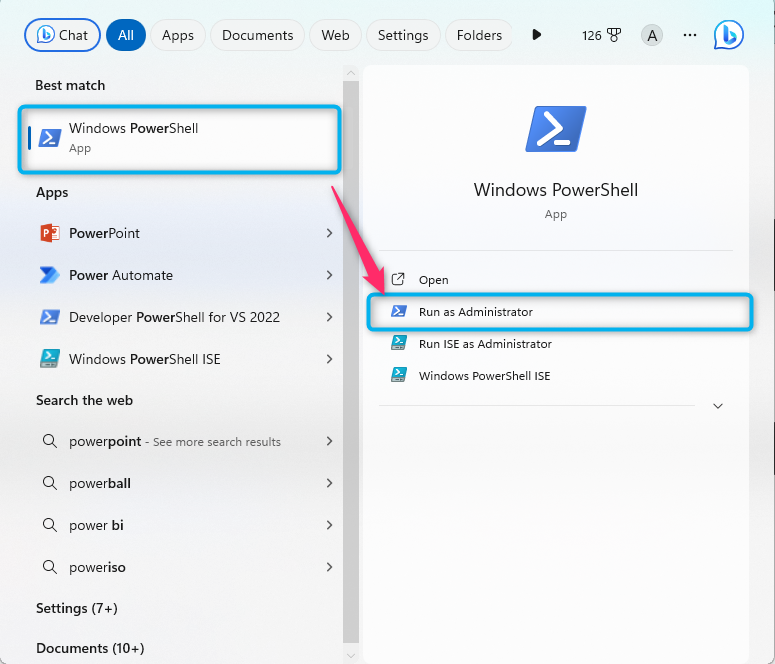
Note: You can also open Windows Command Prompt instead of Windows PowerShell.
Step 2: Enable Virtualization Feature on Windows 11
Now, enable the Virtualization feature on Windows 11 by running the following command:

The above command will prepare your system to host virtual machines so that you can run different operating systems within your Windows environment.
Step 3: Enable Microsoft Windows Subsystem
You should also enable the Microsoft Windows Subsystem for Linux on your computer so that you can directly run other operating systems without needing a separate virtual machine. To enable Microsoft Windows Subsystem for Linux, you can use the below-given command:

Step 4: Check Available Distribution (Optional)
If you want to check the list of available Linux distributions that can be installed through WSL, use the below-given command:
It will provide you with the list of different operating systems that can be installed on Windows 11 through WSL:

Step 5: Set the Default WSL Version
It is recommended to set the default WSL version to 2 for future Linux distribution installation through WSL. The reason is that WSL 2 utilizes the full-linux kernel instead of emulating one like WSL, thus improving the overall performance. Further, it also provides compatibility with several Linux features and tools, thus you should switch to the updated WSL 2 version on Windows 11 from the following command:

Step 6: Install Kali Linux on Windows 11 through WSL
After you set the default WSL version, it’s now time to install Kali Linux on Windows 11 through WSL, you can do it from the following command:
During the installation, follow the onscreen prompt to set the username and password for the Kali Linux environment:

After you enter the username and password, the process will move you into the Kali Linux system with your desired username.

At this stage, the process of installing Kali Linux on Windows 11 is completed in case you only want to use the Kali Linux terminal.
How to Access Kali Linux Desktop on Windows 11
To access the Kali Linux desktop on Windows 11 from WSL, you must install the kex utility. kex is a command-line tool that will serve as a bridge between the Kali Linux environment running with WSL and the GUI interface on your Windows desktop.
To install kex utility on Kali Linux, use the below-given command:

After you complete the installation, run the below-given command to launch kex in server mode.
Initially, you have to set the password for kex that will run your Kali Linux system:

Once the password is set, the Win-Kex client will start running on WSL:

After the client is loaded, you will be able to view the Kali Linux desktop interface on WSL:
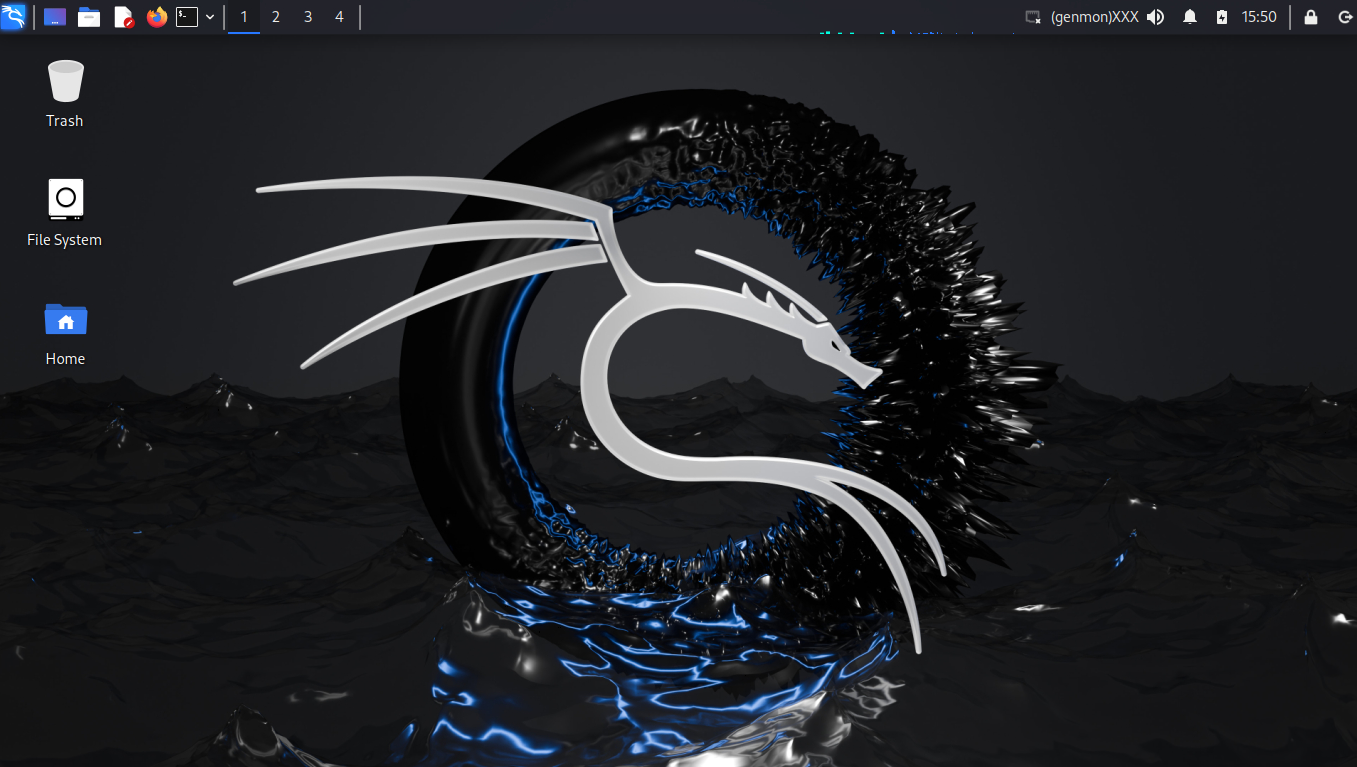
At this stage, you have completed the installation of the Kali Linux desktop on Windows 11 with WSL.
Bonus Method: How to Fix Repository Update Issue in Kali Linux
While running the Kali Linux GUI on Windows 11 WSL with kex, you may encounter issues while updating the repository or installing applications on the system. This problem may occur due to network-related issues and you can fix it by following the below-given steps:
Step 1: Login To Root User
Open your Kali Linux terminal and switch to the root user account using the below-given command:
Step 2: Delete the resolv.conf File
Once you are logged in as a root user, simply run the below-given command to delete the resolv.conf file from Kali Linux:
Step 3: Add Server Details
Now, add the server information inside the newly created resolv.conf file, all this can be done from the following command:
Step 4: Save Changes to the File
Once the server information is added, you should save the file by pressing the CTRL+X key, and add Y on the prompt to approve the changes. Then you can close the file by using the Enter button.
Once you have successfully performed the above steps, you will then be able to update or install applications on your Kali Linux system installed through WSL.
Conclusion
Installing Kali Linux on Windows 11 through WSL is a useful process that allows you to run Kali Linux directly on your Windows environment. However, before installing Kali Linux on Windows 11, you must install WSL on Windows 11, which you can do from Command Prompt/PowerShell or Windows Features. After that, open Command Prompt or Windows PowerShell, enable the Virtualization feature and Windows Subsystem. Then install the Kali Linux system on Windows 11 using wsl –install kali-linux command. You can also install the kex utility on the Kali Linux system to access the Kali Linux desktop on Windows 11 through WSL.
By day, I am an engineer and researcher, building bridges and figuring out how the universe works. But when the clock strikes five, I turn into a wordsmith!
I write about my adventures on my blog, sharing tips and tricks to help others join the tech fun. I have worked on Raspberry Pi, Ubuntu, Debian, and Laptops. Right now, I have accepted the challenge of working on the Kali Linux system, and with my vast expertise in Linux systems, I will help users overcome the challenges through my blogs.
