DHCP (stands for dynamic host configuration protocol) dynamically assigns unique IP addresses and other information to client systems. Some of the information that is assigned by DHCP includes hostname, domain name, IP address of the default gateway and DNS server, etc. It saves the system administrator from the hassle of manually assigning IP addresses and related information to each of the client systems. Usually, in the home or small company setup, routers serve the role of a DHCP server. However, in a large setup, we need to configure a dedicated server to serve as a DHCP server. In Linux, you can easily set up a DHCP server and assigns IP addresses to clients.
In this tutorial, we will demonstrate how to configure DHCP in Linux to automatically assign IP addresses to clients.
How DHCP works
Let’s explain a little about how DHCP works:
Consider a scenario where the client and DHCP server are connected to the same wired network.
- When a client machine is turned on, it sends a broadcast message DHCPDISCOVER to every device on the network.
- When this message reached the DHCP server, it sends back a DHCPOFFER message with an IP address to client.
- The client then sends a DHCPREQUEST to DHCP server to request for this IP address.
- The DHCP server then sends DHCPACK to acknowledge the request and grants the client with an IP address.
Prerequisites
- Minimum two Linux machines (For DHCP server and client)
- User with sudo privileges
- Static IP configured on DHCP server
Note:
For the demonstration purpose, we have used three Linux machines which were on the same LAN. You can think of them as all are connected through each other via switch.
DHCP server
For DHCP server, we have used:
- Ubuntu 20.04 LTS with static IP “192.168.9.1” and hostname “ubuntu”
DHCP client
For DHCP client, we have used two machines:
- Ubuntu 20.04 with hostname “mypc”
- Mint 20 with hostname “mint”
DHCP Server Installation
First, update the system repository index in your system. Issue the below command in Terminal to do so:
$ sudo apt update
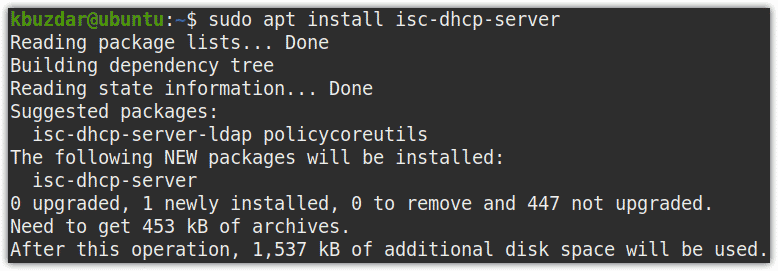
Now issue the following command in Terminal to install DHCP server:
$ sudo apt-get install isc-dhcp-server -y
DHCP Server Configuration
Before configuring a Linux system as a DHCP server, make sure it has a static IP address configured so that clients can easily connect to it. Otherwise, it will be difficult for the clients to find which DHCP server to connect to.
In the /etc/default/isc-dhcp-server file, you will need to specify the interface on which DHCP server will listen to. Issue the following command in Terminal to edit this file:
$ sudo nano /etc/default/isc-dhcp-server
In the INTERFACESv4 entry, specify the interface you want the DHCP server to listen to such as ens33, eth0, eth1, etc.
INTERFACESv4="interface_name"
In our scenario, the interface is ens33, so the entry would change to:
INTERFACESv4="ens33"
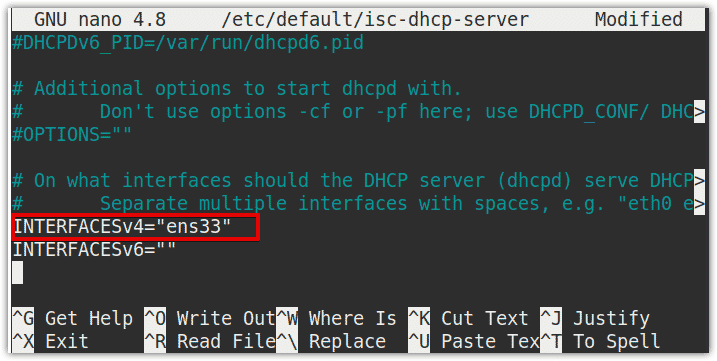
Once you have configured the file, save, and close it.
Now we will configure DHCP Server using its default configuration file located at /etc/dhcp/dhcpd.conf.
Edit the /etc/dhcp/dhcpd.conf file as follows:
$ sudo nano /etc/dhcp/dhcpd.conf
Uncomment the following line by removing the # symbol before it.
authoritative;
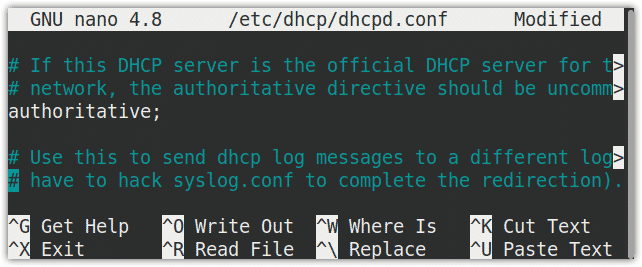
Also, add the following lines in the file:
default-lease-time 600;

max-lease-time 7200;

# subnet

subnet 192.168.9.0 netmask 255.255.255.0 {

# range of subnet

range 192.168.9.5 192.168.9.15;

# gateway address

option routers 192.168.9.1;

# DNS server address

option domain-name-servers 8.8.8.8, 8.8.4.4;

}
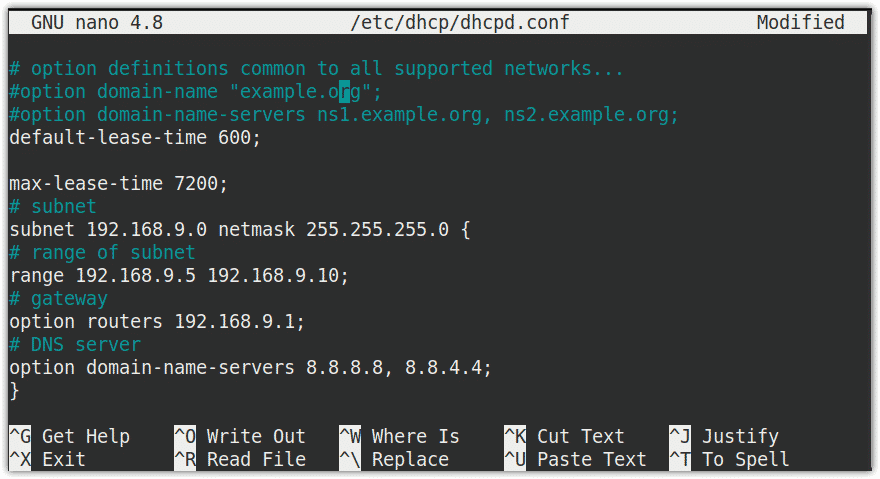
Once you have configured the file, save, and close it.
Assign a static IP address to clients from DHCP server
The DHCP server issues dynamic IP addresses to the clients by default. However, you can also configure it to assign fixed or static IP address to clients. Fixed addresses are required for some network devices like printers, routers, or when you need to remotely connect a device from outside. To assign a static IP address to a specific machine, you will need its MAC address.
Let’s say we want to assign a client with MAC address 00:0c:29:c1:d5:d4 a fixed IP 192.168.1.13 every time.
Edit the /etc/dhcp/dhcpd.conf file and add host entry containing the MAC address of the client and the fixed IP address you want to assign to the client:
host mint {

hardware ethernet 00:0c:29:c1:d5:d4;

fixed-address 192.168.9.13;

}
Note: Fixed IP address should not be from the range of the Dynamic IP range.
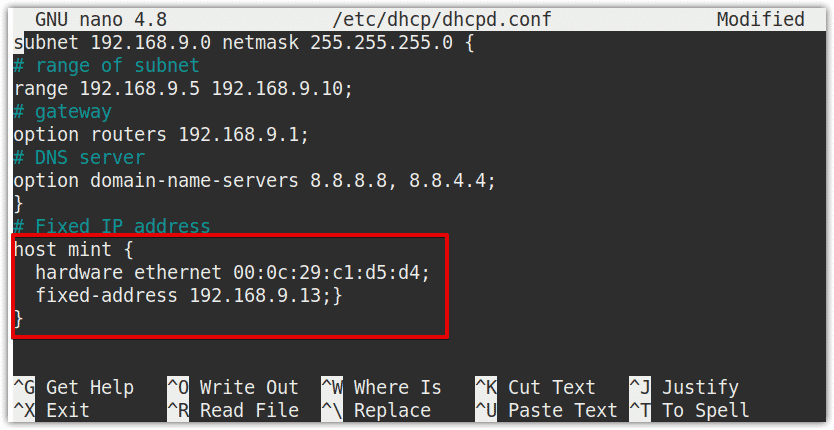
Now, every time the client with the matching MAC address (00:0c:29:c1:d5:d4) sends a DHCPDISCOVER message to the DHCP server, will receive the same IP address 192.168.9.13.
Restart DHCP service
Once you are done with the configurations, restart the DHCP server service. Issue the below command in Terminal to do so:
$ sudo systemctl restart isc-dhcp-server.service
Now verify the status of the DHCP server using the below command:
$ sudo systemctl status isc-dhcp-server.service
The following output shows the DHCP service is active and running successfully without any errors.
 DHCP Client Configuration
Now we will configure two client machines. One client will be assigned random IP from the subnet range defined in the configuration file. The other client will be assigned the static IP.
By default, dynamic IP addressing is configured in Ubuntu OS. However, if it is using the static IP address, you can configure it to obtain an IP address from the DHCP server.
Client 1- Obtain Dynamic IP address from the DHCP server
First, find your network interface name using the following command:
$ ifconfig
Once you have found the interface name, issue the following command in Terminal to configure the network interface:
$ sudo nano /etc/network/interfaces
Insert the below lines in the file:
auto <interface_name>

iface <interface_name>inet dhcp
In our case, it would be:
auto ens33

iface ens33 inet dhcp
Save and close the file and restart the network-manager service using the following command in Terminal:
$ sudo systemctl restart network-manager.service
Now run the ifconfig command to verify the IP address of your client.
$ ifconfig
You can see in the following output that the client has received the IP address 192.168.9.5 which is from the subnet range defined in the DHCP server configuration.

In order to find the IP address of the DHCP server, issue the following command in Terminal:
$ sudo grep -R “DHCPOFFER” /var/sys/log
From the output, you can verify the IP address is assigned by 192.168.9.1 which is the IP address of our DHCP server.

In case, there is no IP address obtained by the client machine from the DHCP server, then use the following commands to release/renew the IP address:
$ sudo dhclient -r

$ sudo dhclient -v
Now run the ifconfig command to verify the IP address of the client. This time hopefully the client will receive the IP address from the DHCP server.
Client 2- Obtain Static IP address from the DHCP server
For our second client machine, we have added the static/fixed IP address entry in the DHCP server configuration file. On the client machine, first configure the interface to acquire the IP address from the DHCP server.
Find your network interface name using the following command:
$ ifconfig
Once you have found the interface name, issue the following command in Terminal to configure the network interface:
$ sudo nano /etc/network/interfaces
Insert the below lines in the file:
auto <interface_name>
iface <interface_name>inet dhcp
In our case, it would be:
auto ens33

iface ens33 inet dhcp
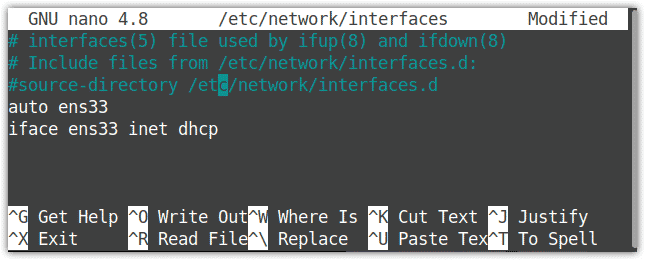
Now save and close the file and restart the network-manager service using the following command in Terminal:
$ sudo systemctl restart network-manager.service
Now run the ifconfig command to verify the IP address of your client.
$ ifconfig
You can see in the following output that the client has received the fixed IP address 192.168.9.13 from the DHCP server. This is the same fixed IP address we have added in the DHCP configuration file.

In order to find the IP address of the DHCP server, issue the following command in Terminal:
$ sudo grep -R “DHCPOFFER” /var/sys/log
From the output, you can verify the IP addresses are assigned by 192.168.9.1 which is our DHCP server.

In case, there is no IP address obtained by the client machine from the DHCP server, then use the following commands to release/renew IP address:
$ sudo dhclient –r -v

$ sudo dhclient -v
Now run the ifconfig command to verify the IP address of the client. This time hopefully the client will receive the IP address from the DHCP server.
View assigned IP addresses by DHCP server
From the DHCP server, you can also verify the dynamic addresses assigned by it to the clients.
In the DHCP server machine, run the following command in Terminal to list the addresses assigned by the DHCP server:
$ dhcp-lease-list
In the following output, you will see only the IP addresses dynamically assigned by the DHCP server to a client. Remember, it will not list the static IP addresses that are issued by the DHCP server.

In this article, you have learned how to install and configure the DHCP server in the Linux system and assign dynamic and fixed IP addresses to the clients. It takes just a few simple steps to configure the DHCP server in a Linux machine. Once you have configured it, it will automatically assign the assigning IP addresses and related information to each machine on the network.

