
Telnet is a network protocol used for connecting to remote systems through a command-line interface. It can be used to configure remote devices such as routers, switches, servers, etc. Telnet can also be used to test if a TCP port on a remote system is open or not.
In today’s guide, we will install the Telnet server and client on Ubuntu. We will be using the two Ubuntu 20.04 LTS machines. On one Ubuntu machine, we will install Telnet server. On another Ubuntu machine, we will install the Telnet client. Then we will connect to the Telnet server using the Telnet client.
Note: Telnet is not a secure protocol because the Telnet session between server and client is unencrypted. You can use it for testing the connectivity to TCP ports. However, for connecting to the remote system, it is recommended to use SSH.
Installing Telnet Server on Ubuntu
Ubuntu default repository contains the Telnet server package. Therefore, it can be simply installed with the apt command. On one Ubuntu machine, install Telnet server by running the command below in the Terminal:
$ sudo apt install telnetd xinetd
After running the above installation command, Terminal might prompt you with the y/n option. To continue the procedure, hit y and then hit Enter. It will then install the Telnet server and xinetd on your Ubuntu system.
After installation, the xinetd service starts automatically. You can view the status of the service as follows:
$ sudo systemctl status xinetd.service

If the service does not start automatically, you can manually start it by running the command below:
$ sudo systemctl start xinetd.service
Now create the /etc/xinetd.d/telnet file using the command below:
$ sudo nano /etc/xinetd.d/telnet
Add the below lines the file:
service telnet

{

disable = no

flags = REUSE

socket_type = stream

wait = no

user = root

server = /usr/sbin/in.telnetd

log_on_failure += USERID

}
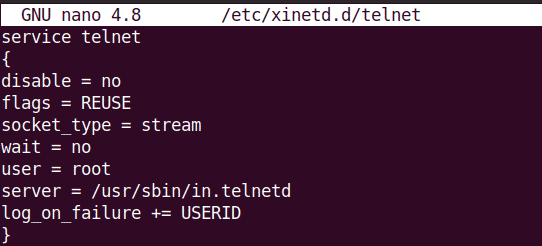
Then save and close the file and restart xinetd.service as follows:
$ sudo systemctl restart xinetd.service
Telnet server uses port 23 for listening to the incoming connections. Therefore, you will need to open this port in your firewall. Run the command below to do so :
$ sudo ufw allow 23
To allow incoming connections to port 23 from only a specific IP or subnet, run the below command instead:
$ sudo ufw allow from <ip or subnet> to any port 23
Installing Telnet Client on Ubuntu
Telnet client is also available in the Ubuntu repository. On your second Ubuntu machine, run the command below in Terminal to install the Telnet client.
$ sudo apt install telnet
After running the above installation command, Terminal might prompt you with the y/n option. To continue the procedure, hit y and then hit Enter. It will then install the Telnet client on your Ubuntu system.
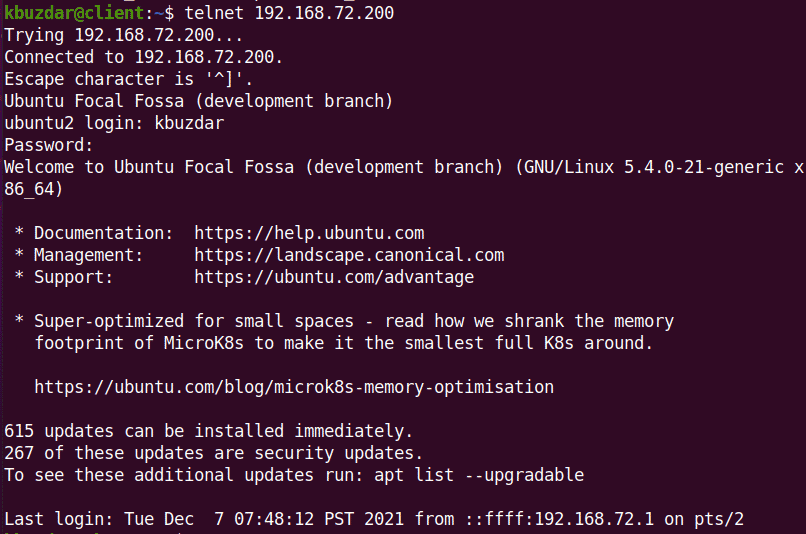
Connect to Telnet Server from Remote System
Now you can connect to your Telnet server from another machine (where the Telnet client is installed). On your client machine, use the following command syntax to connect to the Telnet server:
$ telnet <server-ip>
Where <server-ip> is the IP address of the Telnet server.
Uninstall Telnet Server and Client
If for any reason you want to uninstall Telnet server and client from your Ubuntu machine, you can do so as described below.
To uninstall Telnet server, run this command:
$ sudo apt remove telnetd xinetd
To uninstall Telnet client, run this command:
$ sudo apt remove telnet
After running the above commands, Terminal might prompt you with the y/n option. To continue the procedure, hit y and then hit Enter. It will then remove the applications from your Ubuntu system.
By following the method explained above, you can easily install the Telnet server and client on your Ubuntu systems. We have also shared the method to uninstall the Telnet server and client from Ubuntu in case you need to remove it.

Karim Buzdar holds a degree in telecommunication engineering and holds several sysadmin certifications including CCNA RS, SCP, and ACE. As an IT engineer and technical author, he writes for various websites.


