Cron Jobs are used to perform scheduling actions such as report generation. With cron, we create a Job on a repeating schedule that runs in the background. It is used on most Unix-like systems where one Cron Object corresponds to one line of a crontab also known as Cron Table.
This article explains the use of a Cron Job in Ubuntu.
How Cron Jobs Work?
The cron jobs are written in a cron format to run a Job periodically in the Future. The Syntax of a cron job is:
The Cron Jobs are scheduled according to a five-star pattern. Each asterisk or star represents the time i.e. the first asterisk is for a minute, the second for an hour, the third for a day, the third is for a month and the fourth is for the day of the week. The asterisk (*) means it will run every time. To run a cron Job at 1 p.m. every Tuesday, our cron job syntax will be:
Here, the “0” means the Job will run only once, the “11” means it will run at 1 p.m. (in 24-hour format), the “* *” means the Job will run every day for every month, and the “2” means it will run on Tuesday. Thus this Job will run every Tuesday at 1 pm for every month. Similarly, to run a cron Job every Hour on the Third Day of Every Month, we will make our Job as:
How to Use Cron Jobs in Ubuntu 22.04?
By default, Cron is mostly installed in the Ubuntu but in case Cron does not exist, we need to install it. Follow the steps beneath to install and use Cron in Ubuntu.
Step 1: Installing Cron
Before installing, update the system packages. To update Ubuntu System Packages, use the command:

Once the packages are updated, upgrade the packages:

To install Cron, use the command:

Add the “enable” command with “cron” to ensure cron works in the background:

Step 2: Setting Up Cron Job
A Cron Table or a “crontab” contains all the Cron Jobs as they are specified in it. To create a crontab, use the command:
The “-e” flag is used for editing:

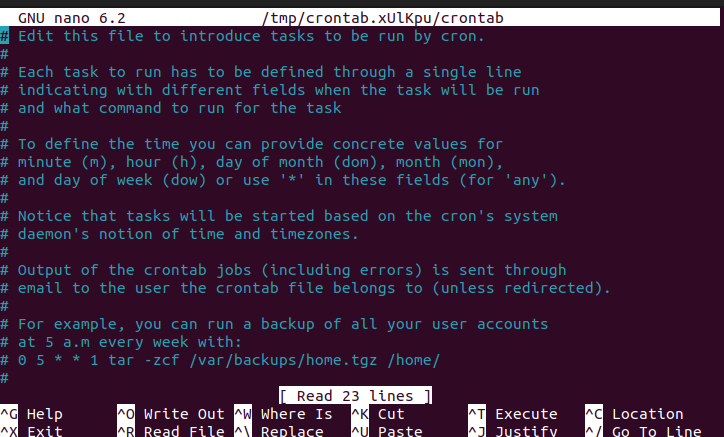
It will ask for the default text editor if you are using Cron for the first time. Select the editor and press “Enter”. A new file will be created where you can add cron jobs:

Step 3: Adding a Cron Job
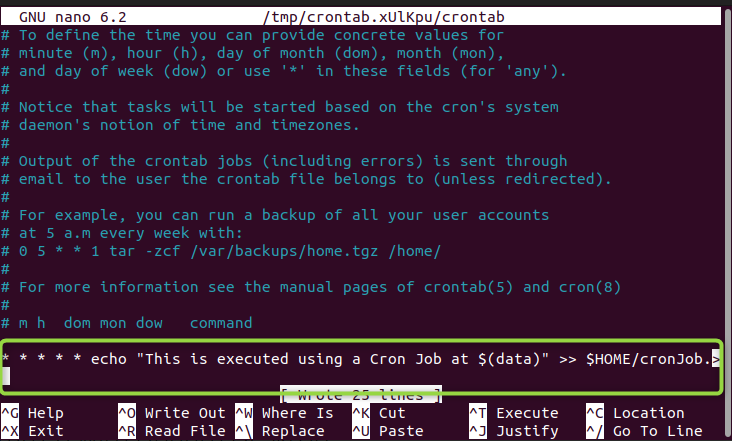
This file also contains details that inform how you can use cron commands to execute cron jobs. Now add a new cron job at the bottom of the file:

With “ * * * * * “ the command will run every minute of every hour of every day of every month.
With this command, the string inside “ ” will be executed each minute. That string is then appended to the “cronjob.txt” file:

Save the file and Exit. This will create a new file “cronjob.txt” on the Homepage. Navigate to your Home Page and you will see the file:

Open the file and you will see the commands executed:

As each minute the cron job will be executed, when you open the file after some time, more cron jobs will have been executed:

Similarly, the following Job executes every 6th day of the month at 9 am:

To check the table of cron jobs i.e. crontab, execute the command below to access the file and see the cron jobs in the table that are currently being executed:

Step 4: Deleting a Cron Job
Once you are done with the tasks or you want to stop the cron job from further executing jobs in the background, use the command:
This will remove your Cron Job:
![]()
To verify, open the file you created earlier for the cron job. You can see that no further commands are executed, i.e. the Cron Job stops:

Conclusion
Cron Jobs are powerful tasks that are mostly performed by system administrators to automate tedious tasks. It reduces the burden of tasks for system administrators. This article explained the installation and the use of Cron Jobs in Ubuntu.


