The Ubuntu Livepatch service automates crucial kernel upgrades for your Ubuntu computers, saving you time and effort. It’s a program that allows businesses to quickly patch Ubuntu Linux kernel vulnerabilities. The live patch application allows you to patch the running kernel without having to reset your computer. This functionality was first introduced in Ubuntu 16.04 LTS and is intended for servers that are expected to operate without rebooting for months or years. This post will go through how to apply the live patch on Ubuntu OS in detail.
How to Access Ubuntu Livepatch Service
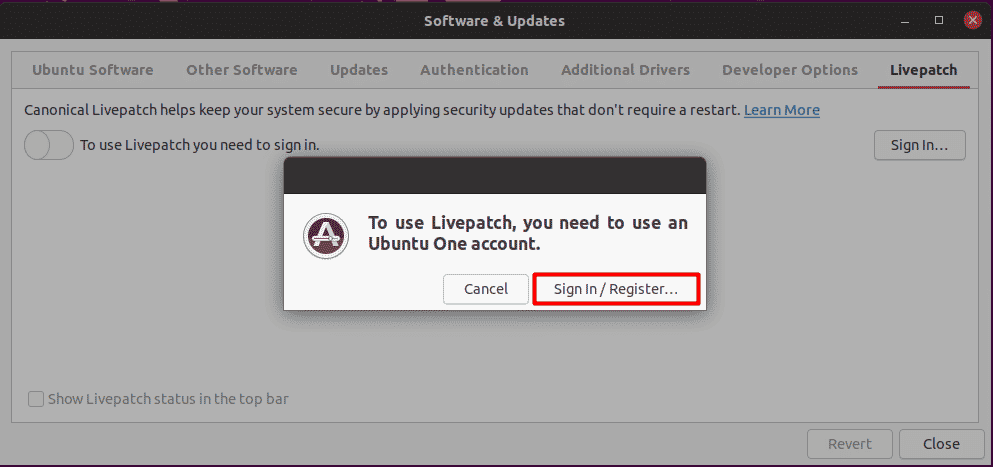
This service, which acts as a single sign-on point for all Ubuntu-related websites, will make it easier for Ubuntu users and community members to find information, communicate, and contribute. If you wish to use the Livepatch services, you’ll need a private key that’s been issued to you and linked to your Ubuntu One account. You must first click the sign-in button, after which a new dialogue box will appear, asking whether you want to establish a new account or login using an existing one, as shown below.


You may accomplish the same thing by going to the official Ubuntu website, which is listed below.

On Ubuntu, there are two basic ways to enable the livepatch option. The first method is specifically for desktop users, and the second one is for servers:
- Enabling livepatch using the graphical user interface(GUI)
- Enabling livepatch using the Terminal
Method 1: Enable livepatch using GUI
The livepatch is now active when you connect into your Ubuntu One account. You can also check this by returning to the “software and updates” settings.
By selecting the “Activities” option then search for livepatch there, finally select the Livepatch option.

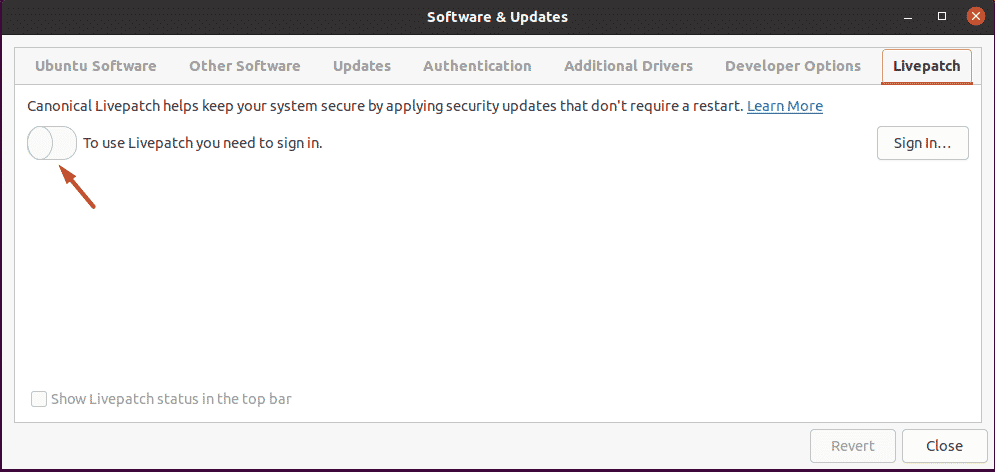
Navigate to “Software and Update” and then click on the livepatch option in the top right corner in order to find livepatch.

If you’ve already logged into your Ubuntu One account, you’ll notice that the livepatch is now active and functional, as shown below.

This is how you use the GUI to enable the livepatch option. It’s also quite simple to enable it through the terminal, as we’ll see in the next section.
Method 2: Enable livepatch using the Terminal
You’ll also need the Ubuntu one account to use the terminal to enable the livepatch, just like in the prior manner. After that, you must go to the official livepatch website, which is responsible for the creation of this application. You’ll find two options here: one for “Ubuntu user,” which you should choose if you’re using Ubuntu yourself and another for “Canonical customer,” which you should choose if you’re a business user with several accounts. In our situation, we’ve chosen the “Ubuntu user” option to give you an idea of what we’re talking about. After you’ve selected this option, go to the bottom left and click on the livepatch token option.

The image below also includes instructions for activating the Ubuntu livepatch, as well as a key. This will generate a secret key associated with your Ubuntu One account. After you’ve obtained the secret key, you’ll need to activate these services in order to use them. To activate them without any problems, you must follow the instructions and apply them as directed.

So, all you have to do to activate the livepatch service is type the following line in the terminal.
$ sudo snap install canonical-livepatch |

After installation, you’re required to link your secret key to a canonical livepatch, which you can accomplish in the terminal by executing the following command.
$ sudo canonical-livepatch enable <secret key> |

You can execute the following command in the terminal in order to check if everything is operating properly or not.
$ sudo canonical-livepatch status |

When everything is working properly, the canonical will make changes to your operating system in the background. If any patches are not applied, they will be listed in the status command.
How to Uninstall Livepatch in Ubuntu
If you want to disable these services for whatever reason, you can do so by running the following command in the terminal:
$ sudo snap remove canonical-livepatch |

You can also disable this feature by opening the software & updates option and uncheck the livepatch option, as shown below:

Conclusion
In this article, we’ve discussed two techniques for installing a livepatch on Ubuntu. You’re required to create an Ubuntu account if you haven’t already, and you won’t be able to install the live patch without one. This capability is also available to desktop users; however, it is strongly recommended for server-based systems. The reason for this is that the servers must be active for a longer amount of time for any new patch or security feature to be implemented without having to turn them down.


