PostgreSQL is a popular household name amongst database administrators and developers. It is a powerful and opensource Relational Database Management System ( RDBMS ) that leverages the SQL query language to create and manipulate databases. With over 30 years of active development, PostgreSQL is widely used as a database for numerous mobile and web applications. Some of the notable Tech giants that use PostgreSQL include Instagram, Uber, spotify, and Reddit.
PostgreSQL 13 is the current stable version of PostgreSQL. It ships with new features including incremental sorting, parallel vacuuming and optimizations such as better data management for big or small workloads and security enhancements.
In this walkthrough, we explore the installation of PostgreSQL 13 on Debian 11 . You might also consider checking out this guide on how to install PostgreSQL 13 on Rocky Linux 8.
Prerequisites
To get started, ensure you have an Debian 11 server instance with SSH access and a sudo user already configured for executing privileged tasks.
Step 1: Install PostgreSQL 13
Thankfully, the latest version of PostgreSQL – PostgreSQL 13 – is hosted on Debian repository. You can confirm this as shown in the command below.
$ apt-cache postgresql

Therefore, to install PostgreSQL 13, first update Debian 11 package index.
$ sudo apt update

Thereafter, use the APT package manager to install PostgreSQL 13 alongside other additional packages and dependencies:
$ sudo apt install postgresql postgresql-contrib
This installs PostgreSQL, and additional software packages and their dependencies.

Once done, head over to the next step.
Step 2: Confirm the status of PostgreSQL 13
The PostgreSQL database service should start automatically without intervention. Verify this with the command:
$ sudo systemctl status postgresql@13-main.service

Alternatively, you can run the following command to confirm its status. The output will provide the status of the server including the PID ( Process ID ).
$ sudo pg_ctlcluster 13 main status
pg_ctlcluster 13
 main status
If you are curious enough, you can check the version installed as follows:
$ /usr/lib/postgresql/bin/postgres -V

Step 3: Starting and enabling PostgreSQL 13
If by any chance PostgreSQL is not running or is inactive, you can start it using the command:
$ sudo systemctl start postgresql@13-main.service
To make PostgreSQL automatically start every time the system is powered on or rebooted, enable it as follows.
$ sudo systemctl enable postgresql@13-main.service

Step 4: Accessing PostgreSQL 13 database server
When PostgreSQL is installed, a new user called postgres is created by default. You can confirm this by having a peek at the /etc/passwd file which stores users’ information such as UID and GID,
$ cat /etc/passwd | grep -i postgres
To make matters simpler, you can invoke the id command
$ id postgres

To connect to the database, switch to the postgres user as shown.
$ sudo su - postgres
Then access the PostgreSQL interactive shell as shown
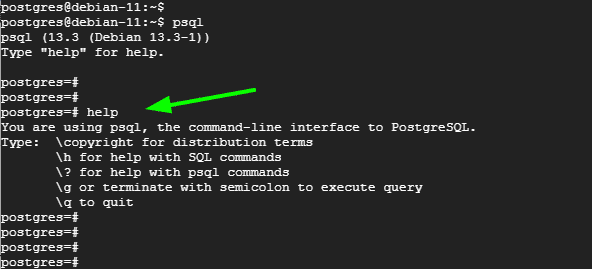
$ psql

The interactive shell allows you to run SQL queries and perform all matter of SQL queries. Run the help command to view some command usages
postgres=# help

To exit the shell, simply run:
# \q
Then exit from the postgres user session.
$ exit
Conclusion
This closes the curtain on this guide. We have walked you through a step-by-step procedure of installing PostgreSQL 13 on Debian 11 Bulls-Eye.


