GZIP is a built-in Linux command or utility that is used for compressing and decompressing the files. This tool is considered really useful in the situations in which you have to transfer the files from one end to another. Therefore, this guide will teach you about the usage of the GZIP command in Linux.
Using the GZIP Command in Linux
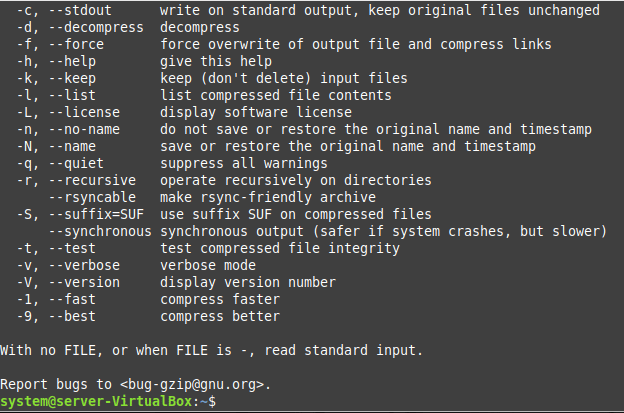
The GZIP command serves multiple purposes by making use of the different options that can be accessed by executing the following command:
$ gzip --help
![]()
You can learn all the different uses of this command by going through its help manual shown in the following image:
Now, for actually using the GZIP command for different purposes in Linux, you can consider the following examples:
Example 1: Compressing a Single File
In this example, we will tell you how to compress a single file with the help of the GZIP command. For that, you will have to execute the following command:
$ gzip testfile.txt
![]()
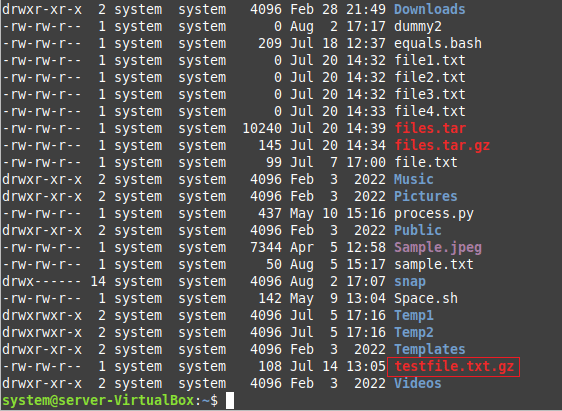
The “testfile.txt” is the name of the text file that is to be compressed. This file resides in the Home directory of our Linux system.
The compression of this file will not produce any output on the terminal. Therefore, to check if the said file has been compressed or not, we list the contents of our Home directory with the “ls –l” command. The portion of the output of this command highlighted in the following image shows that the said file has been compressed successfully.
Example 2: Compressing Multiple Files at Once
Now, we will attempt to compress multiple files at once with the GZIP command. For that, we run this following command:
$ gzip file1.txt file2.txt file3.txt
![]()
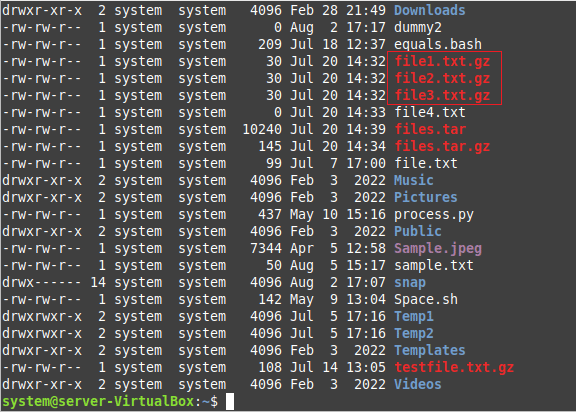
The “file1.txt”, “file2.txt”, and “file3.txt” are the files to be compressed. Again, all these files reside in the Home directory of our system.
To confirm the compression of these files, we run the “ls –l” command again. The highlighted portion in the output of this command verifies that previously mentioned files have been compressed successfully.
Example 3: Keeping the Original File Intact While Compressing a File
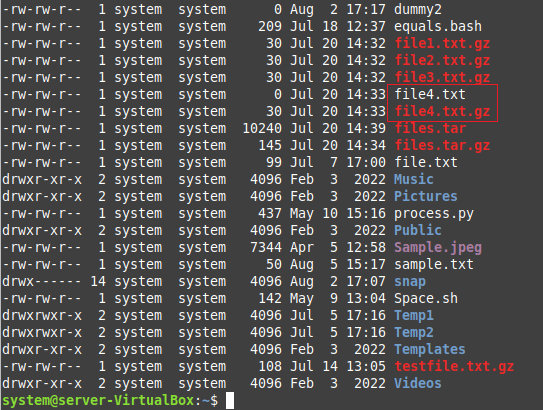
Up until now, we had been compressing the file[s] as it is. Without preserving the original file[s], we directly compress them. However, at times, you might need the original file to stay intact while creating its compressed copy. We can run the GZIP command in the following manner to serve the said purpose:
$ gzip –k file4.txt
![]()
After running this command, when we execute the “ls –l” command, we found out that this time, our original file also stayed intact while creating a compressed version as highlighted in the following image:
Example 4: Decompressing a Single File
The GZIP command can also be used to decompress the compressed files. To decompress a single compressed file with the GZIP command, you have to run it in the following manner:
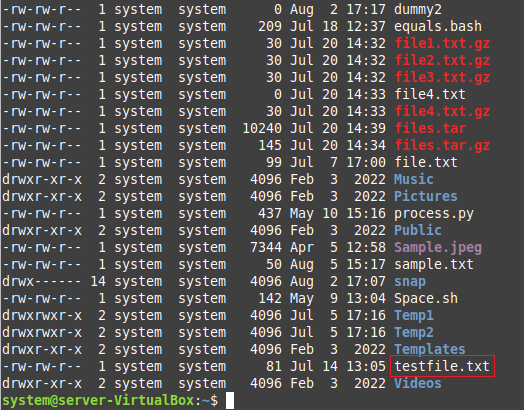
$ gzip –d testfile.txt.gz
![]()
The following output shows that the previously mentioned compressed file is decompressed successfully. (Note: You will have to run the “ls –l” command to verify this.)
Example 5: Decompressing Multiple Files at Once
Now, if you want to decompress multiple compressed files at once with the GZIP command in Linux, you have to run it in the following manner:
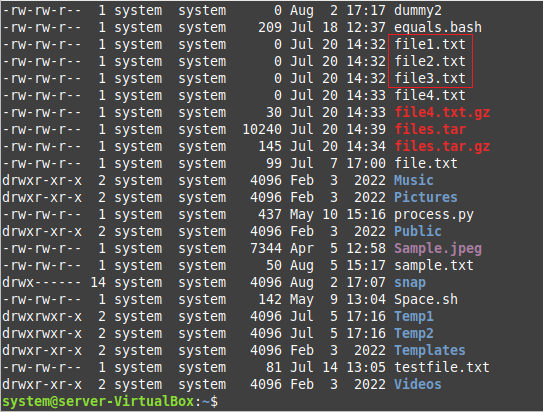
$ gzip –d file1.txt.gz file2.txt.gz file3.txt.gz
![]()
The following output confirms that all the desired compressed files have been decompressed successfully. (Note: You will have to run the “ls –l” command to verify this.)
Conclusion
This article is centered around the GZIP utility in Linux. With the help of the different examples, we shared with you how to use this command for compressing and decompressing your files in Linux. Once you will learn how this command works, you will easily be able to explore the other options that are also available with this command.


