Google Chrome, by far, has been the most frequently used web browser. Because of its user-friendly and efficient interface, it is preferred by a large user community. In this article, we will show you how to install this browser on a Linux Mint 21 system, the latest Linux Mint release.
Installation Procedure of the Google Chrome Browser on Linux Mint 21
For installing the Google Chrome browser on Linux Mint 21, the following steps need to be performed:
Step 1: Add the Public Key for Google Chrome
First, you have to download the public key for Google Chrome on your system with the following command:
$ wget –q –O – https://dl-ssl.google.com/linux/linux_signing_key.pub | sudo apt-key add –
![]()
Once the public key for the Google Chrome browser has been added successfully to your Linux Mint 21 system, you will see the following response on your terminal:

Step 2: Add the Google Chrome Repository to Your System
Now, you need to add Google Chrome’s official repository to your machine with the following command:
$ sudo add-apt-repository “deb http://dl.google.com/linux/chrome/deb/ stable main”
![]()
Adding this repository to your system will not render any response on the terminal.
Step 3: Update Your System
Then, you will have to update your Linux Mint 21 system with the following command:
$ sudo apt update
![]()
Step 4: Install the Google Chrome Browser on Your System
Once your system has been updated successfully, you can easily install Google Chrome on it by running the following command:
$ sudo apt install google-chrome-stable
![]()
Step 5: Launch Google Chrome
After the successful installation of the Google Chrome browser on your Linux Mint 21 system, you can launch it via the terminal by running the command that follows:
$ google-chrome
![]()
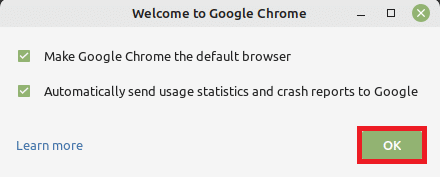
When you run this command, you will be presented with a dialogue box with checkboxes. From here, you can select the options according to your requirements and click on the “OK” button to proceed as highlighted in the image below:

As soon as you click on this button, you will be redirected to the welcome screen of the Google Chrome browser, which is shown in the following image:

Additional Tip
If you want to get rid of the Google Chrome browser from your system, then you can simply proceed with the steps discussed below:
Step 1: Uninstall Google Chrome
First, you can uninstall Google Chrome with the following command:
$ sudo apt-get purge --autoremove google-chrome-stable
![]()
Step 2: Remove the Google Chrome Repository
After that, you need to remove the Google Chrome repository from your system with the following command:
$ sudo add-apt-repository --remove “deb http://dl.google.com/linux/chrome/deb/ stable main”
![]()
Step 3: Remove the Google Chrome Public Key
Finally, you need to remove the public key of Google Chrome from your system to thoroughly get rid of it with the help of the command that follows:
$ wget –q –O – https://dl-ssl.google.com/linux/linux_signing_key.pub | sudo apt-key del –
![]()
The removal of this key will render the response in the following image on the terminal:

Conclusion
The procedure of installing the Google Chrome browser on Linux Mint 21 has been discussed in detail in this guide. Using the steps explained in this article, you will have this browser installed on your system within a few minutes. You can start enjoying the most comfortable surfing experience.


