A hostname is an identifier in human readable format that identifies a device on a network. Ubuntu lets you set the hostname during its installation, as well as allows you to change the hostname later on using several methods. Changing the hostname adds several advantages to the users, such as it will remove confusion or conflicts between multiple devices having the same hostname on the network. Further, there are some organizations that might force you to change the hostname to maintain consistency across their network structure or reflect their brand names.
Outline:
How to Change Hostname on Ubuntu 22.04
The hostname on Ubuntu can be changed through:
How to Change Hostname on Ubuntu 22.04 Using Terminal
Here is the list of methods to change the hostname through Terminal using:
- hostname Command (Temporary)
- hostnamectl Command (Permanent)
- Hostname and Hosts File (Reboot Required)
- sysctl Command
- nmcli Command
- nmtui Command
Method 1: Change Hostname on Ubuntu 22.04 Using hostname Command (Temporary)
The hostname command serves the purpose of displaying the system hostname on Ubuntu. It can also change the hostname with sudo privileges followed by the hostname provided by the user. But, it only changes the hostname for the current Ubuntu session. Whenever the session expires or closes, the hostname will revert to the previous one.
Check the guided instructions given below to change the hostname of your Ubuntu system.
Step 1: Check the Hostname
Before changing the hostname, let’s check the existing hostname of the system:

Step 2: Change the Hostname on Ubuntu
As we know the hostname cannot be changed without the permission of the sudo user. So, to change the hostname, first, add the sudo command to get sudo permission, and then use the hostname command and specify the desired hostname:
Type the user password to authenticate the process:

Step 3: Apply the Change
After changing the hostname, it is a must to apply the change, it can be done from the below-given command:

Step 4: Verify the Change
Once the changes are applied, execute the hostname command again to verify whether the hostname was changed on Ubuntu or not:

Method 2: Change Hostname on Ubuntu 22.04 Using hostnamectl Command Without Reboot (Permanent)
Just like the hostname command, the hostnamectl command also displays the hostname but with complete system details. Changing hostname requires administrator permissions. Unlike the hostname command, the hostnamectl command changes the hostname of the Ubuntu system permanently. Additionally, you do not have to restart the system to apply the changes. Follow the steps given below to change the hostname through hostnamectl command:
Step 1: Change Hostname
First, use the sudo command to allow the administrator privileges followed by the hostnamectl command, and use the set-hostname command to specify the new hostname of your choice:

Step 2: Apply the Hostname Change
Once the hostname is changed, execute the newgrp command to apply the change:

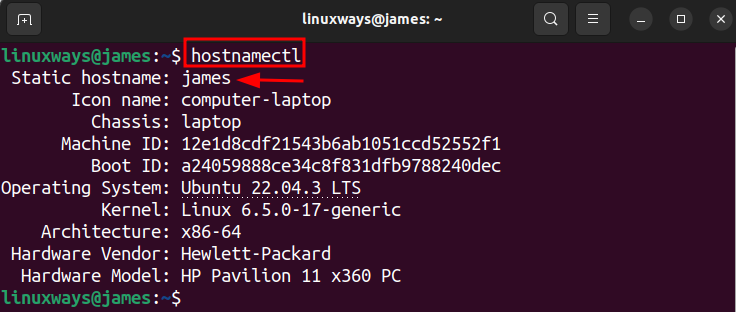
Step 3: Verify the Hostname Change
Once the hostname is changed, execute the given command to verify the hostname change:
Method 3: Change the Hostname on Ubuntu 22.04 Using the hostname and hosts File (Reboot Required)
Your system hostname is stored in the hostname and hosts file located within the etc directory. So you can change the hostname of the Ubuntu system by editing these files by following the instructions given below.
Step 1: Edit Hostname File
Open the hostname file located in the etc directory and edit with the nano editor by executing this command:
Replace the existing hostname of your Ubuntu machine with the new one of your choice:
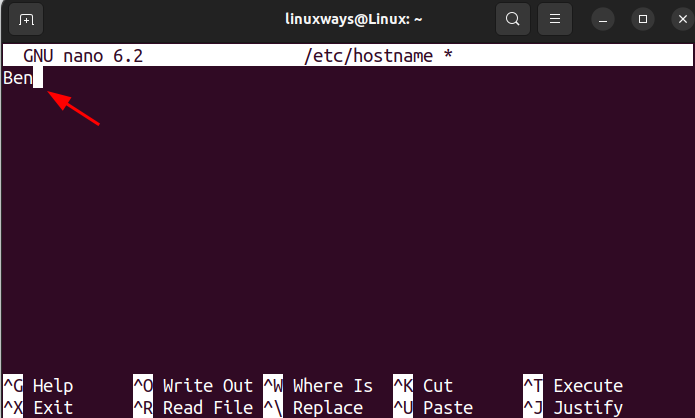
Press CTRL + O and hit Enter to save the changes. Lastly, CTRL + X to exit the editor.
Or, you can edit the hosts file just like the hostname file by executing this command:
Locate the existing hostname in front of the IP address and replace it with the new one of your choice:
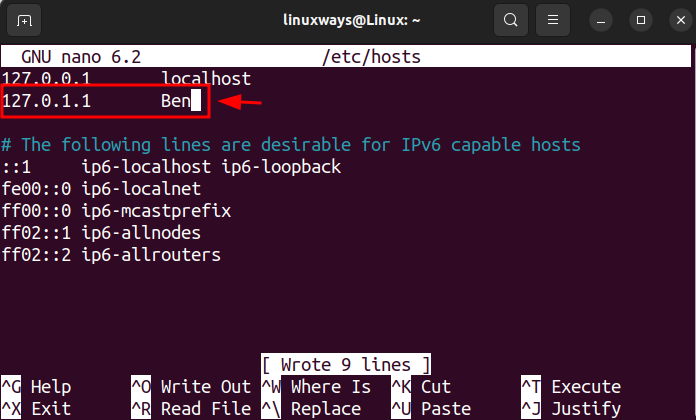
Save the hostname changes and exit.
Step 2: Restart the System
Now, reboot the system, so changes can take effect by executing the below command:
Step 3: Verify the Hostname Change
To check whether the hostname was changed or not, you can run the following command:

Method 4: Change Hostname on Ubuntu 22.04 Using sysctl Command
The sysctl command lets administrators modify, read, and write the changes to the Ubuntu system. Besides that, it can change the hostname on Ubuntu 22.04. You can change the hostname on Ubuntu 22.04 using the sysctl command by following the step-by-step instructions below.
Step 1: Change the Hostname on Ubuntu
To change the hostname, first, use the sudo command to get the admin privileges. Then, use the sysctl command, along with the kernel.hostname object keyword and then specify the new hostname after the = sign:

Step 2: Apply the Hostname Change
To apply and save the changes to the hostname, execute the newgrp command:

Step 3: Verify the Hostname Change
Check the hostname, whether it was changed or not by executing the hostname command:

Method 5: Change Hostname on Ubuntu 22.04 Using nmcli Command
The nmcli command is used to manage the network connections. The nmcli command can also change the hostname on Ubuntu 22.04. Check the instructions provided below to change the hostname using the nmcli command.
Step 1: Change the Hostname on Ubuntu
To change the hostname using the nmcli command, first, add the sudo command to get the admin privileges. Then, use the nmcli to change the hostname, alongside the general and hostname keywords followed by the new hostname of your choice:

Step 2: Apply the Change to the Hostname
Once you changed the hostname, it is necessary to apply the changes to the system hostname by executing the newgrp command:

Step 3: Verify the Change
Check the hostname to verify whether it was changed or not by executing the hostname command:

Method 6: Change Hostname on Ubuntu 22.04 Using nmtui Command
The nmtui command allows the users to edit, create, or activate a connection. Furthermore, it lets you set the hostname of the system. Check the instructions below to change the hostname through the nmtui command.
Step 1: Open the NetworkManager (TUI) Window
Open Terminal and run the nmtui command to open the NetworkManager (TUI) interface:

Step 2: Edit the Hostname
Once the NetworkManager TUI interface is launched, select the Set system hostname option and click the OK button:
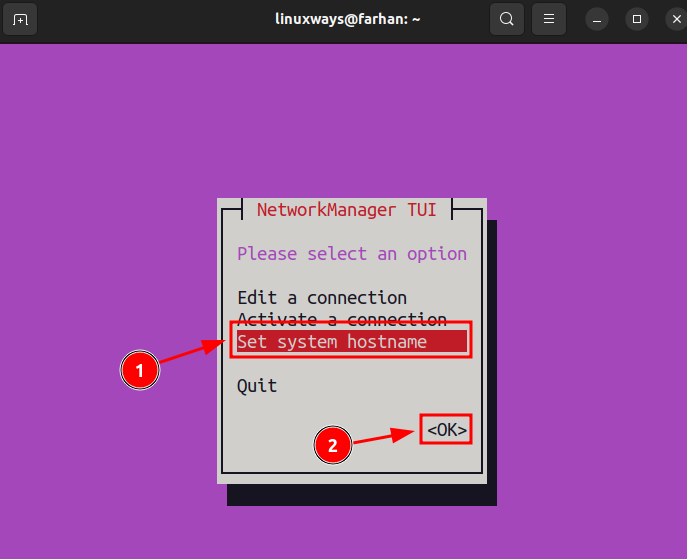
Remove the existing hostname first, then, write the new hostname and hit the OK button:
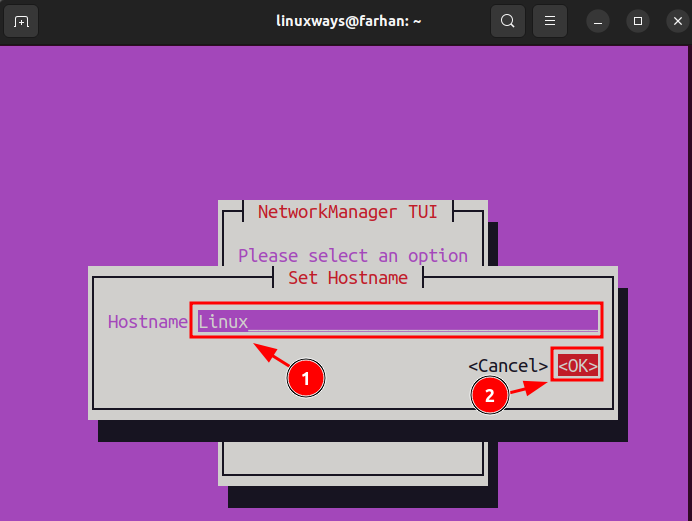
Enter the password to authenticate the Ubuntu system to change the hostname.
Press the OK button to finish the editing of the hostname:
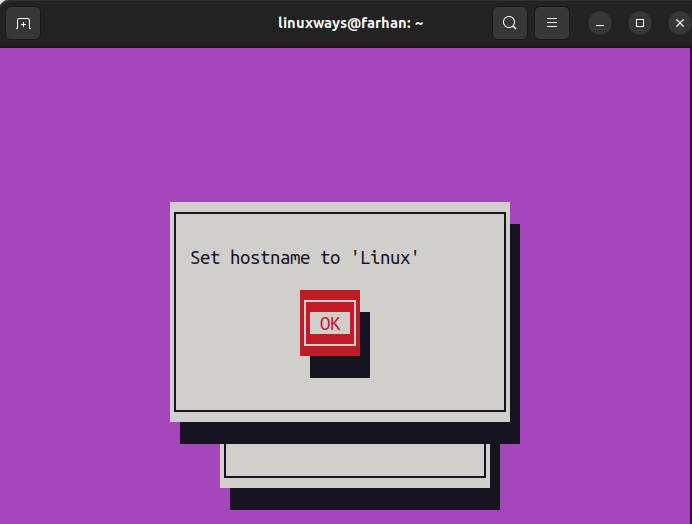
Now, hit the Quit button to close the NetworkManager (TUI) interface:
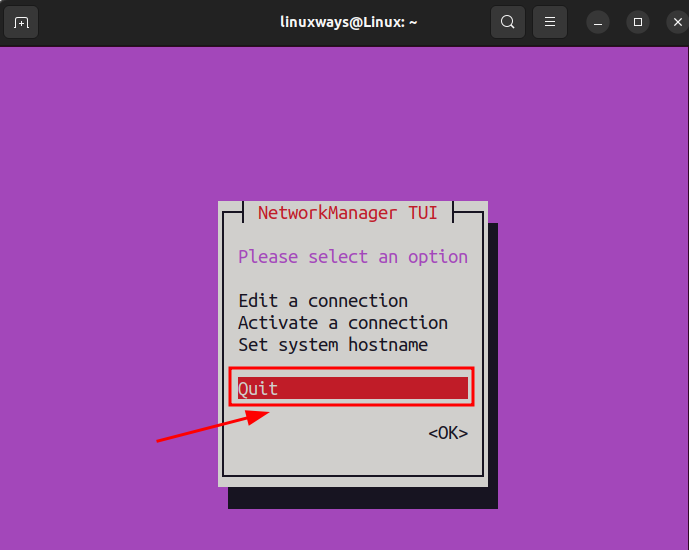
Step 3: Apply the Hostname Change
After changing the hostname, type and execute the newgrp command to save and apply the new hostname:

Step 4: Verify the Hostname Change
Check whether the hostname changed or not by executing the hostname command:

How to Change Hostname on Ubuntu 22.04 Using GUI (Graphical User Interface)
Alongside the terminal, users can also change the hostname using GUI. Changing the hostname using GUI is comparatively easy, and anyone with a basic understanding can do it.
Step 1: Open System Settings
Click on the top right corner and select Settings to launch:
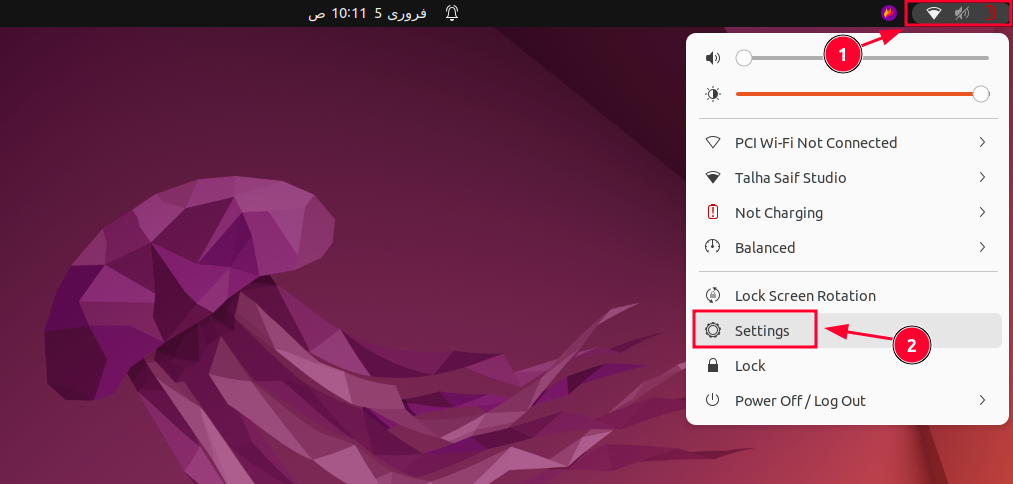
Step 2: Open the About Settings
Once the Settings is launched, look for the About tab and click on this section:
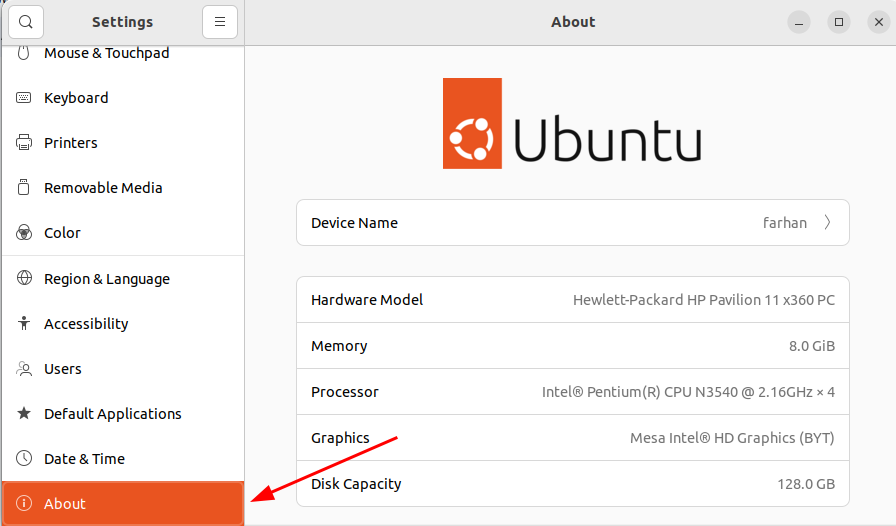
Step 3: Change the Hostname on Ubuntu
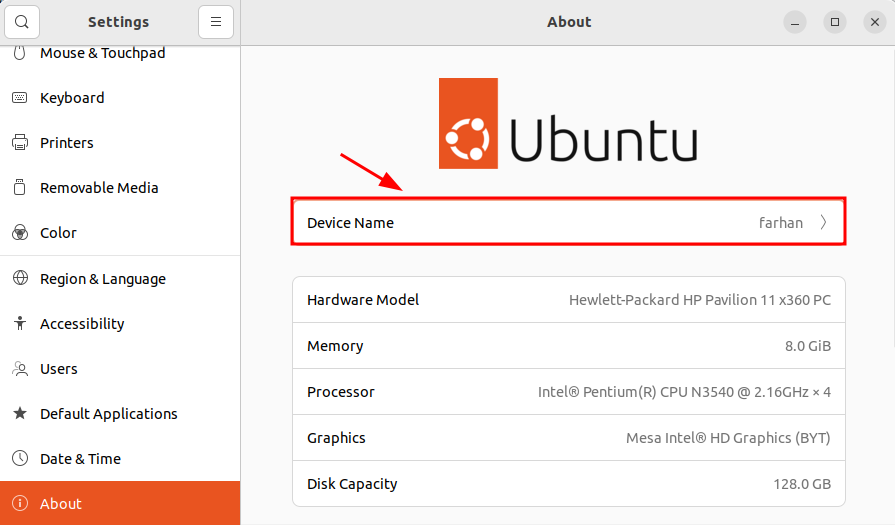
Look for the Device Name section and click on it to edit the hostname:
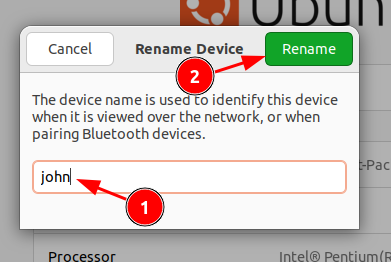
Remove the existing hostname, type the new hostname, and hit the Rename button to change the hostname:
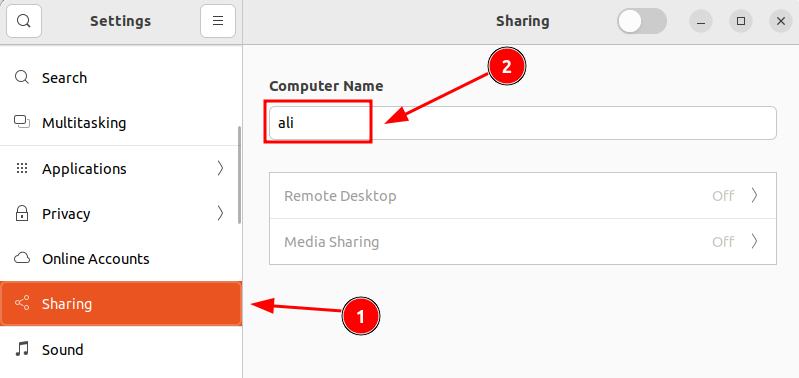
You can also change the hostname on Ubuntu 22.04 using the Sharing option in GUI. For that, navigate to Settings>Sharing, replace the existing hostname with your desired hostname, and press Enter:
Verify the hostname change on Ubuntu using the hostname command in Terminal:

Conclusion
Changing the hostname of the device will allow you to differentiate between the devices on the same network. The hostname on Ubuntu can be changed using both Terminal and GUI. For Terminal, you can use the hostname, hostnamectl, sysctl, nmtui, and nmcli commands to change the hostname. Furthermore, you can also change the hostname by editing the hostname and hosts file. To change the hostname using GUI, open Settings, and navigate to the About section, click the Device Name section, rename the hostname to your desired one. Or, you can go to Settings>Sharing and change the hostname there.
In short, each method lets you change the hostname on Ubuntu, but my recommendation is to change it using the hostnamectl command because it changes the hostname permanently without rebooting the system.


