One of the several duties of a Linux administrator is to manage the user accounts which also includes adding and removing the users. In Linux OS, a user can be added through either the command line and the GUI. This post explains how to add and remove users on Ubuntu OS through both methods.
Note: The commands and GUI procedure discussed have been tested on Ubuntu 20.04 LTS (Focal Fossa).
We will be covering here the following topics:
- Adding a user through command line
- Removing a user through command line
- Adding users through GUI
- Removing users through GUI
Adding a User through Command Line
Adding a user through command line is very simple. You can open the command line in Ubuntu through the Ctrl+Alt+T shortcut.
To add a new user on Ubuntu, run the command in Terminal using the following syntax:
$ sudo adduser <username>
Replace <username> with the actual user name you want to create on your Ubuntu system.
After executing the adduser command, you will be prompted for the sudo password. Provide the password for sudo. After that, type a new password for the user and then type it again to confirm. Then you will be prompted to enter more information for the user account. You can enter new values or simply hit Enter to accept the defaults.
In the end, you will be asked if the information is correct. Press y to continue, after which the new user account will be created on your system.

After creating the new user account, you can also grant it sudo privileges. To grant sudo privileges to the newly created user account, you will need to add that account to the sudo group.
Issue the following command in Terminal to add the newly created user account to the sudo group:
$ sudo usermod -aG sudo <username>
Replace <username> with the actual user name you want to create on your Ubuntu system. ![]()
This command will add the specified user to the sudo group which can be verified using the following command:
$ groups <username>
The following output confirms our username “ummara” is now in the sudo group.

Removing a User through Command Line
In case you need to remove a user account from your system, you can do so by using the following command in Terminal:
$ sudo deluser <username>

The above command will remove the user account from your system. However, it does not remove the Home directory of the user account.
Alternatively, if you want to remove the user account as well as its Home directory, run the following command in Terminal:
$ deluser --remove-home <username>
Adding a User through GUI
For the users who are not comfortable working with the command line, here is how they can add users graphically.
You can add a user account in Ubuntu through the Settings utility. You can open the Settings utility by right-clicking the Ubuntu desktop and selecting Settings.

From the left pane in the Settings utility, go to the Users tab.

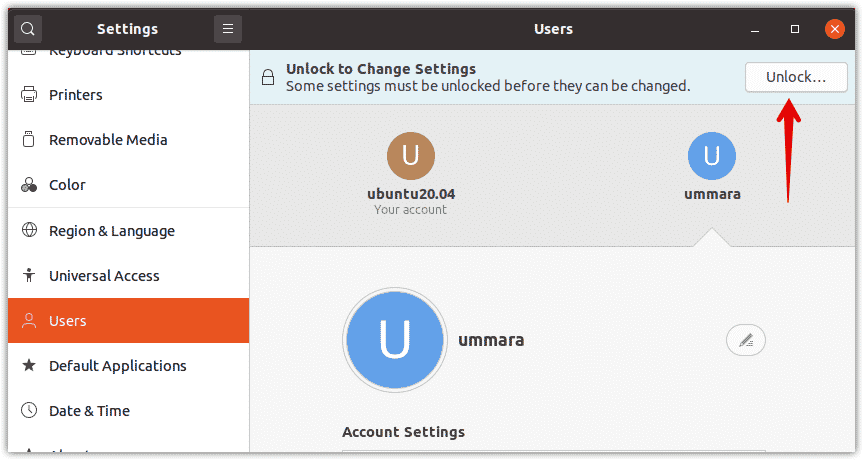
In the right pane, Click the Unlock button (also marked with an arrow in the following screenshot) to change settings.

Now provide your password for authentication and next click the Authenticate button. After that, the settings will be unlocked and you will be able to create a new user.

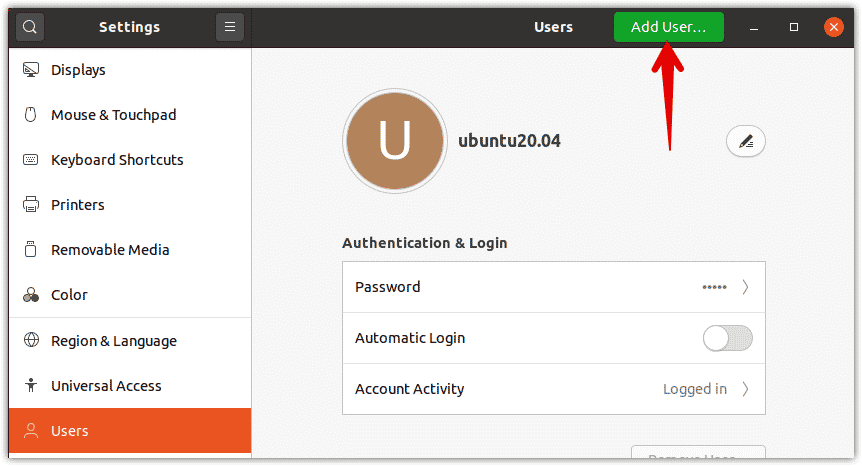
Now in order to add a new user account, click the Add User button located at the top of the Settings window.

Now the following dialog will appear on your screen. For the Account Type, select Standard or Administrator based on what type of access you want to grant to the new user. Then enter the Full Name and it will fill the Username field automatically.
After that, you can choose to allow the user to set the account password itself when the next time it logins, or you can set a password at the current time by selecting the Set a password now radio button and entering the password twice.
Once done with the configurations, click the Add button to create the user.

Removing a User through GUI
To remove a user through GUI, open the Settings utility by right-clicking the Desktop and selecting the Settings option. Then from the left panel in the Settings utility, go to the Users tab.
Then click the Unlock button (also marked with an arrow in the following screenshot) to change settings. After that, provide your password for authentication and next click the Authenticate button.

After that, the settings will be unlocked and you will be able to modify the settings.

Now select the user account you wish to remove from your system and click Remove User.

Now the following dialog will appear asking you if you want to keep or remove the user account files including the user’s Home directory. If you want to keep them, click Keep Files, otherwise click Delete Files to remove the user along with its Home directory.

This is how you can add and remove users on Ubuntu and assign them administrator privileges. Based on your convenience, you can either choose to add and remove users either through the command line or GUI.


