The HTTP/2 protocol is an improvement of its predecessor HTTP/1.1. It provides numerous benefits and improvements such as faster page loading speeds and increased security. If you are running Nginx on HTTP/1.1, then you should consider migrating to HTTP/2.
In this guide, we will explore How to enable HTTP/2 on Nginx on Ubuntu 20.04
Prerequisites
As you get prepared to configure HTTP/2 on your Nginx webserver, ensure you have the following:
Nginx web server that is v 1.9.5 or greater. We have a guide on how to install Nginx on Ubuntu 20.04. To check the version of Nginx that is installed, simply run the command:
$ nginx -V

Next, ensure that you have OpenSSL 1.0.2 or later versions. To verify the version you are running, issue the command:
$ openssl version

Also, for this to work, you need to have the webserver encrypted with an SSL certificate. Here, our webserver is encrypted using the Let’s Encrypt SSL certificate. Already we have this set up where our domain name is linuxtechgeek.info and pointed to our virtual server’s IP address. Additionally, we have configured a virtual host file for the domain.
Lastly, your server must be using TLS v 1.2 and later versions.
Step 1: Test that your site is using HTTP/1
To get started out, we need to verify that our web server is currently using HTTP/1.1. To achieve this, we will run the curl command shown
$ curl -I https://domain-name
In our case, this is going to be:
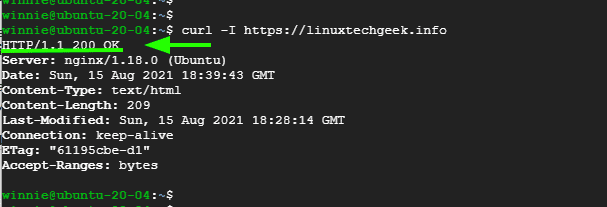
$ curl -I https://linuxtechgeek.info
The first line of the output clearly indicates that we are using HTTP/1.1

Step 2: Enable HTTP/2 by editing the virtual host file
To enable HTTP/2 we need to edit or modify the domain’s virtual host file.
$ sudo vim /etc/nginx/sites-available/linuxtechgeek.info
Locate this line:
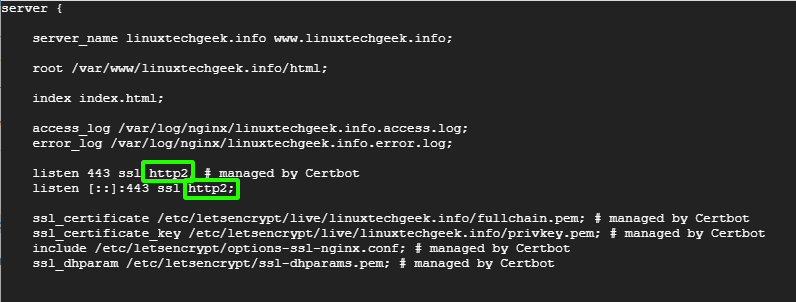
listen 443 ssl
Append the attribute http2 just after ssl.
In case you have a line that starts as follows:
listen [::]:443 ssl …
Add the http2 attribute as well.

Save the changes and exit.
Step 3: Verify if Nginx configuration is Ok
Once you have exited the virtual host file, restart the Nginx webserver
$ sudo systemctl restart nginx
Next, check if the Nginx configuration is sound:
$ sudo nginx -t
From the output, the Nginx configuration is OK.

Step 4: Check if HTTP/2 is enabled
Finally, to verify if HTTP/2 is enabled, execute:
$ curl -I https://linuxtechgeek.info
From the output, HTTP/2 is now enabled. Perfect!

Conclusion
That was a brief guide on how to enable HTTP/2 on the Nginx webserver on Ubuntu 20.04


