In SSL/TLS, SSL stands for Secure Socket Layer where TLS stands for Transfer Layer Security. SSL/TLS is a popular cryptographic protocol that establishes a secure connection between servers and devices by encrypting data through HTTPS protocol. It is an authentication protocol widely implemented in web servers and browsers creating a secure layer over insecure HTTP for secure data exchange between them. For SSL/TLS we need a valid Certificate Authority (CA) and in this article, we will use Let’s Encrypt CA which is free.
Certbot is an open-source software tool for integrating and managing Let’s Encrypt certificates on the web to enable secure HTTPS protocol. It will automatically manage the Let’s Encrypt certificate for you. For this you will need a valid domain with your server IP address pointed on it and Nginx with pre config server block.
In this article, I am going to show you how to install let’s encrypt certificates in Ubuntu 20.04 using Certbot. For the demonstration purpose, I will be using Nginx web server.
Prerequisites
- Your domain name should be mapped to public IP
- Web Server (nginx, apache or any other ) for ssl termination.
- Port 80 should be allowed to the public.
Installing Certbot
For installing Certbot and Nginx plugin execute the following command. Before installing the Certbot make sure you update the package info.
$ sudo apt update
$ sudo apt install certbot python3-certbot-nginx
Make sure your Nginx configuration is working properly and the domain name is included on the config.
Obtaining Let’s Encrypt Certificate Using Certbot
We can get an SSL Certificate in different ways using a different plugin provided by Certbot. To get the certificate we will use the certbot command along with the Nginx plugin which we have installed earlier. The Nginx plugin will manage auto-configuration and reloading Nginx config when needed. For this, you need to execute the following command.
$ sudo certbot --nginx
After executing the above command Certbot will provide the option for choosing the domain for which it will request the certificate for the chosen domain. In this scenario, the subdomain we will request the certificate is option 2.

Output after Certbot command execution.
Now, the Certbot will perform some tasks and again it will ask if you want to redirect HTTP traffic to HTTPS. Choose the number of choices you prefer and press enter.

Manage redirection configuration.
After the redirection config is configured Certbot will begin the final setup and output the following important notes and success message.

Output after obtaining an SSL certificate.
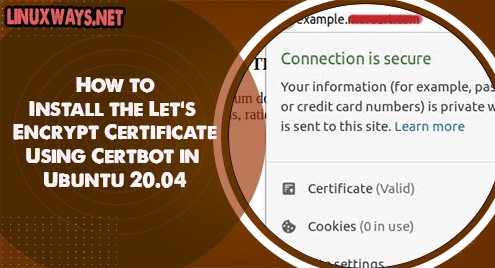
Now, if you hit the URL you will get the lock icon before your URL if you click on it, it will show ‘Connection is secure’ just like the output given below.

If you want more info on the certificate click on the certificate you will get the following result that shows you CA details like issued by, issue date, expiry date, etc.

Renew the SSL Certificate
The actual time period of the certificate is three months so you have to renew your certificate after its valid period ends. The Certbot command provides you an easy certificate renewal method.
You can first check for the renewal by executing the following command,
$ sudo certbot renew --dry-run
If there is no error you are ready to go for your actual renewal.
You just need to execute the following command and the Certbot renew it.
$ sudo certbot renew
Conclusion
In this article, we learn how to install Certbot, to get let’s encrypt certificates. I hope this article helps you to get a free SSL certificate.

Karim Buzdar holds a degree in telecommunication engineering and holds several sysadmin certifications including CCNA RS, SCP, and ACE. As an IT engineer and technical author, he writes for various websites.


