By default, SSH protocol is known to listen to port 22. While it’s perfectly OK, in a security sense, it’s recommended to change the default port to another port. This greatly minimizes the risks of hackers launching automated brute-force attacks using SSH. In this guide, we will demonstrate how you can change the default SSH port to something else in Linux.
Prerequisites
As you get started out, ensure that you have an instance of a Linux server. For this guide, we are using Ubuntu 20.04 server.
Ensure that you also have an SSH client ( such as Putty ) or even a client Linux system to set the connection to the server using the new port.
Step 1: Check if SSH is running on the default port
Firstly, we need to verify that the SSH service is running on the server. To accomplish this, run the following command:
$ sudo systemctl status ssh

The output is a confirmation that the SSH service is active. Let’s even go further and ensure that it is running on the default port. Run the following netstat command.
$ sudo netstat -pnltu | grep 22

Step 2: Select a port and configure SSH
As you might know, TCP ports range from port 0 – 65535. However, the ports from 0 – 1024 are regarded as privileged ports designated for special services such as HTTP ( Port 80 ), FTP ( 21 ), and SMTP ( 25 ) to mention just a few.
To avoid any conflict with privileged ports, we are going to pick a port that’s above port 1024. In this example, we have chosen to change the default port to port 5466. To enable this, we will modify the /etc/ssh/sshd_config SSH configuration file.
$ sudo vim /etc/ssh/sshd_config
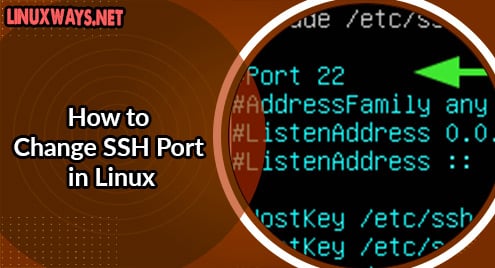
Locate the line that starts with #Port 22 as shown.

Uncomment and specify the port number.

Thereafter, save the changes made and exit the configuration file. For the changes to persist, restart the SSH service.
$ sudo systemctl restart ssh

To verify that SSH is listening to the newly configured port, run:
$ sudo netstat -pnltu | grep 5466

Step 3: Allow the new SSH port on the UFW firewall
If the UFW firewall is enabled, be sure to open the configured port as shown.
$ sudo ufw allow 5466/tcp
$ sudo ufw reload
For CentOS / RHEL, open the port as follows.
$ sudo firewall-cmd --add-port=5466/tcp --add-zone=public --permanent
$ sudo firewall-cmd --reload
At this point, you can remotely access the server, and this is what we will demonstrate shortly.
Step 4: Logging in using the new port
To log in to the server, head over to the SSH client. Specify the port number using the -p option followed by the SSH port and the remote server identity.
$ ssh -p 5466 james@192.168.2.104
As you would expect, you will be prompted to provide the password after which you will be granted access to the remote server.

Conclusion
This brings this topic to a close. For better security, consider using SSH passwordless authentication with SSH public/private key pair.

Karim Buzdar holds a degree in telecommunication engineering and holds several sysadmin certifications including CCNA RS, SCP, and ACE. As an IT engineer and technical author, he writes for various websites.


