MariaDB is one of the most widely used and open-source database management systems. MariaDB is considered as a replacement for MySQL and has much more features and capabilities that you cannot find in MySQL. In our previous posts, we have explained how to install MariaDB in Debian, Mint, and CentOS. This post will be about explaining the installation of MariaDB on Ubuntu 20.04 LTS (Focal Fossa). There are the following two methods to install MariaDB:
- Through Ubuntu Repository
- Through MariaDB Repository
The first method installs the older version of MariaDB (10.3) through Ubuntu Repository while the latter installs the latest version of MariaDB (10.5) through MariaDB Repository.
Prerequisites
- Ubuntu 20.04 LTS system
- User with sudo privileges
Installing MariaDB on Ubuntu through Ubuntu Repository
MariaDB’s version 10.3 is available in the official repositories of Ubuntu distribution. Therefore, you can easily install it via apt. Following are the steps for the installation of MariaDB on Ubuntu.
1. Update package index
In order to install MariaDB, first update the package index. To do so, open the Terminal through the Ctrl+Alt+T shortcut and then execute this command:
$ sudo apt update
2. Install MariaDB
Then install MariaDB as follows:
$ sudo apt install mariadb-server
After running the installation command, the system will ask if you want to continue the installation by prompting you with the y/n option. Hit y to carry on the installation process.
3. Verify Installation
Once the installation of MariaDB is completed, you can verify it as follows:
$ mariadb --version
This command will output the version of MariaDB on your system which verifies that MariaDB is successfully installed. In the bellow output, you can see the installed version of MariaDB is 10.3.25.

Installing MariaDB on Ubuntu through MariaDB Repository
MariaDB’s latest version 10.5 is available in the official MariaDB repository. Therefore, in order to install it, you will have to first add the MariaDB repository to your apt sources and then install it. Below are the steps to install MariaDB 10.5 on Ubuntu.
1. Install Pre-requisites
Install software-properties-common package through the following command in Terminal:
$ sudo apt-get install software-properties-common
2. Add repository key
Then run this command to add the GPG key used to sign the MariaDB package:
$ sudo apt-key adv --fetch-keys 'https://mariadb.org/mariadb_release_signing_key.asc'
3. Add MariaDB repository
Now add MariaDB repository to your apt sources using the following command:
$ sudo add-apt-repository 'deb [arch=amd64,arm64,ppc64el] http://mirror.biznetgio.com/mariadb/repo/10.5/ubuntu focal main'
4. Update package index
Then update the packages index to include the MariaDB repository. Use the following command to do so:
$ sudo apt update
5. Install MariaDB
Once the packages list is updated with the MariaDB repository, you can install MariaDB as follows:
$ sudo apt install mariadb-server
After running the installation command, the system will ask if you want to continue the installation by prompting you with the y/n option. Hit y to carry on the installation process.
6. Verify Installation
Once the installation of MariaDB is completed, you can verify it as follows:
$ mariadb --version
This command will output the version of MariaDB on your system which verifies that MariaDB is successfully installed. In the bellow output, you can see the installed version of MariaDB is 10.5.8 (latest version). 
Securing MariaDB
Now the next step after the installation will be to secure the MariaDB server. We will do this by running a script mysql_secure_installation available on the Linux system. This script allows you to configure passwords for root, disable root login remotely, remove root anonymous user accounts and test database, etc.
To configure the security settings for MariaDB, run the script as follows:
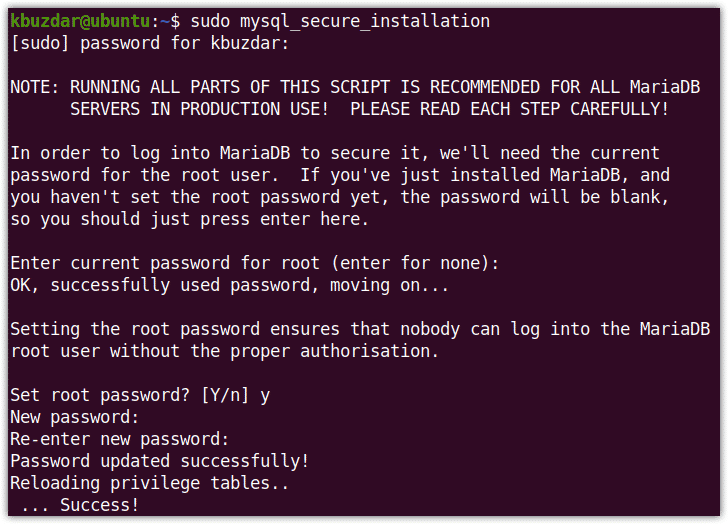
$ sudo mysql_secure_installation
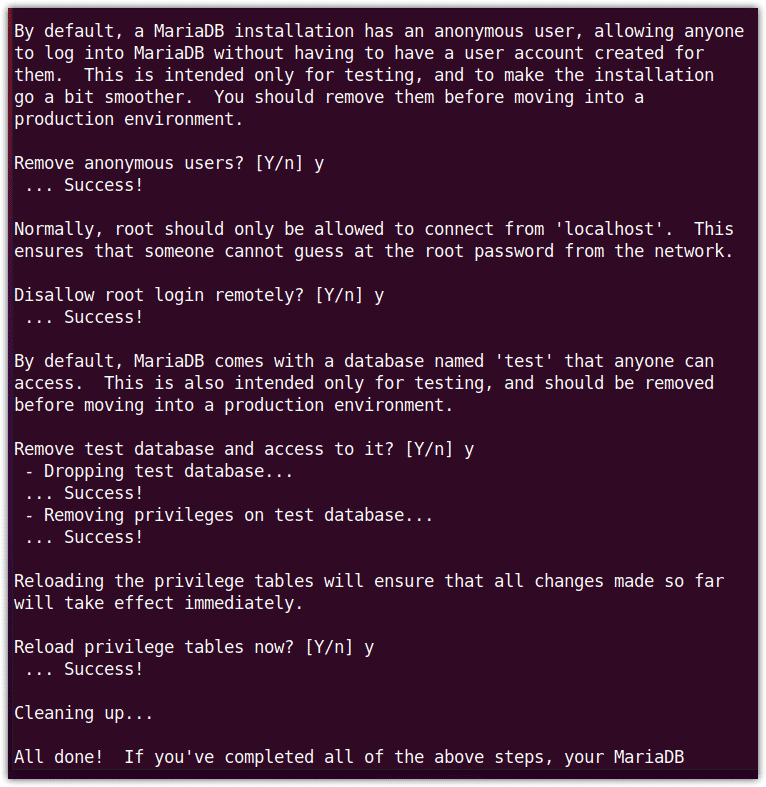
After running the above script, you will be prompted for the various questions. It will ask you to provide your root password for MariaDB. As we have not configured it yet, therefore press Enter. Then it will ask if you want to configure a root password, hit y, and then enter the password and confirm by re-entering it.
Then for all the subsequent questions, hit y as can be seen in the following screenshot.

Verify MariaDB Service
MariaDB service starts running automatically after the installation is completed. To verify if the MariaDB service is running fine without any issues, run the following command in Terminal:
$ sudo systemctl status mariadb
The following output confirms the MariaDB server is active and running.
If the MariaDB service does not run automatically, you can start it manually as follows:
$ sudo systemctl start mariadb
Connecting to MariaDB
Now try connecting to the MariaDB server as a root user. Run the following command to do so:
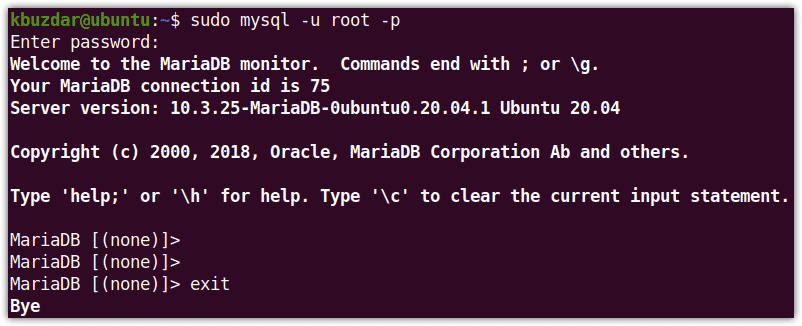
$ sudo mysql -u root -p
You will be prompted to enter the root for MariaDB password (that you have configured earlier). Once you entered the password, you will be connected to the MariaDB database. If you have successfully logged in, you will be seeing something that looks similar to the following:

Uninstalling MariaDB
In case, you want to completely remove MariaDB from your system, you can do so easily using the following command in Terminal:
$ sudo apt-get purge mariadb-server
After running the purge command, the system will ask if you want to continue the process by providing you with the y/n option. Hit y to carry on the uninstallation process.
Then remove the packages that were automatically installed to satisfy dependencies for MariaDB. Run the following command to do so:
$ sudo apt autoremove
That is all there is to it! In this post, we have explained the installation of MariaDB on Ubuntu 20.04 LTS system using two different methods. Then we have explained how to secure it by configuring some security options and then, in the end, we have tested the connection to MariaDB. By following the above simple steps, you can easily setup MariaDB on your ubuntu system. For more information, visit MariaDB’s official documentation.


